

Hey
Superman here just saw that the rivet holding the outfront computer mount on my metron 5d poppet out on one side. A idiot (... me) must have done what i always do - overtighten the mount screw forcing the rivet to push out.
well.... any advise on glue for glueing the rivetback into the carbon-hole of the handlebar?
What works well bonding metal to carbon? Superglue experience has not been super (high strengh på to brittle)
Heard about something like Araldite Epoxy.
Thanks...
glueing screw rivit back into metron 5d - glue advise?
Moderator: robbosmans
hm - no one?
Well - Found out that 3m Scotch-Weld DP460 should work + get a new rivnut and make a homemade expander tool.
Just thought of asking the local bike shop if they have any rivnuts (are the same as for bottle bosses)
But i must say that i am dissapointed in the design of the rivnut mounting. there is about 7mm of CF laminate. WWWAAAYYYY to thick to make rivnuts secure
The expantion area is like 5mm high, so the rivnut only hangs on with its nails.
Hate half-assed solutions...


Visit starbike.com Online Retailer for HighEnd cycling components
Great Prices ✓ Broad Selection ✓ Worldwide Delivery ✓
www.starbike.com
Do you have pics? Might help folks to visualize.
Epoxy in general is strong stuff and should be fine for a computer mount. But it’ll be impossible to adjust if you don’t get it right the first time because it is strong
Epoxy in general is strong stuff and should be fine for a computer mount. But it’ll be impossible to adjust if you don’t get it right the first time because it is strong
Specialized Tarmac Sworks SL6, Moots Compact, Carl Strong Titanium
Yeah, you need epoxy that sticks to epoxy and you need to sand that spot down. I"d do the rivnut and the expoxy. The rivnut to better take the canalevered vibrations and the epoxy to hold the rivnut in place while you tighten it. Sand the hole a bit, put epoxy on the rivnut, then insert the rivenut.
thanks.jfranci3 wrote: ↑Sun Jan 26, 2020 5:31 pmYeah, you need epoxy that sticks to epoxy and you need to sand that spot down. I"d do the rivnut and the expoxy. The rivnut to better take the canalevered vibrations and the epoxy to hold the rivnut in place while you tighten it. Sand the hole a bit, put epoxy on the rivnut, then insert the rivenut.
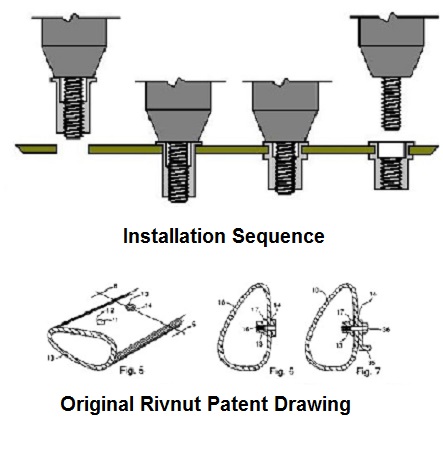
That rivnut was compressed but the nut does not appear to be the proper thickness. The nut also looks like it was not flush when it was compressed. If you look at the top of the nut, it's fatter than further down. Because of that, the hole is probably compromised too.
If you elect to use another rivnut, get one made to install on thicker material. Buy/borrow the proper rivnut tool. Buy a couple nuts so you can practice and feel how much tension it takes to fully compress the nut. With aluminum nuts, you do not want to pull out the threads when you compress the nut. Maybe a bit of epoxy may help too.
If you elect to use another rivnut, get one made to install on thicker material. Buy/borrow the proper rivnut tool. Buy a couple nuts so you can practice and feel how much tension it takes to fully compress the nut. With aluminum nuts, you do not want to pull out the threads when you compress the nut. Maybe a bit of epoxy may help too.
ThanksButcher wrote: ↑Mon Jan 27, 2020 5:03 pmThat rivnut was compressed but the nut does not appear to be the proper thickness. The nut also looks like it was not flush when it was compressed. If you look at the top of the nut, it's fatter than further down. Because of that, the hole is probably compromised too.
If you elect to use another rivnut, get one made to install on thicker material. Buy/borrow the proper rivnut tool. Buy a couple nuts so you can practice and feel how much tension it takes to fully compress the nut. With aluminum nuts, you do not want to pull out the threads when you compress the nut. Maybe a bit of epoxy may help too.
Visit starbike.com Online Retailer for HighEnd cycling components
Great Prices ✓ Broad Selection ✓ Worldwide Delivery ✓
www.starbike.com
Already because of the not very tight fit of the rivnut (slight oversized hole) i think epoxy is the only longterm way to go. (rattling fit)Butcher wrote: ↑Mon Jan 27, 2020 5:03 pmThat rivnut was compressed but the nut does not appear to be the proper thickness. The nut also looks like it was not flush when it was compressed. If you look at the top of the nut, it's fatter than further down. Because of that, the hole is probably compromised too.
If you elect to use another rivnut, get one made to install on thicker material. Buy/borrow the proper rivnut tool. Buy a couple nuts so you can practice and feel how much tension it takes to fully compress the nut. With aluminum nuts, you do not want to pull out the threads when you compress the nut. Maybe a bit of epoxy may help too.
Think my approach will be sanding slightly to. Make top and inside smoother and removing any adhesive left overs, sanding the area with the superficial carbon damage smooth and clean with vacuum and denatured alcohol. Then putting epoxy (using 3M dp460, expensive bit should be super good for carbon/metal adhesion) on the rivnut, put in, compress slightly, let it cure for lile 2-3 days and pray.
I am afraid that rivnuts for that laminate thickness are going to be to tall for the wing shaped handlebar. Also being sensitive with the expansion tool, as i dont want delamination caused by excessive pressure om the carbon wall.
So in the end, i hope for the epoxy to hold that rivnut in place, as a normal expansion lip is not feasible on this handlebar design.


