


C64 gear cable routing?
Moderator: robbosmans
I guess this the only way of routing the gear cables without them touching the frame? Im not keen on the amount this cable hangs out or crossing the inner cables inside the down tube. Doesn't crossing the cables cause friction? However, I also dont like how much of the cable outer comes in contact with the frame if done the other way. Not sure what the answer is.
Last edited by wilwil on Wed Oct 03, 2018 1:35 pm, edited 1 time in total.
Run closer to the frame but so you can still turn the bars. Run rubber bumpers to stop paint scratches. I find self sealing silicon tape is a perfect frame protector when applied to the cables.
Evo 4.9kg SL3 6.64kg Slice RS 8.89kg viewtopic.php?f=10&t=110579" onclick="window.open(this.href);return false;" onclick="window.open(this.href);return false;


Visit starbike.com Online Retailer for HighEnd cycling components
Great Prices ✓ Broad Selection ✓ Worldwide Delivery ✓
www.starbike.com

@Wilwil... that pic was just a mock up with cables held in place by hand but yes, I turned the bars fully and for that frame/stem I do believe that length was pretty close to what I would use. But each case is different depending on frame size, stem length and amount of spacers under the stem. Personally, if it were my bike I’d cross them internally and go with the routing I showed in the above pic. There is no friction from the cables crossing over each other, at least none that is the slightest bit detrimental to shifting. Just make sure the cables don’t get actual twisted around each other as opposed to just overlapping because that will cause havoc on your shifting. As an aside a friend actually bought that very frame, shop built it up and used the more traditional method of cable routing. Looks a mess... cables too long for starters, and the clearcoat on the headtube was already being rubbed through. I put a couple of clear stickie pieces of protector tape on the headtube where it was rubbing. I don’t like the sleeves on the cable outers because while they may be made of a softer material, they’re still rubbing the dirt against the headtube, versus having a clear immovable protective shield on the headtube itself where the cables make contact.
Colnago C64 - The Naked Build; Colnago C60 - PR99; Trek Koppenberg - Where Emonda and Domane Meet;
Unlinked Builds (searchable): Colnago C59 - 5 Years Later; Trek Emonda SL Campagnolo SR; Special Colnago EPQ
Unlinked Builds (searchable): Colnago C59 - 5 Years Later; Trek Emonda SL Campagnolo SR; Special Colnago EPQ
Yes, I really think with the cable entry ports where they are on the downtube, by far the best routing both functionally and aesthetically is the crossing internal method. Perhaps the only downside is if you’re not sure exactly where the bars are going to end up and the stem length that will ultimately be used. The traditional method will allow for extra length in the cable housing which will not get in the way of your riding (it will just look bad) while you may be playing with stem lengths, spacers, etc as you dial in your fit. There’s less leeway for extra length in the housings when the internal cross is being used.... you want just enough to allow for a full turn sideways of the bars. I guess I also consider the aesthetics up front as well here, because I do like to have all cables ultimately intersecting each other perfectly just underneath dead center of the stem up front. Just makes for a really nice looking build at the end, like some thought was put into it before that last adjustment was made and you end up looking at the complete build thinking “hmmm, something’s not right there but I’m not sure what it is”.
What size frame are you working with?
What size frame are you working with?
Colnago C64 - The Naked Build; Colnago C60 - PR99; Trek Koppenberg - Where Emonda and Domane Meet;
Unlinked Builds (searchable): Colnago C59 - 5 Years Later; Trek Emonda SL Campagnolo SR; Special Colnago EPQ
Unlinked Builds (searchable): Colnago C59 - 5 Years Later; Trek Emonda SL Campagnolo SR; Special Colnago EPQ
The frame has arrived. Ive tried to thread a rear mech cable through the frame for practice and I have a problem. I can get round the BB guide with PTFE sleeving installed but I cant thread it along the chainstay. I can thread some more tubing along the chain stay to use as a guide but once the cable is threaded round the BB with sleeving its not possible to thread the cable into the chain stay sleeving guide. I could run some sleeving right the way through the frame by removing the down tube hatch but then how do I remove it to intstall the shorter peice round the BB?
Okay I’ve threaded the cable out through the first hole in the BB. Next I threaded sleeve from the drop out through the rear hole in the BB. Push the cable into the sleeve and push the sleeve up through the front hole into the down tube until it disappears into end of the chainstay enough to fit the supplied Jagwire cable stop. It doesn’t seem possible to push the cable along the chain stay from the BB and have it come out of the rear end.
Well, did you figure it out? I’m having a difficult time imagining how you’re having such an issue with this. I mocked it up and while I didn’t build it up completely I saw no issues that I would have in routing the cables. In fact, I really do love the molded in cable guides at the BB, like some other manufacturers do now as well, like the Trek Emonda for example. I will say that if you’re dealing with internally routed cables these days, especially if they are electric installs, then it’s almost imperative to have one of the cable routing kits with magnets and various ways of guiding cables through the frame tubes. I have the Park kit and was kicking myself for not getting it much sooner than I did. Oh, and the two pieces of PTFE tubing that I would use would not run all the way through the chainstays. Just long enough to be stuffed up the downtube and into the rear chainstay. The cables would run free beyond those points.
Colnago C64 - The Naked Build; Colnago C60 - PR99; Trek Koppenberg - Where Emonda and Domane Meet;
Unlinked Builds (searchable): Colnago C59 - 5 Years Later; Trek Emonda SL Campagnolo SR; Special Colnago EPQ
Unlinked Builds (searchable): Colnago C59 - 5 Years Later; Trek Emonda SL Campagnolo SR; Special Colnago EPQ
You actually didnt try to install a cable in your post. The problem is getting the cable out of the end of the chainstay. This cant be done, it seems, without a sleeve. The same sleeve is then pushed forward and round the BB and up the downtube. Yes this does give more sleeve than is necessary but I cant see another way. Im now sufering with the Acros headset which doesnt fit. Ive built a few Colnagos but this one is a bag of problems.Calnago wrote: ↑Thu Oct 04, 2018 5:53 pmWell, did you figure it out? I’m having a difficult time imagining how you’re having such an issue with this. I mocked it up and while I didn’t build it up completely I saw no issues that I would have in routing the cables. In fact, I really do love the molded in cable guides at the BB, like some other manufacturers do now as well, like the Trek Emonda for example. I will say that if you’re dealing with internally routed cables these days, especially if they are electric installs, then it’s almost imperative to have one of the cable routing kits with magnets and various ways of guiding cables through the frame tubes. I have the Park kit and was kicking myself for not getting it much sooner than I did. Oh, and the two pieces of PTFE tubing that I would use would not run all the way through the chainstays. Just long enough to be stuffed up the downtube and into the rear chainstay. The cables would run free beyond those points.
Have you got a magnetized internal cable routing kit? I didn't have to route the whole cable through to see how easy it would be to get that cable through the chainstay hole, at least with a magnet involved. Unless there's some sort of obstruction in the way like a piece of carbon or glue that's blocking the hole...
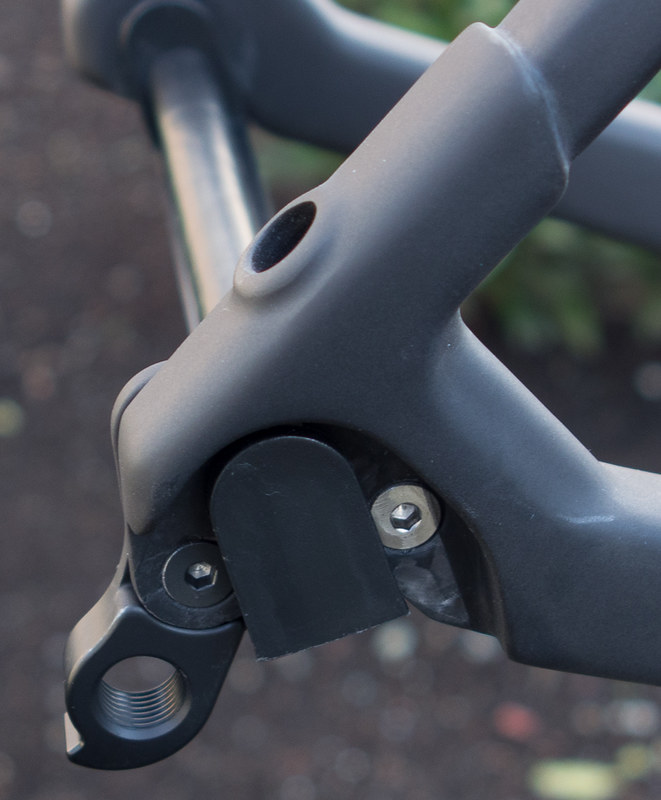
But if you find it easier to route a length of tubing as a guide through the chainstay temporarily to route the cable, then that's an alternative way of doing it too. There's usually more than one way to accomplish these things, but this does not seem like it should be in any way overly difficult to me. By the way, I didn't actually route a cable all the way through out the end of the chainstay, but I did route it around the BB and into the chainstay while I was playing around with it. Once I got that far, the rest seemed like it would be easy peasy during an actual build, and I still think it would be.
But if you find it easier to route a length of tubing as a guide through the chainstay temporarily to route the cable, then that's an alternative way of doing it too. There's usually more than one way to accomplish these things, but this does not seem like it should be in any way overly difficult to me. By the way, I didn't actually route a cable all the way through out the end of the chainstay, but I did route it around the BB and into the chainstay while I was playing around with it. Once I got that far, the rest seemed like it would be easy peasy during an actual build, and I still think it would be.
Colnago C64 - The Naked Build; Colnago C60 - PR99; Trek Koppenberg - Where Emonda and Domane Meet;
Unlinked Builds (searchable): Colnago C59 - 5 Years Later; Trek Emonda SL Campagnolo SR; Special Colnago EPQ
Unlinked Builds (searchable): Colnago C59 - 5 Years Later; Trek Emonda SL Campagnolo SR; Special Colnago EPQ
Visit starbike.com Online Retailer for HighEnd cycling components
Great Prices ✓ Broad Selection ✓ Worldwide Delivery ✓
www.starbike.com
Only way is to push the sleeve from the drop out and out through the rear BB hole. Then with the cable hanging out of the front BB hole push it into the sleeve and out the end of the chainstay. Then remove the sleeve. The sleeve for the BB routing will have already been pushed onto the cable and just has to be pulled into position. All this with no BB cups or cranks installed. Not sure I can live with your crossed cables though...


