

Does anyone know if the headset, including bearings are the same for the c64 and c60? I want to buy a headset online and can only see one for teh c60.
I damaged my headset while trying to remove the bearings. I think i overtightened the top cap and now the bearings are fried.
Colnago C64 - Inside and Out
Moderators: MrCurrieinahurry, maxim809, Moderator Team


Visit starbike.com Online Retailer for HighEnd cycling components
Great Prices ✓ Broad Selection ✓ Worldwide Delivery ✓
www.starbike.com
-
wheelsONfire

- Posts: 6294
- Joined: Mon Jul 07, 2014 8:15 am
- Location: NorthEU
The T45 BB (For 30mm axle), is it only available from CeramicSpeed?
Bikes:
Ax Lightness Vial EVO Race (2019.01.03)
Open *UP* (2016.04.14)
Paduano Racing Fidia (kind of shelved)
Ex bike; Vial EVO D, Vial EVO Ultra, Scott Foil, Paduano ti bike.
Ax Lightness Vial EVO Race (2019.01.03)
Open *UP* (2016.04.14)
Paduano Racing Fidia (kind of shelved)
Ex bike; Vial EVO D, Vial EVO Ultra, Scott Foil, Paduano ti bike.

As far as I know, there are no others doing it. You must be considering using a crank with a 30mm spindle in a C64?wheelsONfire wrote:The T45 BB (For 30mm axle), is it only available from CeramicSpeed?
Colnago C64 - The Naked Build; Colnago C60 - PR99; Trek Koppenberg - Where Emonda and Domane Meet;
Unlinked Builds (searchable): Colnago C59 - 5 Years Later; Trek Emonda SL Campagnolo SR; Special Colnago EPQ
Unlinked Builds (searchable): Colnago C59 - 5 Years Later; Trek Emonda SL Campagnolo SR; Special Colnago EPQ
As you must have found out, the bearings are pressed into the headset cups at the Acros factory, so unlike removal of just the bearings in most frames where the bearings themselves just drop into the carbon shell (no separate cups), the headset cups need to be carefully removed.insightt47 wrote:Does anyone know if the headset, including bearings are the same for the c64 and c60? I want to buy a headset online and can only see one for teh c60.
I damaged my headset while trying to remove the bearings. I think i overtightened the top cap and now the bearings are fried.
The headsets of the C60 and C64 are not exactly the same, as the C64 upper headset cup incorporates some vibration dampening material in it, however I “think” (but double triple check on this) that the upper and lower headset bores in the frame itself are the same and so a C60 headset should work just fine if that’s the case. But you really need to check with Colnago on that rather than guess, which is basically what I’m doing here. Actually, your best source for this might be to contact Acros directly and ask them. They have been very responsive with the technical info specs that I’ve inquired about in the past. And if you don’t know what you’re doing as far as removing and replacing the headset cups go, then make sure you enlist someone who does.
Colnago C64 - The Naked Build; Colnago C60 - PR99; Trek Koppenberg - Where Emonda and Domane Meet;
Unlinked Builds (searchable): Colnago C59 - 5 Years Later; Trek Emonda SL Campagnolo SR; Special Colnago EPQ
Unlinked Builds (searchable): Colnago C59 - 5 Years Later; Trek Emonda SL Campagnolo SR; Special Colnago EPQ
-
wheelsONfire
- Posts: 6294
- Joined: Mon Jul 07, 2014 8:15 am
- Location: NorthEU
If i was buying, yes, i would use a BB 386 crankset.
I just don't get why it's so many framesets coming with compatibility with only 24mm axle.
It's really idiotic!
I just don't get why it's so many framesets coming with compatibility with only 24mm axle.
It's really idiotic!
Bikes:
Ax Lightness Vial EVO Race (2019.01.03)
Open *UP* (2016.04.14)
Paduano Racing Fidia (kind of shelved)
Ex bike; Vial EVO D, Vial EVO Ultra, Scott Foil, Paduano ti bike.
Ax Lightness Vial EVO Race (2019.01.03)
Open *UP* (2016.04.14)
Paduano Racing Fidia (kind of shelved)
Ex bike; Vial EVO D, Vial EVO Ultra, Scott Foil, Paduano ti bike.
Has anybody seen the C64 seapost with the 30mm offset? I wonder how it looks. My 45s EPS has the seat all the way back at the rails limit. That is mostly because of the steep seat tube, which is the same as in the C64. I am going to order a C64 and I wonder if I should continue using the seat at the rails limit, or if I should get the 130mm seatpost instead of the 15mm. I am 65.5" so I rather stay with the 45s and not go to 48s because of the headtube length. Thanks.
-
Freewayflyer
- Posts: 13
- Joined: Sat Apr 07, 2018 8:31 pm
Hello,
About the C64 / C60 saddle rails clamp mechanizm,
I'll appreciate info / pics explaining how the front bolt is meant to be adjusted for moving the saddle front / back and chainging inclination.
This bolt seems to work differently than most other saddle rail clamps mechs.
It has a threaded dial but not clear how this works...
Is this bolt part of the clamp or fixed in the seatpost ?
Thanks
-
Freewayflyer
- Posts: 13
- Joined: Sat Apr 07, 2018 8:31 pm
One more question, can a larger diameter saddle reails clamp for saddles with carbon rails be bought from colnago separatley ?
The stock one seems for smaller diameter metal rails.
Thanks again - hope this may help anyone else that ancountered the same issues.
The stock one seems for smaller diameter metal rails.
Thanks again - hope this may help anyone else that ancountered the same issues.
-
bikeboy1tr
- Posts: 1396
- Joined: Thu Mar 21, 2013 3:19 am
- Location: Southern Ontario Canada
The threaded dial has a right hand thread and it I assume has a threaded sleeve in the post itself. So if you want the nose of your saddle pointing down loosen the bolt at the rear of the clamp and turn the dial in clockwise if you were looking down upon it from above. Sometimes the dial is difficult to turn even though the seat clamp bolt on the rear is backed off. I lubed mine so it would turn easier. Hope this helps.Freewayflyer wrote: ↑Fri Nov 02, 2018 3:35 pmHello,
About the C64 / C60 saddle rails clamp mechanizm,
I'll appreciate info / pics explaining how the front bolt is meant to be adjusted for moving the saddle front / back and chainging inclination.
This bolt seems to work differently than most other saddle rail clamps mechs.
It has a threaded dial but not clear how this works...
Is this bolt part of the clamp or fixed in the seatpost ?
Thanks
viewtopic.php?f=10&t=154188
2018 Colnago V2R Rim Brake
2019 Colnago V2R Disc Brake
2014 Norco Threshold Disc Brake
2006 Ridley Crosswind Rim Brake
2018 Colnago V2R Rim Brake
2019 Colnago V2R Disc Brake
2014 Norco Threshold Disc Brake
2006 Ridley Crosswind Rim Brake
-
r4nd0mv4r14bl3
- Posts: 85
- Joined: Thu Jun 11, 2015 9:26 am
I guess I have the honor of taking this thread to the new season 
Me frameset is going to be built for the second time soon and I have gathered a number of issues that I would like to address this time. (Should I make a separate topic? Will post here first). One of them is about headset bearings.
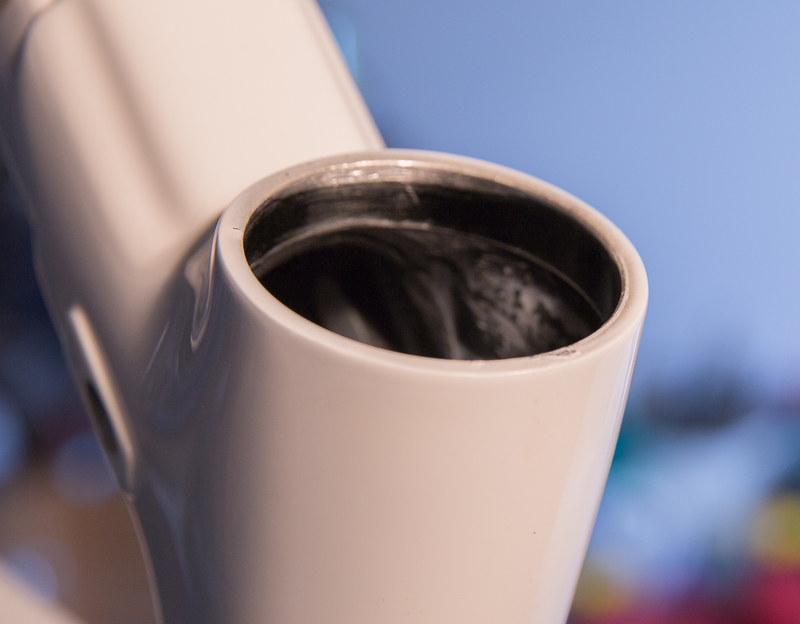
As the readers probably know already, C64 uses Acros headset bearings. Here's is a picture of a fitted new lower bearing.

Since those on my frameset were removed and replaced with a new set, I had a chance to play with the old ones to get some idea how they're holding up. An unpleasant surprise was that the lower bearing was feeling quite gritty. This is after no more than 3 months of use, mostly dry and at most 2-3 wet rides in total. My first reaction was that sealing of these bearings is probably not very good and fine sand will make its way inside the bearing.
So I figured that maybe the bearings can be cleaned if the seal comes off without breaking into pieces. Removing the seal was quite easy. The seal itself is not a soft rubbery one but more like stiff plasticky. Like this, I guess it cannot result in a tight fit to keep off the elements from inside of the bearing. Here's a photo of the lower bearing with seal removed.

Cleaning the inside of the bearing is not going to be the easiest thing to do, some dirt is going to be stuck behind the semi-transparent plastic bearing guide. After trying some degreasing agent, it felt better but not quite clean enough. And it would be more difficult to clean if the bearing is not removed from the frame. Not good. And the persective of replacing headset bearings after every three months is not a nice one.
So, here comes my question. What would be a good preemptive measure to minimize the lower headset bearing contamination? Cover it with some heavy grease? This will not be a very clean solution and probably needs reapplying regularly. What about some silicone; would it stick to the outside of the bearing and form a nice solid cover after it cures? Let me know if you have any ideas.
Cheers! and thanks for reading!
Me frameset is going to be built for the second time soon and I have gathered a number of issues that I would like to address this time. (Should I make a separate topic? Will post here first). One of them is about headset bearings.
As the readers probably know already, C64 uses Acros headset bearings. Here's is a picture of a fitted new lower bearing.
Since those on my frameset were removed and replaced with a new set, I had a chance to play with the old ones to get some idea how they're holding up. An unpleasant surprise was that the lower bearing was feeling quite gritty. This is after no more than 3 months of use, mostly dry and at most 2-3 wet rides in total. My first reaction was that sealing of these bearings is probably not very good and fine sand will make its way inside the bearing.
So I figured that maybe the bearings can be cleaned if the seal comes off without breaking into pieces. Removing the seal was quite easy. The seal itself is not a soft rubbery one but more like stiff plasticky. Like this, I guess it cannot result in a tight fit to keep off the elements from inside of the bearing. Here's a photo of the lower bearing with seal removed.
Cleaning the inside of the bearing is not going to be the easiest thing to do, some dirt is going to be stuck behind the semi-transparent plastic bearing guide. After trying some degreasing agent, it felt better but not quite clean enough. And it would be more difficult to clean if the bearing is not removed from the frame. Not good. And the persective of replacing headset bearings after every three months is not a nice one.
So, here comes my question. What would be a good preemptive measure to minimize the lower headset bearing contamination? Cover it with some heavy grease? This will not be a very clean solution and probably needs reapplying regularly. What about some silicone; would it stick to the outside of the bearing and form a nice solid cover after it cures? Let me know if you have any ideas.
Cheers! and thanks for reading!
Servicing a headset bearing:
1. Remove from bike.
2. Remove bearing seals on both sides.
3. Spray with degreaser.
4. Spin to distribute degreaser and dislodge dirt + dirty grease.
5. Blow with compressed air to clean.
6. Repeat steps 3.-5. as needed. The outer race of a clean & unsealed bearing should spin effortlessly when holding it at the inner race and blasting air at the balls in an angle.
7. Install a seal and pack with grease. As the headset won't experience any kind of RPMs, it can be packed completely with thick marine grade ball bearing grease.
8. Install the other seal and lube the outer surfaces of seals with said grease.
9. Install to bike.
In most cases road bike's headset bearings should last the lifetime of a frame. If "almost new" bearings feel rough, I'd suspect they have been either almost dry inside when installed, the headset has been adjusted too tight or they have some how gotten contaminated by the elements really badly.
-
r4nd0mv4r14bl3
- Posts: 85
- Joined: Thu Jun 11, 2015 9:26 am
Thanks for your post Jugi. However, cleaning the bearings with both seals removed (which requires pushing bearings out of the frame) is something that I would like to avoid. At least not to do it on regular basis. That's why i am looking for a way to keep the elements off the bearings. Thick grease might actually work.
Sent from my ONEPLUS A6003 using Tapatalk
Sent from my ONEPLUS A6003 using Tapatalk
Visit starbike.com Online Retailer for HighEnd cycling components
Great Prices ✓ Broad Selection ✓ Worldwide Delivery ✓
www.starbike.com
@r4nd0mv4r14bl3: I think this is as good a thread as any to post your question.
There's no way that that bearing should be shot after only 3 months. So I'd want to try to ascertain what the underlying cause was. Those headsets are kind of like Chirs King headsets and should last years and years without anything having to be done. The same type have been used in Colnagos since they moved from external headsets, not always by Acros, but Acros has been a main supplier since the C59 days. My EPQ, C59, C60 are all still perfect. You already know that just popping them out and cleaning them as was just suggested is a no go from the get go, but since you have removed and already installed a new set of cups/bearings, did you by chance have a good look at the faces of the headtube? Specifcally, did the faces appear to be well... "faced", with no globs of paint anywhere, which would essentially "deface" the surface to a point of unevenness that that alone could have caused the premature wear on the bearings. I'm going to presume you weren't constantly spraying a pressure washer type stream right at the junction of the fork and headtube in the cleaning process. What prompted you to the remove the cups in the first place, the rough bearing? How are the new bearings turning when you just turn them with your finger... can you feel any roughness at all, or are they perfectly smooth? If all is smooth and seemingly good, then going forward I would just apply a coat of marine grease to the outside to protect it from the elements, or if you have to buy some anyway, a good product that might be even better for this application is Morgan Blue's Aquaproof Paste. You don't want it in the bearings themselves, but it's got a high adhesion factor and is a very good "barrier" to the elements if you will and prevents corrosion etc. Plus, using it at the bottom of the bearing, gravity would help in ensuring it doesn't move into the bearings themselves.
I guess at this point, just cross your fingers and hope it doesn't happen again... perhaps it was a faulty bearing from the factory. But if it happens again, then you need to look a little deeper for the cause. When I got my C60, I noticed that the lower bearing wasn't quite as smooth as I'd like it to feel right out of the box. I knew it would bug me going forward, because it had to be either a poorly pressed bearing within the cup itself (done at the Acros factory), or something up with the face of the headtube. So I took it apart. And sure enough, while the headtube had been faced before paint, there was a glob of paint on the surface that needed to come off, so I took it upon myslef to reface the headtube for good measure. I really didn't remove any headtube material, but rather just skimmed off the paint. Reassembled carefully with a proper press etc., and once I felt how smooth it turned, all was right with the world again. But I wonder if I hadn't done this if I might have ended up with a premature bearing failure as well. Facing is important, very important, whenever those faces are relied upon to provide square and aligned surfaces for two cups at either end, be it on a head tube or a bottom bracket shell. Chirs King would go to great lengths to tell you just how critical it is not only for the headtube to be properly faced, but the stem faces as well, and they have a tool for that. I've never faced an actual stem, however. With today's molded carbon shells, where headset bearings just simply drop in, facing is something many might look at you and say "Facing... what's that?" It's important for a setup like this.
Here's what I'm talking about, an excerpt from my C60 Build Thread...
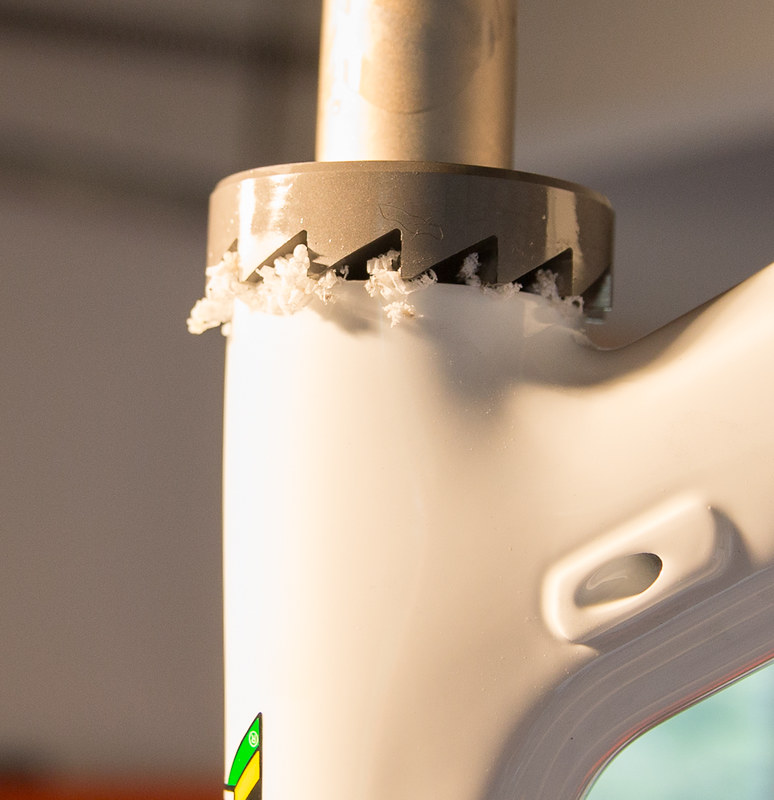
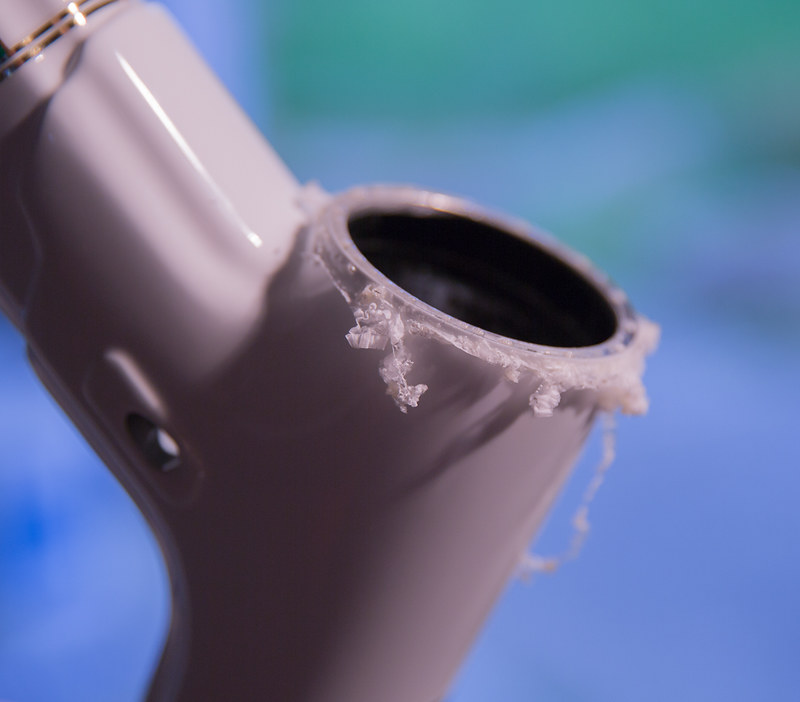
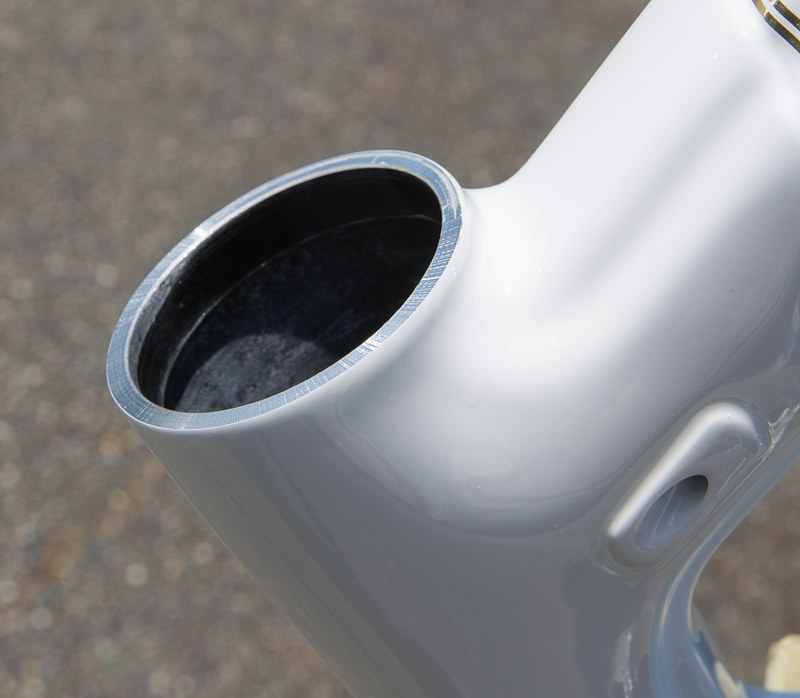
Ok, upon taking delivery of the frame, I noticed the headset bearings were already in the frame right out of the box. They are supposed to be, but I kind of assumed they'd be pressed in cups with slipfit bearings like in my C59 at first, and was curious why they hadn't fallen out. Turns out they use an Acros high quality headset that have the bearings prepressed into cups, then the cups are pressed into the headset. Ok... but the lower one seemed just a tad rough to me. A bit like a misaligned pressfit bearing in a bottom bracket shell. Anyway, long story short, that would never do, so out they came so I could inspect things and maybe just press them in again carefully thinking that had somehow just got pressed in a bit askew. Well... the paint is so thick, and they get painted prior to pressing in the cups, that a ridge of paint had dried under the lower cup....
Note the ridge of paint along the lower right edge of the headtube. While we're at it, notice the alloy rings about a centimeter deep into the headset. Makes for a good pressfit of the headset cups... so long as the ends are perfectly faced... Clearly, as a minimum I needed to face the headtube to remove the excess paint etc...
Facing process.... While I've never built a Colnago where I haven't faced the BB shell, since the move to pressed in headset cups/bearings from the factory I have not faced a newer (since the EPS model) headtube until now... or even removed the cups/bearings on any C59 or EPQ. Models prior to the EPS used an external headset. These are much the same in principal, just a little cleaner in that they are buried in the headtube. Colnago could have done a better job of marketing this, as I think it's a significantly better design than just carving/molding a race into a carbon shell that you just pop a couple slip fit bearings in, and then squeeze everything together with preload. The logo on my C59 top tube says C-HS, spelled out underneath as "Colnago Headset System". Kind of a silly graphic especially when virtually no one knew what was special about it and it appeared that they were just adopting an "integrated headset" like everyone else had seemingly already done. And really, there wasn't anything "special" except that it was not at all a case of adopting the "integrated headset" trend. Rather, it retained the durability and longevity that external headsets enjoyed, versus the "new standard" of just dropping the bearings directly into your frame shell, which could be subject to wear and damage.
Setting up...
The actual facing operation...
Checking progress...
Final Result... smooth and square... repeated the process for the top of the headtube, although it probably wasn't necessary.
I forgot to photograph the pressing in of the headset cups, but once in they were perfectly silky smooth, and I was now completely happy. I used Morgan Blue Aquaproof Paste as an anitseize compound between the headset cups and the inner diameter of the headtube.
There's no way that that bearing should be shot after only 3 months. So I'd want to try to ascertain what the underlying cause was. Those headsets are kind of like Chirs King headsets and should last years and years without anything having to be done. The same type have been used in Colnagos since they moved from external headsets, not always by Acros, but Acros has been a main supplier since the C59 days. My EPQ, C59, C60 are all still perfect. You already know that just popping them out and cleaning them as was just suggested is a no go from the get go, but since you have removed and already installed a new set of cups/bearings, did you by chance have a good look at the faces of the headtube? Specifcally, did the faces appear to be well... "faced", with no globs of paint anywhere, which would essentially "deface" the surface to a point of unevenness that that alone could have caused the premature wear on the bearings. I'm going to presume you weren't constantly spraying a pressure washer type stream right at the junction of the fork and headtube in the cleaning process. What prompted you to the remove the cups in the first place, the rough bearing? How are the new bearings turning when you just turn them with your finger... can you feel any roughness at all, or are they perfectly smooth? If all is smooth and seemingly good, then going forward I would just apply a coat of marine grease to the outside to protect it from the elements, or if you have to buy some anyway, a good product that might be even better for this application is Morgan Blue's Aquaproof Paste. You don't want it in the bearings themselves, but it's got a high adhesion factor and is a very good "barrier" to the elements if you will and prevents corrosion etc. Plus, using it at the bottom of the bearing, gravity would help in ensuring it doesn't move into the bearings themselves.
I guess at this point, just cross your fingers and hope it doesn't happen again... perhaps it was a faulty bearing from the factory. But if it happens again, then you need to look a little deeper for the cause. When I got my C60, I noticed that the lower bearing wasn't quite as smooth as I'd like it to feel right out of the box. I knew it would bug me going forward, because it had to be either a poorly pressed bearing within the cup itself (done at the Acros factory), or something up with the face of the headtube. So I took it apart. And sure enough, while the headtube had been faced before paint, there was a glob of paint on the surface that needed to come off, so I took it upon myslef to reface the headtube for good measure. I really didn't remove any headtube material, but rather just skimmed off the paint. Reassembled carefully with a proper press etc., and once I felt how smooth it turned, all was right with the world again. But I wonder if I hadn't done this if I might have ended up with a premature bearing failure as well. Facing is important, very important, whenever those faces are relied upon to provide square and aligned surfaces for two cups at either end, be it on a head tube or a bottom bracket shell. Chirs King would go to great lengths to tell you just how critical it is not only for the headtube to be properly faced, but the stem faces as well, and they have a tool for that. I've never faced an actual stem, however. With today's molded carbon shells, where headset bearings just simply drop in, facing is something many might look at you and say "Facing... what's that?" It's important for a setup like this.
Here's what I'm talking about, an excerpt from my C60 Build Thread...
Ok, upon taking delivery of the frame, I noticed the headset bearings were already in the frame right out of the box. They are supposed to be, but I kind of assumed they'd be pressed in cups with slipfit bearings like in my C59 at first, and was curious why they hadn't fallen out. Turns out they use an Acros high quality headset that have the bearings prepressed into cups, then the cups are pressed into the headset. Ok... but the lower one seemed just a tad rough to me. A bit like a misaligned pressfit bearing in a bottom bracket shell. Anyway, long story short, that would never do, so out they came so I could inspect things and maybe just press them in again carefully thinking that had somehow just got pressed in a bit askew. Well... the paint is so thick, and they get painted prior to pressing in the cups, that a ridge of paint had dried under the lower cup....
Note the ridge of paint along the lower right edge of the headtube. While we're at it, notice the alloy rings about a centimeter deep into the headset. Makes for a good pressfit of the headset cups... so long as the ends are perfectly faced... Clearly, as a minimum I needed to face the headtube to remove the excess paint etc...
Facing process.... While I've never built a Colnago where I haven't faced the BB shell, since the move to pressed in headset cups/bearings from the factory I have not faced a newer (since the EPS model) headtube until now... or even removed the cups/bearings on any C59 or EPQ. Models prior to the EPS used an external headset. These are much the same in principal, just a little cleaner in that they are buried in the headtube. Colnago could have done a better job of marketing this, as I think it's a significantly better design than just carving/molding a race into a carbon shell that you just pop a couple slip fit bearings in, and then squeeze everything together with preload. The logo on my C59 top tube says C-HS, spelled out underneath as "Colnago Headset System". Kind of a silly graphic especially when virtually no one knew what was special about it and it appeared that they were just adopting an "integrated headset" like everyone else had seemingly already done. And really, there wasn't anything "special" except that it was not at all a case of adopting the "integrated headset" trend. Rather, it retained the durability and longevity that external headsets enjoyed, versus the "new standard" of just dropping the bearings directly into your frame shell, which could be subject to wear and damage.
Setting up...
The actual facing operation...
Checking progress...
Final Result... smooth and square... repeated the process for the top of the headtube, although it probably wasn't necessary.
I forgot to photograph the pressing in of the headset cups, but once in they were perfectly silky smooth, and I was now completely happy. I used Morgan Blue Aquaproof Paste as an anitseize compound between the headset cups and the inner diameter of the headtube.
Colnago C64 - The Naked Build; Colnago C60 - PR99; Trek Koppenberg - Where Emonda and Domane Meet;
Unlinked Builds (searchable): Colnago C59 - 5 Years Later; Trek Emonda SL Campagnolo SR; Special Colnago EPQ
Unlinked Builds (searchable): Colnago C59 - 5 Years Later; Trek Emonda SL Campagnolo SR; Special Colnago EPQ


