


Those well organized press in tools are some serious kit..wish I had a garage/basement/room for myself to use as a bike room...
I know you're not close to full recovery but what do you think about the c60 vs your other Colnago's?
Colnago C60 - Traditional PR99
Moderators: MrCurrieinahurry, maxim809, Moderator Team
Beautiful bike and amazing attention when assembling. Wishing the same care could be placed in the assembly of my protos
Sent from my iPhone using Tapatalk
Sent from my iPhone using Tapatalk


Visit starbike.com Online Retailer for HighEnd cycling components
Great Prices ✓ Broad Selection ✓ Worldwide Delivery ✓
www.starbike.com

-
TomColnago
- Posts: 150
- Joined: Sat Sep 05, 2015 4:05 pm
WOW! That's an amazing looking bikes! Your build threads are brilliant as ever
Calnago wrote:Now, the inner diameter of the threadfit shell and the outer diameter of the Campy cups were all very much within spec, and I feel I could just have pressed them in dry, relying on the anodization alone to prevent oxidation etc. But just for good measure I coated the inside of the Threadfit cups and the outer surfaces of the Campy cups with Morgan Blue Aquaproof Paste. I've kind of gotten into the habit of using Loctite 609 and Primer for any pressfit application, and Campy actually recommends that now as do many other manufacturers, but that's mostly a result of the inability of most frame manufacturers to be able to produce a consistently perfect carbon shell, round and within spec for all the tolerances needed for a good pressfit install. Again, kudos to Colnago for the Threadfit Bottom Bracket, and while it likely does add some weight to the frame, it's a welcome feature for sure in this day and age of creaks etc. Oh, I NEVER use grease in a pressfit application. Either Loctite 609 and Primer, or more recently experimenting with Aquaproof Paste from Morgan Blue, or dry with nothing at all. I added "dry", because this is the first bottom bracket I've seen that I actually think a dry install would be perfectly fine. Grease facilitates movement, and that is not what you want happening between your frame shell and the surfaces of any pressed in cups. It also masks noise, so while after greasing up your creaky pressfit BB and thinking all is well because it's quiet, that just ain't the case. The sound of movement betweem the surfaces (creaks) is just being masked. Unfortunately, grease seems to be the goto solution for a lot of bike shops when it comes to creaky bottom brackets. I suppose that ensures a repeat customer, not much else.
As with all your build threads, I am very much enjoying these posts.
I am awaiting the final parts to allow me to build up my own C60 - PLLB 56S in the next few weeks. So was very interested in your decision to use the Morgan Blue Aquaproof Paste (I have a had a pot here for few years now) for the cup installation, as I still see it in my eyes as a grease, be it a thick one? I was planning to use the Loctite method as discussed here:
http://weightweenies.starbike.com/forum/viewtopic.php?t=137823
Cheers
Rich

The Aquaproof Paste from Morgan Blue is NOT to be used as you would a grease. It is really intended for applications exactly like this such has pressed in headsets, bottom brackets, etc., where the surfaces are not meant to move between each other... it has properties to prevent oxidation and galling, same as something like ti-prep or other copper based anti seize compounds. It has high adhesion properties as well as being extremely water resistant (even salt water they say). I'm trying it out because I heard that's exactly what Colnago uses for the threads of the Threadfit system. I also have used it in one Cannondale Evo Pressfit 30 application, as opposed to Loctite 609 and primer. If the pressfit tolerance is good, then I think the Aquaproof Paste will be fine. If the Pressfit tolerance is questionable I'd go with the Loctite solution. I think Colnago actually has actually advised to someone a dry install of whichever cups you end up pressing into the threadfit cups, and quite frankly I think it would work just fine. I'm willing to experiment a bit on my own bikes, but for others I always go with something tried and true. I've been riding the C60 and I really doubt I'm going to have any issues with the bottom bracket. I would go with the Aquaproof Paste on your install of the cups, simply because if you do need to remove them down the road at some point, the process will likely be a little easier. I have removed some PF30 cups out of a carbon shell that I had installed with Loctite 609 and Primer. It takes some impact to break the bond, which is good... means it has done it's job. But if you can get away without it, why not. For the C60 and Campy alloy BB cups, I think you'll be just fine, but if you uses Loctite, that's fine too imo. Campy recommends it now, but as with any recommendation you have to judge how applicable that is to your own situation and either follow the recommendation to a tee or adjust accordingly to better fit your specific needs. But for the C60 threadfit system, I think I would just go with Aquaproof paste that you have. If for any reason, you experience creaking, then no big deal... just remove it and reinstall using the Loctite method. That's what I'm doing. If I do experience any creaking down the road... I won't hesitate to pull it and redo it with Loctite 609 and primer. But I don't think that will be the case here.
Colnago C64 - The Naked Build; Colnago C60 - PR99; Trek Koppenberg - Where Emonda and Domane Meet;
Unlinked Builds (searchable): Colnago C59 - 5 Years Later; Trek Emonda SL Campagnolo SR; Special Colnago EPQ
Unlinked Builds (searchable): Colnago C59 - 5 Years Later; Trek Emonda SL Campagnolo SR; Special Colnago EPQ
Ok, so continuing with the build... I suppose it's cutting the fork time.
Measure once, maybe twice, well... three times for good measure, then cut. Probably the most nerve wracking experience a beginning bike builder does, especially if it's on a high end frame with a color matched fork that would be very difficult to replace if done incorrectly.
So... ok, let's get to it... no... wait... I need to measure once more... Ha.
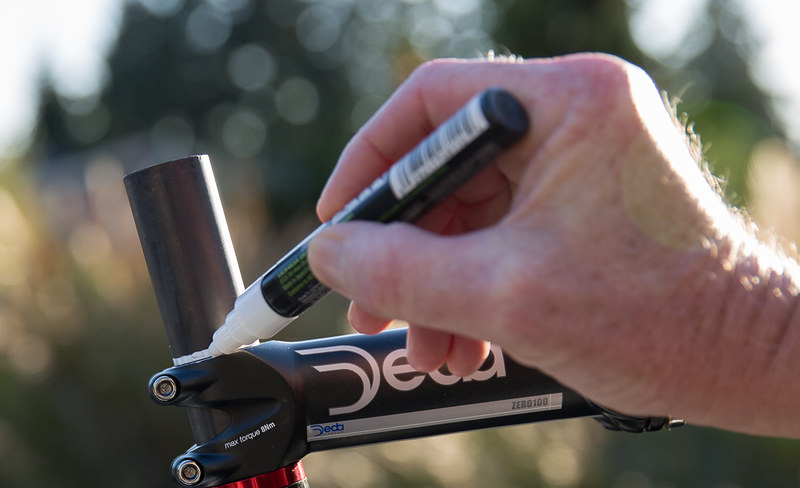
First, stack everything up exactly as it will finished... in this case I am using the stem that has the highest stack height... maybe just a millimeter more than the stem I'm pretty sure will be ending up there (the ProVibe), but it's stack height is just shy of 40mm, whereas this one is just proud of 40mm. Since I want to end up with a little lip above the top of the stem for the top spacer to center on, I'm using the tallest stack height stem for marking the cut line...
Ok... using a bistro marker (very handy as the white line shows up nicely and just wipes off easily with water, no fuss no mess), I use it for a lot of things.... including marking this line...
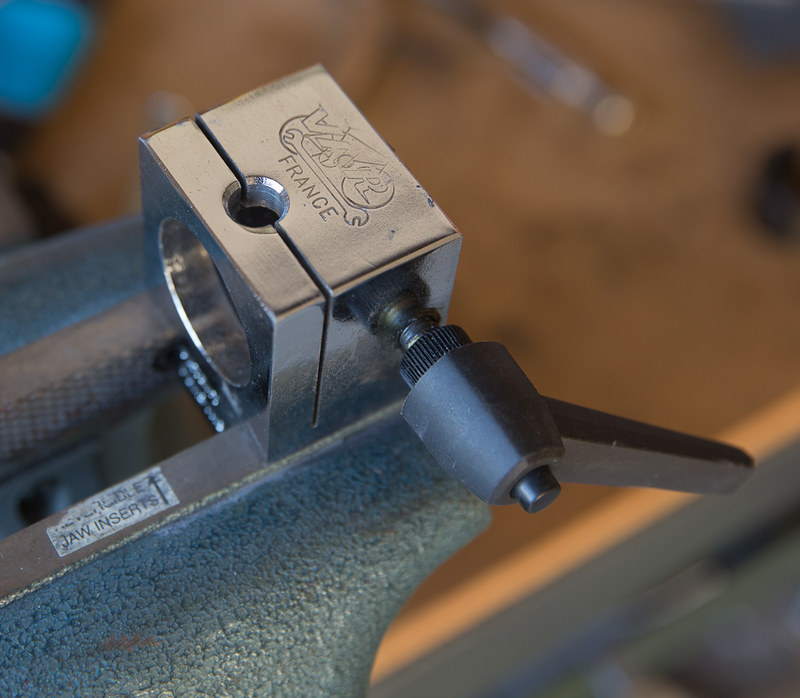
Now the fun part... use whatever method you use to actually cut the fork. I use a 32tooth good hacksaw, and a VAR cutting guide secured in a bench vise. I can cut as thin a slice as I want using this thing, and once I cut off as fine a slice as I could and still have a slice to hold (versus a pile of carbon dust). I think the slice I cut off was thinner than the kerf of the saw blade. Nice.
The VAR cutting guide....
Fork secured in the guide and vice...
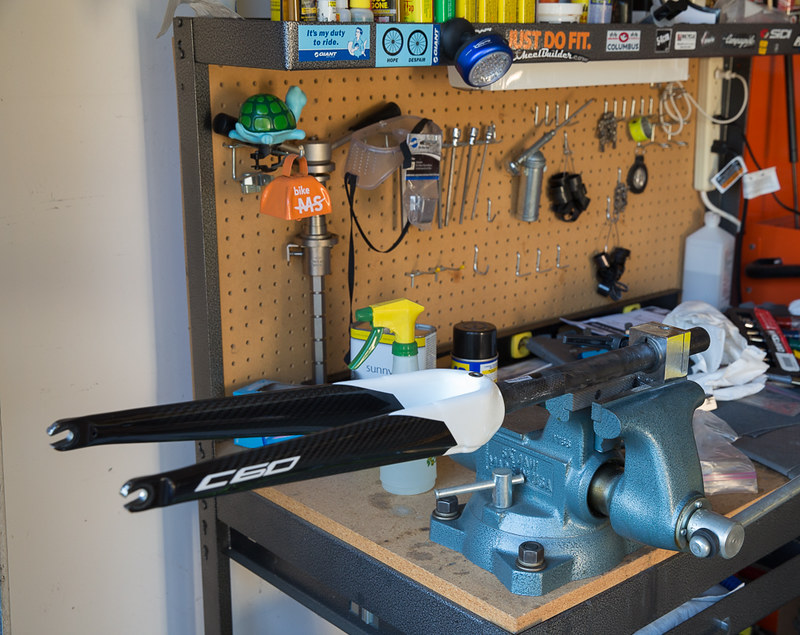
The actual cut... I use a little water spritzer to keep things damp, maybe it aids cutting smoothly, I don't know, I've just always done it like that cuz it seems like a good thing to do...
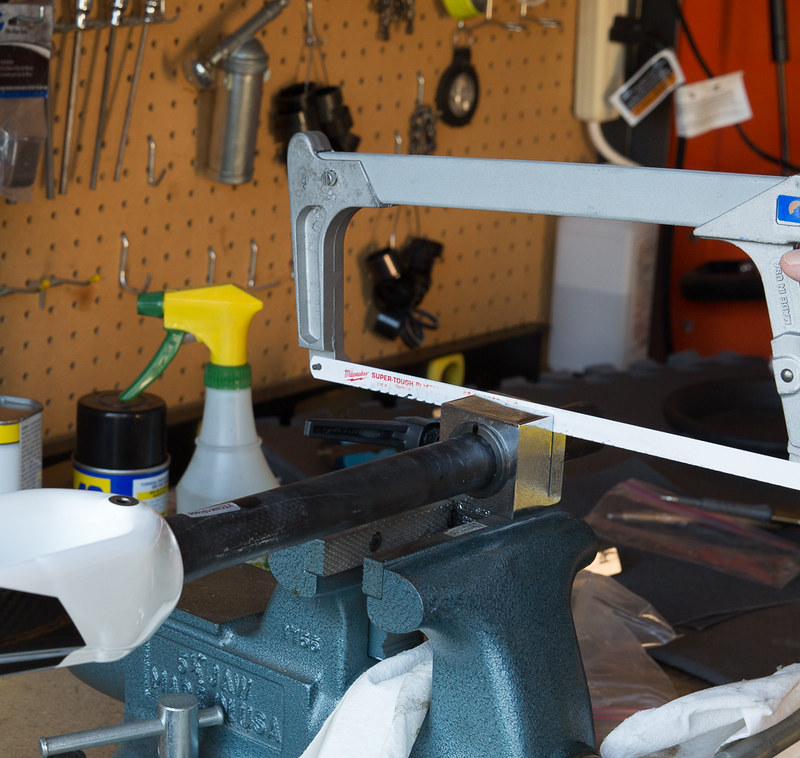
And there you have it.... a nice perfectly square, straight cut...
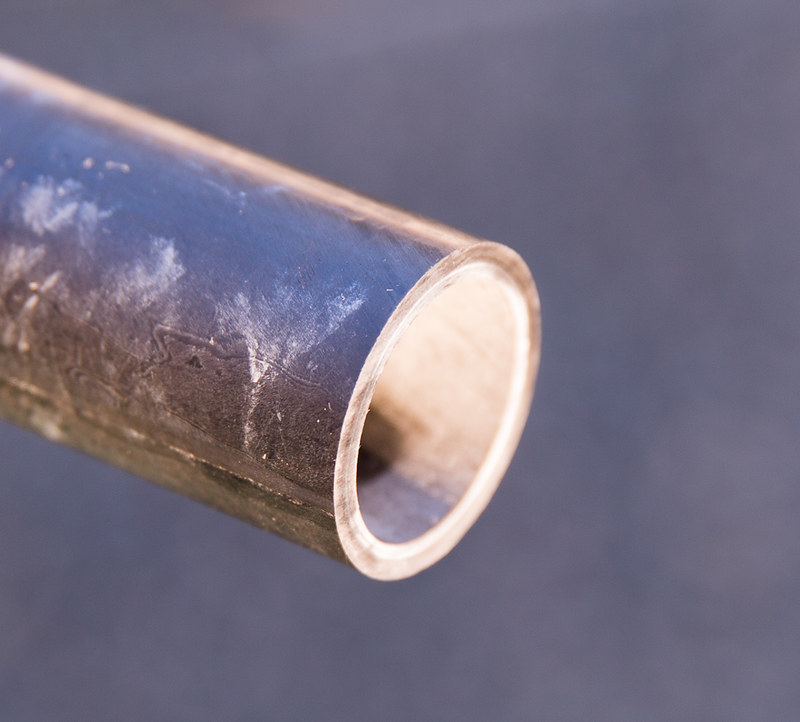
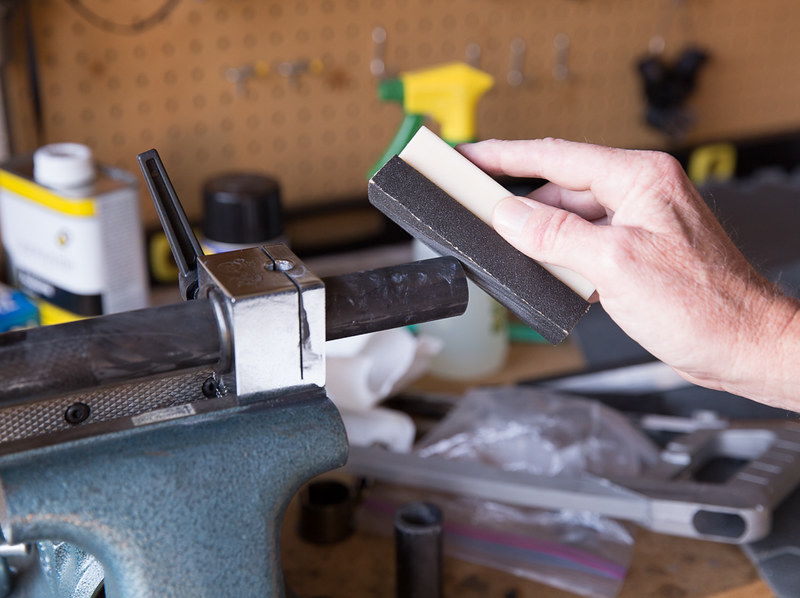
One last step is to just lightly remove the sharp edge of the cut on the outer diameter of the steer tube. Many headset covers will have an internal rubber o-ring on them so you don't want to risk cutting into it or damaging it when you install those...
Ok... there you have it... fork is cut and done. Easy!
After every step, my cat smacks this button...

Measure once, maybe twice, well... three times for good measure, then cut. Probably the most nerve wracking experience a beginning bike builder does, especially if it's on a high end frame with a color matched fork that would be very difficult to replace if done incorrectly.
So... ok, let's get to it... no... wait... I need to measure once more... Ha.
First, stack everything up exactly as it will finished... in this case I am using the stem that has the highest stack height... maybe just a millimeter more than the stem I'm pretty sure will be ending up there (the ProVibe), but it's stack height is just shy of 40mm, whereas this one is just proud of 40mm. Since I want to end up with a little lip above the top of the stem for the top spacer to center on, I'm using the tallest stack height stem for marking the cut line...
Ok... using a bistro marker (very handy as the white line shows up nicely and just wipes off easily with water, no fuss no mess), I use it for a lot of things.... including marking this line...
Now the fun part... use whatever method you use to actually cut the fork. I use a 32tooth good hacksaw, and a VAR cutting guide secured in a bench vise. I can cut as thin a slice as I want using this thing, and once I cut off as fine a slice as I could and still have a slice to hold (versus a pile of carbon dust). I think the slice I cut off was thinner than the kerf of the saw blade. Nice.
The VAR cutting guide....
Fork secured in the guide and vice...
The actual cut... I use a little water spritzer to keep things damp, maybe it aids cutting smoothly, I don't know, I've just always done it like that cuz it seems like a good thing to do...
And there you have it.... a nice perfectly square, straight cut...
One last step is to just lightly remove the sharp edge of the cut on the outer diameter of the steer tube. Many headset covers will have an internal rubber o-ring on them so you don't want to risk cutting into it or damaging it when you install those...
Ok... there you have it... fork is cut and done. Easy!
After every step, my cat smacks this button...
Colnago C64 - The Naked Build; Colnago C60 - PR99; Trek Koppenberg - Where Emonda and Domane Meet;
Unlinked Builds (searchable): Colnago C59 - 5 Years Later; Trek Emonda SL Campagnolo SR; Special Colnago EPQ
Unlinked Builds (searchable): Colnago C59 - 5 Years Later; Trek Emonda SL Campagnolo SR; Special Colnago EPQ
Ok... now for throwing on the components and stuff...
But first... I want to make absolutely certain the derailleur hanger is perfectly aligned, horizontally, vertically, and every which way in between. There has been some chatter in other threads about whether the C60 derailleur hanger is really within the Campy Specifications for derailleur hangers, so this is one of the things that I really want to test out in detail later in this build. A straight aligned hanger is absolutely necessary if any testing like this is to be done, but this should be done on any build, new or old. And yes, I tweaked it a bit to get it perfect...
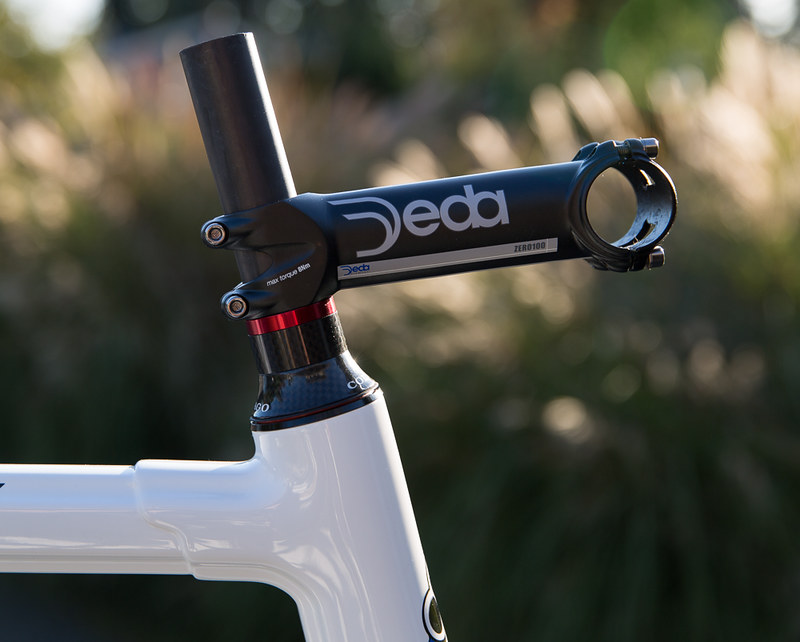
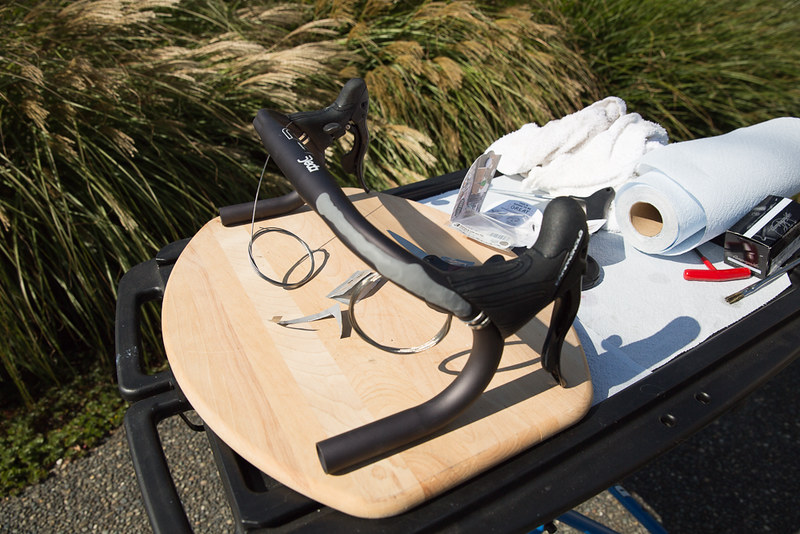
Ok, now the handlebars. I use Deda Alloy Zero 100 SHALLOW bars. Note I wrote the SHALLOW in caps only because that's how they do it on their bars, not because I'm yelling. And at a 135mm drop they're not even that shallow. Italians! Never mean what they say. Ha. In deda sizing they are 44's but they measure outside to outside. So, they're really comparable to a more standard sizing of 42 center to center. It's my natural width, and it's just right. The wider trend was just dumb and they marketed it as "expanding your chest, open up to breathe, blah blah blah". I think what a pile of BS... get the bars that match your natural position. I think super narrow bars are just as dumb, unless you are really an elite time trialist and really attempting to get as absolutely aero as possible. But in my mind, super narrow bars compromise your control on a road bike in the more sketchy turns. Anyway, that's my thought on the subject of width. As for shape, it's all very personal... I really do prefer a classic shape over all else, and I've tried many. This particular bar works with Campy levers very nicely as well. Some bars work better with certain groups than others, and vice versa. With these bars and the campy levers, I can grab the brakes easily from any of the positions, and the flat drop on the bottom is actually long enough to fully grab comfortably.
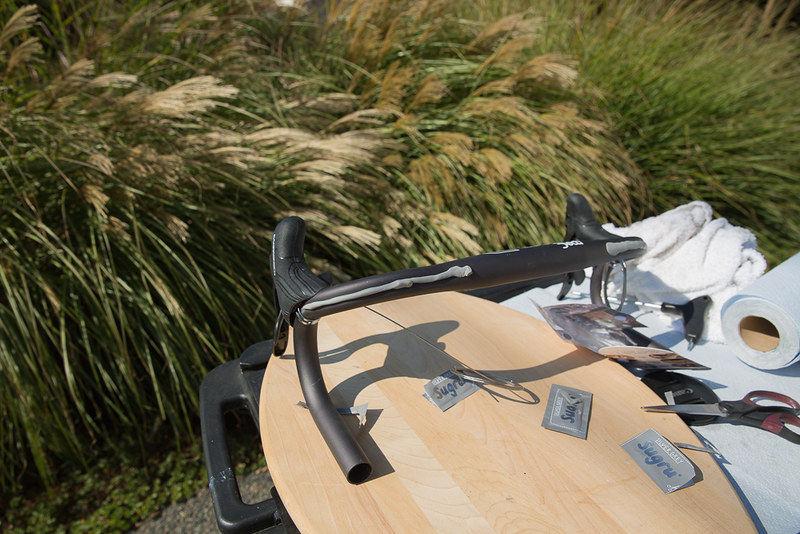
One thing though... is that these bars have cable grooves both front and back. I only use the front routing of the cables. In the past I've filled in the rear cable groove with cut pieces of cable housing... it works but can sometimes leave just a bit of a bump at the ends. Last time I used a silicone mold epoxy. That worked but did not stick to the bars as it was intended to be used for rubber molds with no "sticking" qualities. This time I tried Sugru, and it is jusssstt right. I think I'll be sticking with it for now.
I like to mount the levers to these bars before I put them on the bike because I can perfectly align them on a flat table top or something. They conform to the old school way of lever/bar fit, where the tips of the levers are in line with a line drawn from the drops. At least that's where I like them. I you're using other ergo type bars, then I would mount the bars to the bike first and then place the levers where they work best and according to individual rider preference...
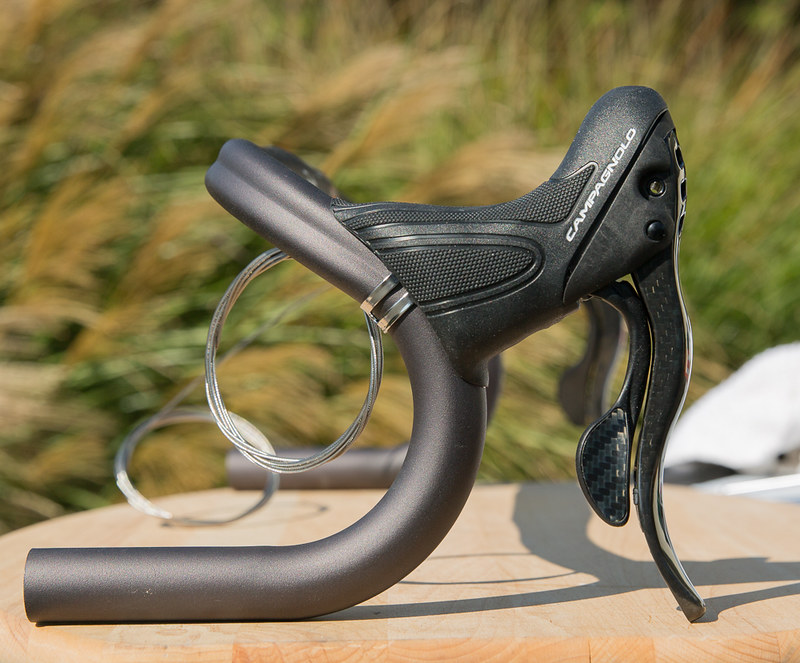
Note the levers already have the derailleur cables routed through the "front" routing guides. Use that. It is much preferable to the routing on the outside. The bend on the outside routing of the Campy levers is very acute. It works, but eventually the cables will fray at that spot similar (although not as badly) to the cable fray issue on Shimano levers with their 90 degree bend. I discovered this a long time ago while riding and noticed my shifting wasn't very good. That puzzled me since normally everything is so dialed on my bikes. Anyway, it was the beginning of a ride and I figured I'd adjust things when I got home. Then all of a sudden I noticed a prick into my palm by my index finger at the hoods. It was a frayed cable and the end of a broken steel strand had poked through the rubber hood into my hand. Ok... from that day on I've never routed campy cables using that routing... I always go the front route even though the bars may have guides (as in this case) at the back...
My first attempt at applying the Sugru to fill in the rear cable groove... looks a bit messy but it made for a very smooth round back of the bars which gets covered in tape anyway. Best thing about this stuff is that it actually sticks to the bars unlike the stuff I used before making it much easier to work with and tape things up later...
And now the left side.... roll it out...
And squish it down...
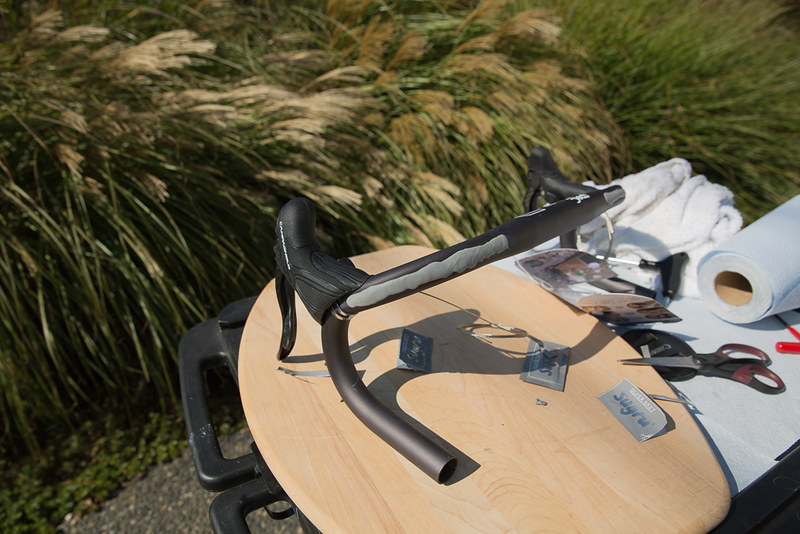
Done!
But first... I want to make absolutely certain the derailleur hanger is perfectly aligned, horizontally, vertically, and every which way in between. There has been some chatter in other threads about whether the C60 derailleur hanger is really within the Campy Specifications for derailleur hangers, so this is one of the things that I really want to test out in detail later in this build. A straight aligned hanger is absolutely necessary if any testing like this is to be done, but this should be done on any build, new or old. And yes, I tweaked it a bit to get it perfect...
Ok, now the handlebars. I use Deda Alloy Zero 100 SHALLOW bars. Note I wrote the SHALLOW in caps only because that's how they do it on their bars, not because I'm yelling. And at a 135mm drop they're not even that shallow. Italians! Never mean what they say. Ha. In deda sizing they are 44's but they measure outside to outside. So, they're really comparable to a more standard sizing of 42 center to center. It's my natural width, and it's just right. The wider trend was just dumb and they marketed it as "expanding your chest, open up to breathe, blah blah blah". I think what a pile of BS... get the bars that match your natural position. I think super narrow bars are just as dumb, unless you are really an elite time trialist and really attempting to get as absolutely aero as possible. But in my mind, super narrow bars compromise your control on a road bike in the more sketchy turns. Anyway, that's my thought on the subject of width. As for shape, it's all very personal... I really do prefer a classic shape over all else, and I've tried many. This particular bar works with Campy levers very nicely as well. Some bars work better with certain groups than others, and vice versa. With these bars and the campy levers, I can grab the brakes easily from any of the positions, and the flat drop on the bottom is actually long enough to fully grab comfortably.
One thing though... is that these bars have cable grooves both front and back. I only use the front routing of the cables. In the past I've filled in the rear cable groove with cut pieces of cable housing... it works but can sometimes leave just a bit of a bump at the ends. Last time I used a silicone mold epoxy. That worked but did not stick to the bars as it was intended to be used for rubber molds with no "sticking" qualities. This time I tried Sugru, and it is jusssstt right. I think I'll be sticking with it for now.
I like to mount the levers to these bars before I put them on the bike because I can perfectly align them on a flat table top or something. They conform to the old school way of lever/bar fit, where the tips of the levers are in line with a line drawn from the drops. At least that's where I like them. I you're using other ergo type bars, then I would mount the bars to the bike first and then place the levers where they work best and according to individual rider preference...
Note the levers already have the derailleur cables routed through the "front" routing guides. Use that. It is much preferable to the routing on the outside. The bend on the outside routing of the Campy levers is very acute. It works, but eventually the cables will fray at that spot similar (although not as badly) to the cable fray issue on Shimano levers with their 90 degree bend. I discovered this a long time ago while riding and noticed my shifting wasn't very good. That puzzled me since normally everything is so dialed on my bikes. Anyway, it was the beginning of a ride and I figured I'd adjust things when I got home. Then all of a sudden I noticed a prick into my palm by my index finger at the hoods. It was a frayed cable and the end of a broken steel strand had poked through the rubber hood into my hand. Ok... from that day on I've never routed campy cables using that routing... I always go the front route even though the bars may have guides (as in this case) at the back...
My first attempt at applying the Sugru to fill in the rear cable groove... looks a bit messy but it made for a very smooth round back of the bars which gets covered in tape anyway. Best thing about this stuff is that it actually sticks to the bars unlike the stuff I used before making it much easier to work with and tape things up later...
And now the left side.... roll it out...
And squish it down...
Done!
Colnago C64 - The Naked Build; Colnago C60 - PR99; Trek Koppenberg - Where Emonda and Domane Meet;
Unlinked Builds (searchable): Colnago C59 - 5 Years Later; Trek Emonda SL Campagnolo SR; Special Colnago EPQ
Unlinked Builds (searchable): Colnago C59 - 5 Years Later; Trek Emonda SL Campagnolo SR; Special Colnago EPQ
-
SuperDomestique
- Posts: 93
- Joined: Mon Sep 05, 2016 11:07 pm
Nice one Cal. Glad you got a C60 even though your EPS is near perfection. The C60 is a great riding frame, I look forward to your thoughts. Surely you don't have any tyre clearance issues now?
Beautiful pictures as usual.
I tried to order myself this colour c60 in a 55 when I started working with Colnago through my fit studio earlier this year and didn't get the answer I wanted.
I spoke to them about it again only last week, so shocked but also pleased to see this thread!
They would do me a run if I ordered enough of them buts it's too big a gamble for me in the numbers talked about. Hopefully the more quality we put out for them the more the min order number will come down and I can get a white beauty one day.
Not 100% sure on the masking lines between the white and carbon on fork and stats but not sure what else you could do with the fork moulding.
Like the top cap. A heavy handed mechanic cracked the one you sent me all those years ago..
Sorry to read about your crash. Hope the recovery is going well.
Elliott
The Brakes - Campy Dual Pivot both front and rear.
The brakes I'm using weren't brand new, so needed some cleaning up. In the process, I removed the little springy thingies that are the equivalent of lawyer tabs on forks. They of course are there to prevent brake pads from shooting out of the shoes when your favorite super duper expert mechanic installs them backwards (I guess it happens). Anyway, I've found them to be a royal pain in the ass when you want to replace or change pads, so I've opted to omit them on my personal bikes. I would never omit them on anyone else's bike that I was working on. Just sayin...
Cleaning.... and finger pointing at the little springy thingies that somehow did not find their way back on the bike...
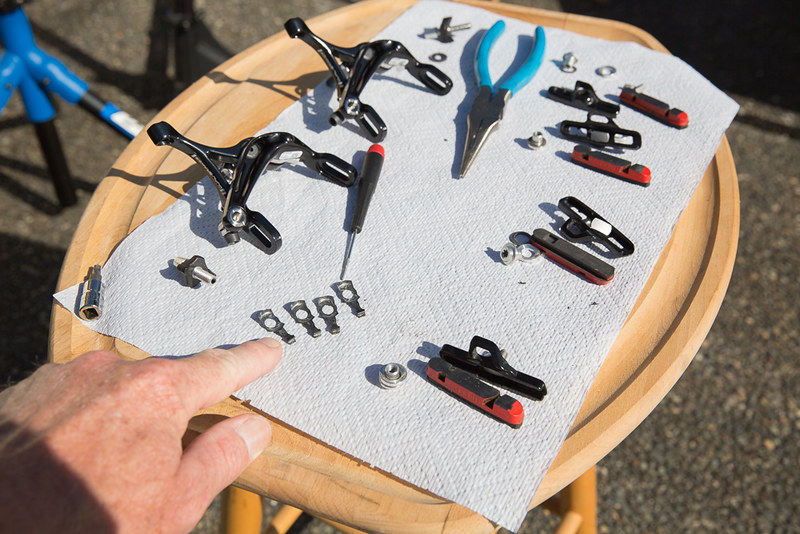
And.... mounted...
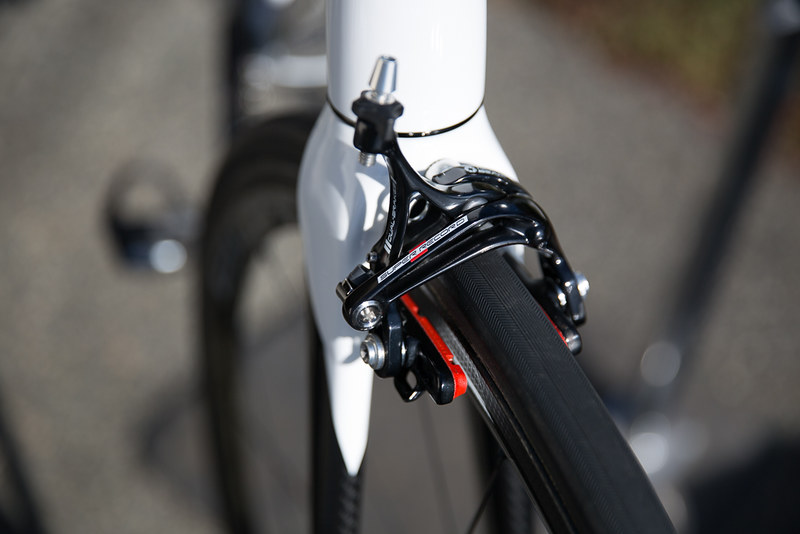
I like both front and rear to be the dual pivot design. They just work better. They stay centered, and if they're adjusted properly both pads contact the rim simultaneously which is much harder to achieve with the single pivot design. There is no more tire clearance with the single pivot design except at the very top center, but that is wasted because there is actually less side clearance when you apply the brakes as the sides of the single pivot arms come in sooner. I know this after having spent a winter years ago as the local friends expert road bike winter full fender installer. This was when carbon road forks in particular had really tight clearances and I took pride in cutting and drilling and fashioning full fenders that would fit my friend's road bikes. Not an easy task at the best of times. Anyway, at the rear, the single pivot design would more often than not squeeze the sides of the fender to the point I would have to cut slots by the arms and springs so they wouldn't squeeze the fenders onto the tire as the clearances were so damn tight. Silly. The single pivots are a few grams lighter, and despite the marketing, do not modulate better. They are just weaker. Good modulation comes from straight true rims, minimal cable friction, and smooth operating calipers and levers. And the dual pivot calipers are smoother.
The brakes I'm using weren't brand new, so needed some cleaning up. In the process, I removed the little springy thingies that are the equivalent of lawyer tabs on forks. They of course are there to prevent brake pads from shooting out of the shoes when your favorite super duper expert mechanic installs them backwards (I guess it happens). Anyway, I've found them to be a royal pain in the ass when you want to replace or change pads, so I've opted to omit them on my personal bikes. I would never omit them on anyone else's bike that I was working on. Just sayin...
Cleaning.... and finger pointing at the little springy thingies that somehow did not find their way back on the bike...
And.... mounted...
I like both front and rear to be the dual pivot design. They just work better. They stay centered, and if they're adjusted properly both pads contact the rim simultaneously which is much harder to achieve with the single pivot design. There is no more tire clearance with the single pivot design except at the very top center, but that is wasted because there is actually less side clearance when you apply the brakes as the sides of the single pivot arms come in sooner. I know this after having spent a winter years ago as the local friends expert road bike winter full fender installer. This was when carbon road forks in particular had really tight clearances and I took pride in cutting and drilling and fashioning full fenders that would fit my friend's road bikes. Not an easy task at the best of times. Anyway, at the rear, the single pivot design would more often than not squeeze the sides of the fender to the point I would have to cut slots by the arms and springs so they wouldn't squeeze the fenders onto the tire as the clearances were so damn tight. Silly. The single pivots are a few grams lighter, and despite the marketing, do not modulate better. They are just weaker. Good modulation comes from straight true rims, minimal cable friction, and smooth operating calipers and levers. And the dual pivot calipers are smoother.
Colnago C64 - The Naked Build; Colnago C60 - PR99; Trek Koppenberg - Where Emonda and Domane Meet;
Unlinked Builds (searchable): Colnago C59 - 5 Years Later; Trek Emonda SL Campagnolo SR; Special Colnago EPQ
Unlinked Builds (searchable): Colnago C59 - 5 Years Later; Trek Emonda SL Campagnolo SR; Special Colnago EPQ
-
SuperDomestique
- Posts: 93
- Joined: Mon Sep 05, 2016 11:07 pm
On the brakes - just grab the pad and pull it at 90 degrees to the shoe from one end of the pad, comes straight out if you've got guitarist strength fingers.
Slot the replacement in as normal.
Never need to touch those clips personally.
Slot the replacement in as normal.
Never need to touch those clips personally.
SuperDomestique wrote:Nice one Cal. Glad you got a C60 even though your EPS is near perfection. The C60 is a great riding frame, I look forward to your thoughts. Surely you don't have any tyre clearance issues now?
Beautiful pictures as usual.
I tried to order myself this colour c60 in a 55 when I started working with Colnago through my fit studio earlier this year and didn't get the answer I wanted.
I spoke to them about it again only last week, so shocked but also pleased to see this thread!
They would do me a run if I ordered enough of them buts it's too big a gamble for me in the numbers talked about. Hopefully the more quality we put out for them the more the min order number will come down and I can get a white beauty one day.
Not 100% sure on the masking lines between the white and carbon on fork and stats but not sure what else you could do with the fork moulding.
Like the top cap. A heavy handed mechanic cracked the one you sent me all those years ago..
Sorry to read about your crash. Hope the recovery is going well.
Elliott
@Elliot, no clearance issues on any of my bikes now, since the new Boras came out. They are just that little bit wider that a 25mm tubular sits lower without getting pushed up an extra millimeter or so more than necessary as they did in the narrower pre-2015 Boras. So, now all is perfect, clearance wise, on any of my Colnagos using 25's (tubulars), and certainly there is indeed more clearance, but not scads more on the C60. It is perfect for a 25mm tubular, but I think a 25mm Continental 4000S clincher mounted on say a wide ENVE rim may still be tight, probably still doable, but tight. Not really a concern to me however.
And re the masking lines you talk about... yes, this was one of the things I was a stickler about on my EPQ... I still wanted the clean Chevron graphics of the EPS. I looked at how they did the black/white transition on the C59 and wasn't digging it as I wanted still more of a classic look which I ultimately got on the EPQ. I think with this C60 they really got the graphics as nailed as possible. There is not a hint of marketing BS... (Q-stays, C-HS, Colnago Headset System, Structural Internal Routing) etc. Just clean lines and a few Colnago logos and panels. Plus, I like how they did the "C60" on both sides of the top tube that is readable from either side, versus the directional logo on the very top side of the top tube like they did on a lot of C59's. So... it's perfect as far as I'm concerned.
Last edited by Calnago on Fri Nov 11, 2016 11:01 pm, edited 1 time in total.
Colnago C64 - The Naked Build; Colnago C60 - PR99; Trek Koppenberg - Where Emonda and Domane Meet;
Unlinked Builds (searchable): Colnago C59 - 5 Years Later; Trek Emonda SL Campagnolo SR; Special Colnago EPQ
Unlinked Builds (searchable): Colnago C59 - 5 Years Later; Trek Emonda SL Campagnolo SR; Special Colnago EPQ
SuperDomestique wrote:On the brakes - just grab the pad and pull it at 90 degrees to the shoe from one end of the pad, comes straight out if you've got guitarist strength fingers.
Slot the replacement in as normal.
Never need to touch those clips personally.
Ha! it's that 90 degree pulling with gorilla strength that might end up chipping the other seatstay or fork upon releasing, no? But I haven't actually tried what you're talking about. I will next time and see how it goes. Just seems so barbaric
Colnago C64 - The Naked Build; Colnago C60 - PR99; Trek Koppenberg - Where Emonda and Domane Meet;
Unlinked Builds (searchable): Colnago C59 - 5 Years Later; Trek Emonda SL Campagnolo SR; Special Colnago EPQ
Unlinked Builds (searchable): Colnago C59 - 5 Years Later; Trek Emonda SL Campagnolo SR; Special Colnago EPQ
-
SuperDomestique
- Posts: 93
- Joined: Mon Sep 05, 2016 11:07 pm
It's not that difficult, they come out easy. It's all about having a good grip not how hard you pull.
Also just pull enough to get the pad half out and stop, then go back and gently release. They kinda peel back so it's easy to control, try it off the bike.
Oh and I can't reply to your pm, not enough posts I guess, email me and I'll answer your q.
Also just pull enough to get the pad half out and stop, then go back and gently release. They kinda peel back so it's easy to control, try it off the bike.
Oh and I can't reply to your pm, not enough posts I guess, email me and I'll answer your q.
Visit starbike.com Online Retailer for HighEnd cycling components
Great Prices ✓ Broad Selection ✓ Worldwide Delivery ✓
www.starbike.com
I never thought of removing the retention clips (springs) from my Campagnolo brake pad holders. Great idea. I have been prying my pads out with a tiny screwdriver to get started, then peeling the pad the rest of the way out. Somewhat of a pain when I was changing between the red (carbon) and black (aluminum) pads frequently.
Sent from my iPhone using Tapatalk
Sent from my iPhone using Tapatalk
It's all downhill from here, except for the uphills.


