Colnago C60 - Traditional PR99

Who are you (no off-topic talk please)

Moderators: MrCurrieinahurry, maxim809, Moderator Team

Post Reply
User avatar
Calnago
In Memoriam
Posts: 8612
Joined: Sun Nov 07, 2010 9:14 pm

by Calnago

deano87 wrote:Im still waiting to hear about how the jewellery turned out. haha

Image

Image

Image

Image
Colnago C64 - The Naked Build; Colnago C60 - PR99; Trek Koppenberg - Where Emonda and Domane Meet;
Unlinked Builds (searchable): Colnago C59 - 5 Years Later; Trek Emonda SL Campagnolo SR; Special Colnago EPQ

by Weenie


Visit starbike.com Online Retailer for HighEnd cycling components
Great Prices ✓    Broad Selection ✓    Worldwide Delivery ✓

www.starbike.com


carbontulip
Posts: 15
Joined: Thu Mar 31, 2011 2:45 pm

by carbontulip

Calnago wrote:You are fine with the 2015 stuff. And definitely use the newer cups (IC15-RE41). That clearance looks similar to mine and I’ve not had any touching. It’s solid. Keep in mind that with the older outboard cups the BB shells were only 68mm (eng) or 70mm (ita) wide and the chainstays joined up with the BB a lot closer together. With the wider shelled BB’s they can place the chainstays as far a part as practical. It doesn’t look like much clearance but that C60 BB lug doesn’t flex. Sleep well.
And yes, as you realize, with the pre 2010 rings and the male/female chainring bolts, it’s the backside of the bolts that can sometimes cause interference.
Oh, and throwing on a chaincatcher is always good insurance as well. I much prefer the K-Edge Pro over the supplied Colnago chaincatcher as the K-Edge has Independent mounting and adjustment bolts, versus just a single bolt that requires you to perfectly adjust the derailleur alignment and the chaincatcher alignment simultaneously.


Thanks, Calnago! That's perfect!

Exactly what I wanted to verify. My K Edge Pro catcher is also coming in on Wednesday so I can finally get this build going.

BTW, those IC15-RE41 cups took some moderate force to press - went in straight, no issues, but I felt like IC11-RE41 were mich easier to press in and out. I guess Colnago recommendation to use a dry method now make sense.

User avatar
Calnago
In Memoriam
Posts: 8612
Joined: Sun Nov 07, 2010 9:14 pm

by Calnago

Got a pic of the tool you used to press in the cups? Sounds like they went in nice and straight. Also, sounds like you removed some cups as well during the process as you tried out a few things... what tool did you use for that? You don’t really want to be removing and pressing in cups on a regular basis as the process shaves a micro bit of material each time. Does your C60 have the continuous alloy sleeve in the BB shell or does it have the more recent “two piece” BB shell where there’s a left and right insert? Don’t know when they made that change and I haven’t worked on any with the new style. Just wondering how deep each half goes in to the shell.
Colnago C64 - The Naked Build; Colnago C60 - PR99; Trek Koppenberg - Where Emonda and Domane Meet;
Unlinked Builds (searchable): Colnago C59 - 5 Years Later; Trek Emonda SL Campagnolo SR; Special Colnago EPQ

carbontulip
Posts: 15
Joined: Thu Mar 31, 2011 2:45 pm

by carbontulip

Calnago wrote:@Superdomestique: I can appreciate your "rule" of wanting 14cm of seat tube showing, but that's strictly an acquired taste and has zero affect on fit as you know. That said, I'd agree that 14cm is a nice rule of thumb on a frame my size for sure, albeit completely subjective. That's pretty much what it is shown currently. But if you measure from where the bottom of the seat collar clamp, basically where the white paint stops, then it's ~15cm. Also depends on choice of saddle, and its "stack height" and profile (is it a dipped saddle shape or more flat, etc). And of course, what one deems personally acceptable or not, aesthetically speaking.

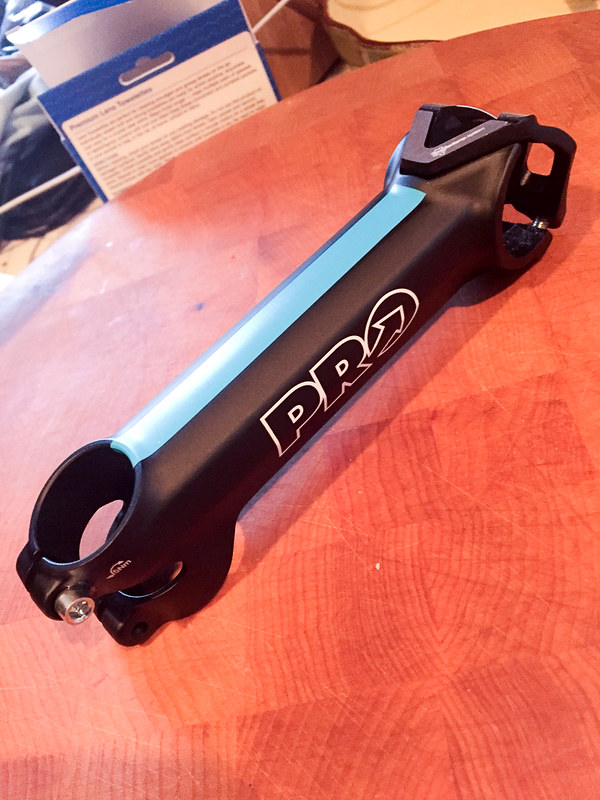
The issue I potentially had with the 59cm frame, versus my 61, was primarily about the reach difference (fit wise) versus my setup on the C59. The difference in handling is still very much an exploratory process and I'm looking forward to getting my C59 back to compare the handling differences, if any, more critically to see if I can tell what those small differences might be. The top tube is 9mm shorter on the C60, but they share the same seat tube angle. I played around a lot with stuff on my C59 and other bikes, and much preferred the fit I got with a 130mm stem over a 120mm stem. So, the 59cm frame would kind of put me back at that ealier fit, all else being equal. I decided to try it out for a while anyway, possibly even playing with my weight balance on the whole bike by moving the saddle a titch back and splitting the difference, just to experiment a bit. In the end, I got a 140mm stem to try out, which put my fit back to my identical position on my C59 and all is right with the world. It is a Team Sky stem (the only one I could find in a 140mm length), and I actually liked the "PRO" graphcis on the side, but could never live with the blue stripe on top, so I stripped that...

Image


In the end, I suppose it's a coin toss. On this bike (C60), I have more spacers under the stem and more seatpost showing versus my C59. On my C59, I have just one 3mm alloy spacer, and less seatpost. However, due to the fact that the seatpost and frame are both essentially the same carbon color, the seatpost on the C59 actually looks longer simply because your eye calculates from the color change of frame to seatpost, or if the color is the same, from the top tube, if that makes sense. If I had to choose one over the other, strictly on the basis of overall aesthetics (forget the paint scheme for a moment), I'd personally choose the C59. No... wait, the C60. No, uh... Lol.

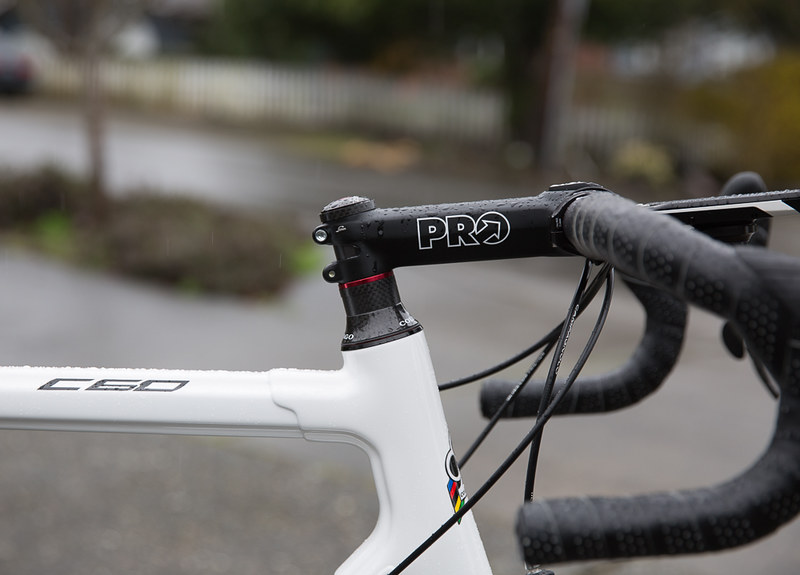
And here's the current setup... 140mm stem and fit feels like an old friend again.
Also, spacer stack now consists of 20mm total above the top cover (17mm carbon, 3mm alloy red "bit o' bling")...

Image

Image


Hey Calnago, noticed you have no Campy cable adjuster. I never felt there is a reason for them if your stuff dialed in just right. Are you in the same camp?

Thx

User avatar
Calnago
In Memoriam
Posts: 8612
Joined: Sun Nov 07, 2010 9:14 pm

by Calnago

Deleted and reposted below as the first post did not appear in Tapatalk correctly for some reason.
Last edited by Calnago on Wed Nov 15, 2017 8:07 pm, edited 4 times in total.
Colnago C64 - The Naked Build; Colnago C60 - PR99; Trek Koppenberg - Where Emonda and Domane Meet;
Unlinked Builds (searchable): Colnago C59 - 5 Years Later; Trek Emonda SL Campagnolo SR; Special Colnago EPQ

User avatar
Calnago
In Memoriam
Posts: 8612
Joined: Sun Nov 07, 2010 9:14 pm

by Calnago

carbontulip wrote:Hey Calnago, noticed you have no Campy cable adjuster. I never felt there is a reason for them if your stuff dialed in just right. Are you in the same camp?

Thx

The thing is, that "if" you mention is quite a big "if" when it comes to dialing in the front derailleur of a 2015+ front derailleur without the adjuster. Getting that front derailleur "dialed" is not the same task as setting up a pre 2015 derailleur, yet a lot of folks seem to go about it the same way. I omit the cable adjuster on my bikes only. For any bike that isn't mine, I always install it because dialing it in without it usually results in a front derailleur that is anything but "dialed in".

The tension on that cable is so important (which is why the cable adjuster was introduced in 2015) for proper shifting. When in the big ring, you should be able to cleanly use every cog in the back with no front derailleur rub.

A very brief description of how I dial it in is this:
1. Make absolutely sure the front derailleur is dead parallel to the front chain ring.
2. Back off the high limit screw so that it would be easy to throw the chain to the outside of the big chain ring (this ensures that it won't interfere with the next step.
3. Screw the lower limit screw in so that it pushes the derailleur cage out so that it almost touches the chain when the chain is on the big/big combo (crossed). Pull the derailleur out with your hand while you do this so as not to stress the threads on the lower limit screw anymore than necessary.
4. Using a fourth hand tool to pull the derailleur cable while it is loosely connected to the derailleur to get the tension just right. While doing this, the left lever should be in the 3rd click position (where it would be when the chain is on the big ring).
5. Using the fourth hand tool, ensure that the inner plate of the derailleur cage is about as close to the chain as you can get it without rubbing (with the chain in the big/big combo). Tighten down the cable pinch bolt enough so that it holds while you test it out.
6. Back off the lower limit screw so that the derailleur can move to it's lowest position and be in the small/small combo.
7. Shift the left button two clicks in one fell swoop to shift chain to the small ring. There should still be rubbing if the chain is on the biggest rear cog. This is by design... as the 2015+ front shifter has a bar in it that prevents a complete throw (unlike pre 2015 shifters), thus greatly reducing the chance of a chain drop on the inside. One more click will get the derailleur to the lowest position. Make sure the lower limit is backed off enough to allow the derailleur to move all the way over. If the cable tension is too tight, it won't go far enough over and you will have to slacken off the tension a bit by going through the above process again. NOW, if you had the cable adjuster installed, you would just use that to both tighten and loosen it enough to get it perfectly adjusted. So, this is why the cable adjuster is so important. Because until you have a lot experience setting it up without the cable adjuster, it's just a whole lot easier with it.
8. If the small/small runs cleanly with no derailleur rub, then set the lower limit screw to where it needs to be at that point.
9. Ok, now play with some testing. From the small/small (and the front shifter at it's lowest point with no more button pushes available), it should take exactly three clicks to move the chain to the big ring while still on the largest cog. Once there, there should be no rub, and if you want to ride big/big, go for it, any cog, any time.
10. Move the rear derailleur all the way down to the smallest cog. Now, shift back and forth between the big and small ring. It should do this easily. Once satisfied that you can get to the big ring easily from anywhere no matter where the chain is on the cassette, then set the upper limit screw as the last step while on the big ring and smallest cog. Test again, to make sure you can still easily get to the big ring from the small ring no matter where the chain is on the rear.
11. The front derailleur will require either 1,2, or 3 clicks to move from the small ring to the large ring, depending on where the front shifter was at the time. One test I like to do is to move the chain to the smallest cog while on the small ring. Shift the front shifter two clicks, not three. It should not have shifted to the big ring, but the small/small combo should be running cleanly. Now, while the chain is in small/small and the front shifter is in it's second click position, give it one more click to ensure that that's all it needs to move the chain from the small ring to the big ring. If it does, you're golden, pat yourself on the back and go have a beer. I like this last test, because moving the chain to the big ring from the small ring while the chain is on the small rear cog is sometimes the most difficult, and if you can do this easily with just that final last 3rd click, as opposed to a full sweep of the lever, then you know you've got it pretty well dialed.
12. Everything should be good and stay that way for a long time. I've found campy derailleur cables stretch very little if at all. But on a new build, I still usually like to leave the chain on the big ring up front, and somewhere in the middle to larger cogs of the cassette when not in use for about a week, just so that there is always some tension on the cable just to allow things to settle in at the beginning. Once settled, and you're sure no more adjustment is required I generally leave the drive chain in the small/small combo when not in use just to let everything be as "relaxed" as possible. No plug in required.

I think I meant to outline these steps somewhere in the thread but then thought it might just add to the confusion for most people. I can pretty easily set up a system without the inline adjuster first time through at this point, but concede that it is a whole lot easier to do with it installed. I just don't like it on my bike for aesthetic reasons... kind of like the junction box and loose wires faffing about on electric systems.

[Edit]: Hmmm, for whatever reason this post isn’t showing up correctly in Tapatalk and missing almost all of the content. Yet it seems to show up fine on the full web version on my computer. Oh well... one of life’s mysteries which I can’t be bothered to solve right now.
Colnago C64 - The Naked Build; Colnago C60 - PR99; Trek Koppenberg - Where Emonda and Domane Meet;
Unlinked Builds (searchable): Colnago C59 - 5 Years Later; Trek Emonda SL Campagnolo SR; Special Colnago EPQ

fogman
Posts: 1067
Joined: Fri Oct 30, 2009 10:36 pm

by fogman

Your post showed up fine on my Tapatalk before you deleted it.


Sent from my iPhone using Tapatalk
It's all downhill from here, except for the uphills.

User avatar
Calnago
In Memoriam
Posts: 8612
Joined: Sun Nov 07, 2010 9:14 pm

by Calnago

Hmmm... that’s weird. It’s still not showing up correctly on mine. Were you able to see a dissertation of 12 points where I described the set up? All I see is the guys quote I was responding to and my post starting with “I think I meant to outline...”
but most of what I wrote came before that.
Colnago C64 - The Naked Build; Colnago C60 - PR99; Trek Koppenberg - Where Emonda and Domane Meet;
Unlinked Builds (searchable): Colnago C59 - 5 Years Later; Trek Emonda SL Campagnolo SR; Special Colnago EPQ

User avatar
alistaird
Posts: 279
Joined: Thu Jul 21, 2016 8:21 pm

by alistaird

Calnago wrote:Hmmm... that’s weird. It’s still not showing up correctly on mine. Were you able to see a dissertation of 12 points where I described the set up? All I see is the guys quote I was responding to and my post starting with “I think I meant to outline...”
but most of what I wrote came before that.
I can see the 12 points...

A

Sent from my SGP312 using Tapatalk

carbontulip
Posts: 15
Joined: Thu Mar 31, 2011 2:45 pm

by carbontulip

Calnago wrote:
carbontulip wrote:Hey Calnago, noticed you have no Campy cable adjuster. I never felt there is a reason for them if your stuff dialed in just right. Are you in the same camp?

Thx

The thing is, that "if" you mention is quite a big "if" when it comes to dialing in the front derailleur of a 2015+ front derailleur without the adjuster. Getting that front derailleur "dialed" is not the same task as setting up a pre 2015 derailleur, yet a lot of folks seem to go about it the same way. I omit the cable adjuster on my bikes only. For any bike that isn't mine, I always install it because dialing it in without it usually results in a front derailleur that is anything but "dialed in".

The tension on that cable is so important (which is why the cable adjuster was introduced in 2015) for proper shifting. When in the big ring, you should be able to cleanly use every cog in the back with no front derailleur rub.

A very brief description of how I dial it in is this:
1. Make absolutely sure the front derailleur is dead parallel to the front chain ring.
2. Back off the high limit screw so that it would be easy to throw the chain to the outside of the big chain ring (this ensures that it won't interfere with the next step.
3. Screw the lower limit screw in so that it pushes the derailleur cage out so that it almost touches the chain when the chain is on the big/big combo (crossed). Pull the derailleur out with your hand while you do this so as not to stress the threads on the lower limit screw anymore than necessary.
4. Using a fourth hand tool to pull the derailleur cable while it is loosely connected to the derailleur to get the tension just right. While doing this, the left lever should be in the 3rd click position (where it would be when the chain is on the big ring).
5. Using the fourth hand tool, ensure that the inner plate of the derailleur cage is about as close to the chain as you can get it without rubbing (with the chain in the big/big combo). Tighten down the cable pinch bolt enough so that it holds while you test it out.
6. Back off the lower limit screw so that the derailleur can move to it's lowest position and be in the small/small combo.
7. Shift the left button two clicks in one fell swoop to shift chain to the small ring. There should still be rubbing if the chain is on the biggest rear cog. This is by design... as the 2015+ front shifter has a bar in it that prevents a complete throw (unlike pre 2015 shifters), thus greatly reducing the chance of a chain drop on the inside. One more click will get the derailleur to the lowest position. Make sure the lower limit is backed off enough to allow the derailleur to move all the way over. If the cable tension is too tight, it won't go far enough over and you will have to slacken off the tension a bit by going through the above process again. NOW, if you had the cable adjuster installed, you would just use that to both tighten and loosen it enough to get it perfectly adjusted. So, this is why the cable adjuster is so important. Because until you have a lot experience setting it up without the cable adjuster, it's just a whole lot easier with it.
8. If the small/small runs cleanly with no derailleur rub, then set the lower limit screw to where it needs to be at that point.
9. Ok, now play with some testing. From the small/small (and the front shifter at it's lowest point with no more button pushes available), it should take exactly three clicks to move the chain to the big ring while still on the largest cog. Once there, there should be no rub, and if you want to ride big/big, go for it, any cog, any time.
10. Move the rear derailleur all the way down to the smallest cog. Now, shift back and forth between the big and small ring. It should do this easily. Once satisfied that you can get to the big ring easily from anywhere no matter where the chain is on the cassette, then set the upper limit screw as the last step while on the big ring and smallest cog. Test again, to make sure you can still easily get to the big ring from the small ring no matter where the chain is on the rear.
11. The front derailleur will require either 1,2, or 3 clicks to move from the small ring to the large ring, depending on where the front shifter was at the time. One test I like to do is to move the chain to the smallest cog while on the small ring. Shift the front shifter two clicks, not three. It should not have shifted to the big ring, but the small/small combo should be running cleanly. Now, while the chain is in small/small and the front shifter is in it's second click position, give it one more click to ensure that that's all it needs to move the chain from the small ring to the big ring. If it does, you're golden, pat yourself on the back and go have a beer. I like this last test, because moving the chain to the big ring from the small ring while the chain is on the small rear cog is sometimes the most difficult, and if you can do this easily with just that final last 3rd click, as opposed to a full sweep of the lever, then you know you've got it pretty well dialed.
12. Everything should be good and stay that way for a long time. I've found campy derailleur cables stretch very little if at all. But on a new build, I still usually like to leave the chain on the big ring up front, and somewhere in the middle to larger cogs of the cassette when not in use for about a week, just so that there is always some tension on the cable just to allow things to settle in at the beginning. Once settled, and you're sure no more adjustment is required I generally leave the drive chain in the small/small combo when not in use just to let everything be as "relaxed" as possible. No plug in required.

I think I meant to outline these steps somewhere in the thread but then thought it might just add to the confusion for most people. I can pretty easily set up a system without the inline adjuster first time through at this point, but concede that it is a whole lot easier to do with it installed. I just don't like it on my bike for aesthetic reasons... kind of like the junction box and loose wires faffing about on electric systems.

[Edit]: Hmmm, for whatever reason this post isn’t showing up correctly in Tapatalk and missing almost all of the content. Yet it seems to show up fine on the full web version on my computer. Oh well... one of life’s mysteries which I can’t be bothered to solve right now.


That is solid set of instructions! Thanks a lot! Didn't even realize it's that invloved - well... now I know.

You should the Head of Campy Tech Writing Department - it's ridiculous how scarce their instructions are - almost no info and the info that is IN there makes my brain hurt

User avatar
Calnago
In Memoriam
Posts: 8612
Joined: Sun Nov 07, 2010 9:14 pm

by Calnago

carbontulip wrote:That is solid set of instructions! Thanks a lot! Didn't even realize it's that invloved - well... now I know.

You should the Head of Campy Tech Writing Department - it's ridiculous how scarce their instructions are - almost no info and the info that is IN there makes my brain hurt

Keep in mind that omitting the inline cable adjuster in the post 2015 mechanical front derailleur is NOT what Campy recommends or instructs, simply because to dial it in without it does take some understanding of how it all works (it's not like pre 2015 stuff) and possibly some trial and error in the process I describe above. While I can probably dial it in this way just as fast with or without the inline adjuster, it took some time to work through the method and get a feel for knowing exactly where to "set" the derailleur and to know how much tension should be on the cable at that point. My recommendation to most: Use the inline adjuster.

And regarding the instructions from Campy... what comes in the retail boxes these days are just really some very simplistic "user notes". But they have a wealth of Tech Docs on their website (like most companies), and some very good instructional videos. I agree that sometimes stuff gets lost in the translation from Italian to English for sure, so some prior knowledge is always helpful on the occasion where you need to ascertain what they "meant to say".

But generally, I find the tech docs to be quite good as are their videos. Check them out if you haven't. And try to think through the why's when learning how to do something as opposed to just doing it by rote. There is a user on here that insists that you MUST install the C-clip in the drive side cup of the Utratorque cranks before attaching the NDS crank etc. and if you don't then you have installed it incorrectly. Why? "Because that's what the instructions say". This is bollocks. It makes zero operational difference when you install the c-lip, but I can give more reasons why I prefer to install it as the last step in the crank installation rather than at the beginning (where the sole reason for doing it then would be to prevent the drive side crank from falling out when inserting the NDS crank). In fact, if you watch their installation video closely, they install the c-clip after the whole crank has been torqued down. Gasp... I'm surprised it didn't blow up while filming.

Another instructional confusion that was sometimes hard to explain to the "by rote" crowd was when Ultratorque first came out and the instructions stated that using Loctite and hand tightening the BB cups (in a threaded system) was the "preferred method" versus torquing the cups to a nice solid 35Nm (without Loctite). The reason for that was simply that too many times the mechanics were marring up the cups using crude tools etc., creating a less than pleasant experience explaining to the customer why his brand new bike is all scratched up on the cups. Ha. There's good fitting BB cup tools these days and now they actually have a video or diagram on their site describing the hand tightening method as the "Inferior" method with a big circle and line through it. Pretty funny. It took way too long for Campy to remove that "preferred method" statement from their instructions. Please don't use the now "inferior method'. Use a torque wrench to 35Nm.
Colnago C64 - The Naked Build; Colnago C60 - PR99; Trek Koppenberg - Where Emonda and Domane Meet;
Unlinked Builds (searchable): Colnago C59 - 5 Years Later; Trek Emonda SL Campagnolo SR; Special Colnago EPQ

carbontulip
Posts: 15
Joined: Thu Mar 31, 2011 2:45 pm

by carbontulip

Calnago wrote:
carbontulip wrote:That is solid set of instructions! Thanks a lot! Didn't even realize it's that invloved - well... now I know.

You should the Head of Campy Tech Writing Department - it's ridiculous how scarce their instructions are - almost no info and the info that is IN there makes my brain hurt

Keep in mind that omitting the inline cable adjuster in the post 2015 mechanical front derailleur is NOT what Campy recommends or instructs, simply because to dial it in without it does take some understanding of how it all works (it's not like pre 2015 stuff) and possibly some trial and error in the process I describe above. While I can probably dial it in this way just as fast with or without the inline adjuster, it took some time to work through the method and get a feel for knowing exactly where to "set" the derailleur and to know how much tension should be on the cable at that point. My recommendation to most: Use the inline adjuster.

And regarding the instructions from Campy... what comes in the retail boxes these days are just really some very simplistic "user notes". But they have a wealth of Tech Docs on their website (like most companies), and some very good instructional videos. I agree that sometimes stuff gets lost in the translation from Italian to English for sure, so some prior knowledge is always helpful on the occasion where you need to ascertain what they "meant to say".

But generally, I find the tech docs to be quite good as are their videos. Check them out if you haven't. And try to think through the why's when learning how to do something as opposed to just doing it by rote. There is a user on here that insists that you MUST install the C-clip in the drive side cup of the Utratorque cranks before attaching the NDS crank etc. and if you don't then you have installed it incorrectly. Why? "Because that's what the instructions say". This is bollocks. It makes zero operational difference when you install the c-lip, but I can give more reasons why I prefer to install it as the last step in the crank installation rather than at the beginning (where the sole reason for doing it then would be to prevent the drive side crank from falling out when inserting the NDS crank). In fact, if you watch their installation video closely, they install the c-clip after the whole crank has been torqued down. Gasp... I'm surprised it didn't blow up while filming.

Another instructional confusion that was sometimes hard to explain to the "by rote" crowd was when Ultratorque first came out and the instructions stated that using Loctite and hand tightening the BB cups (in a threaded system) was the "preferred method" versus torquing the cups to a nice solid 35Nm (without Loctite). The reason for that was simply that too many times the mechanics were marring up the cups using crude tools etc., creating a less than pleasant experience explaining to the customer why his brand new bike is all scratched up on the cups. Ha. There's good fitting BB cup tools these days and now they actually have a video or diagram on their site describing the hand tightening method as the "Inferior" method with a big circle and line through it. Pretty funny. It took way too long for Campy to remove that "preferred method" statement from their instructions. Please don't use the now "inferior method'. Use a torque wrench to 35Nm.


Thanks! Yes, I've been building Campy-only bikes for 20+ years and ore than familiar with how words in instructions are translated 'directly' :)

EJAColnago
Posts: 1
Joined: Mon Feb 29, 2016 3:56 pm

by EJAColnago

I just came across this thread.

The PR99 color scheme is stunning. My own C59 is in the PR99 scheme and it is my favorite.

My C60 is in the MHWH scheme, it is beautiful, but the C59 geats far more looks and comments.

Thank you for posting the pictures and details of your build.

User avatar
Ringo
Posts: 168
Joined: Tue Jan 23, 2018 10:06 am

by Ringo

I didn’t know where to ask this..
My c60 arrived and before I set it up I want to put some frame protection first.
The color is plg6 and it’s mostly white.
I cannot find anywhere the chainstay from lizard skins.
I looked shelter tape from effetto mariposa in order to put some on the “hot spots”.
Since yours is white, which are the usual places that I have to protect?
XXTi
C60

User avatar
Calnago
In Memoriam
Posts: 8612
Joined: Sun Nov 07, 2010 9:14 pm

by Calnago

I don't know where you live but REI sells the Lizard Skins "Carbon Leather" chainstay protector in the USA. Or you can order directly from Lizard Skin. I've done that before.
As for putting clear wrap on your nice new frame... do what you want, but I hate that stuff all over a frame. What are you protecting it for... resale? I think that stuff looks like s#&t and the edges will always get outlined with a fine line of dirt. I remember my mom used to leave the cellophane wrap on new lampshades she bought. I think I was a teenager before I realized that those lamps in my room should have the cellophane removed. Or the old ladies that would cover their fine couch in a hard plastic cover to "protect it". Ha. For what? In the meantime, nothing says comfy in the summer like laying down on your fine couch with a layer of plastic between you and the fabric. It's a bike first and foremost. Even nice bikes get scratched now and then. Do your best to take care of it for sure, but it is a bike first and foremost. You would probably be surprised at some of the crap I've ridden my nicest bikes through. The only place on a bike I'd even consider using that is maybe where unavoidable cable housing rub on the frame would quickly rub through the paint otherwise. To each his own.
Colnago C64 - The Naked Build; Colnago C60 - PR99; Trek Koppenberg - Where Emonda and Domane Meet;
Unlinked Builds (searchable): Colnago C59 - 5 Years Later; Trek Emonda SL Campagnolo SR; Special Colnago EPQ

by Weenie


Visit starbike.com Online Retailer for HighEnd cycling components
Great Prices ✓    Broad Selection ✓    Worldwide Delivery ✓

www.starbike.com


Post Reply