

Nice bike, really like it!
Can you give us the weight of that use stem?
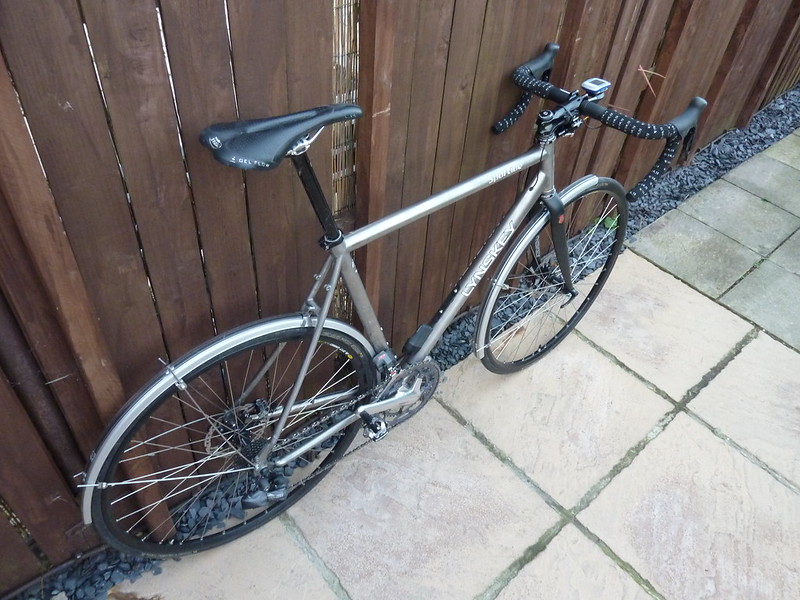
Lynskey Sportive Disc, Hydraulics and Di2
Moderators: MrCurrieinahurry, maxim809, Moderator Team


Visit starbike.com Online Retailer for HighEnd cycling components
Great Prices ✓ Broad Selection ✓ Worldwide Delivery ✓
www.starbike.com
Thanks! 
The USE stem is 160g in the 110mm length that I have. Not super light, but its looks and 'solidity' make up for that in my opinion. I have a Thomson on my Soloist and I really wanted another one, but I actually prefer the USE now.
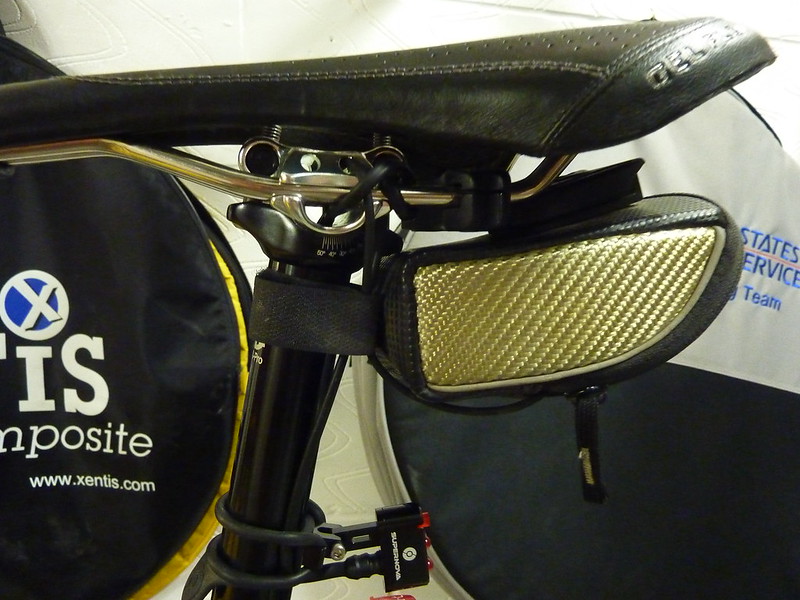
Had a real job wondering what to do with the Di2 junction A wiring. Cable-tying it to the side of the stem with a bit of bar tape in between will have to do for now! At least it's easy to check the battery condition.
The USE stem is 160g in the 110mm length that I have. Not super light, but its looks and 'solidity' make up for that in my opinion. I have a Thomson on my Soloist and I really wanted another one, but I actually prefer the USE now.
Had a real job wondering what to do with the Di2 junction A wiring. Cable-tying it to the side of the stem with a bit of bar tape in between will have to do for now! At least it's easy to check the battery condition.

Really enjoyed reading your build thread. Thanks for posting all the progress photos etc. with the little write-ups about how you did it and why, as well as describing the harder parts. Show some pics again when it's all fendered up. Or as you say over there... mudguards.
Colnago C64 - The Naked Build; Colnago C60 - PR99; Trek Koppenberg - Where Emonda and Domane Meet;
Unlinked Builds (searchable): Colnago C59 - 5 Years Later; Trek Emonda SL Campagnolo SR; Special Colnago EPQ
Unlinked Builds (searchable): Colnago C59 - 5 Years Later; Trek Emonda SL Campagnolo SR; Special Colnago EPQ
Thanks. It's good to hear that some one is reading (and enjoying) all my ranting and raving. I've been posting on a UK-based site andjust noticed that a couple of the posts relating to the brake setup are missing from this thread.
Check it out here if you're interested: http://www.bikeradar.com/forums/viewtop ... t=12943271
'Fendering-up' happens tomorrow,
Check it out here if you're interested: http://www.bikeradar.com/forums/viewtop ... t=12943271
'Fendering-up' happens tomorrow,
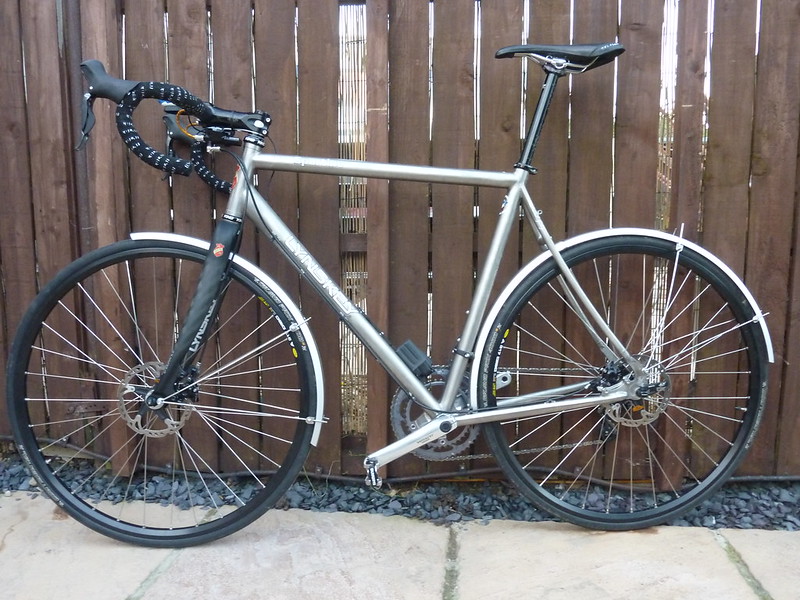
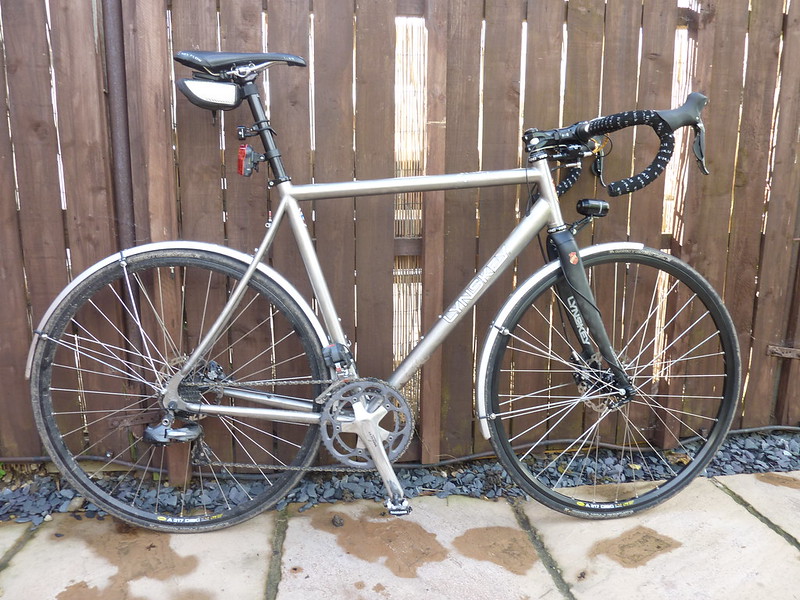
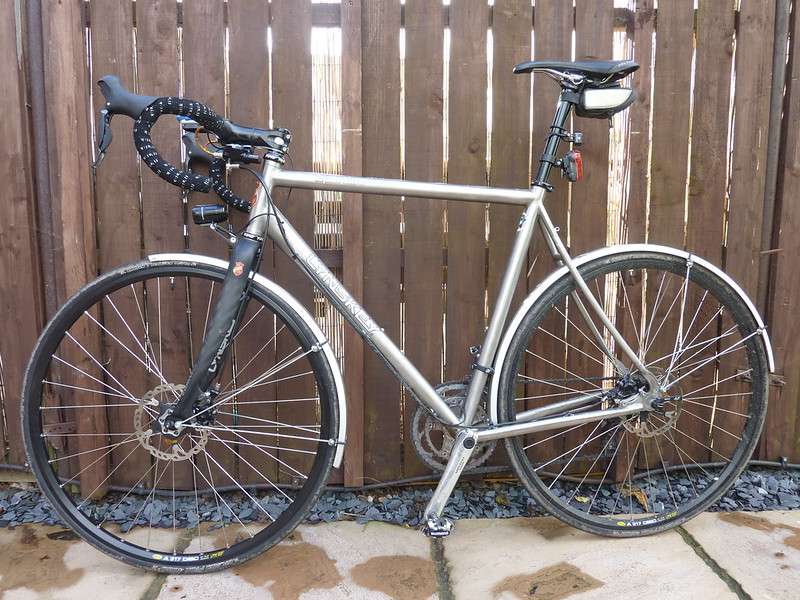
I fitted the mudguards last night - a bit if a fiddly operation as the massive mud clearance and disk brake means that numerous spacers need to be employed. I fitted the reinforcement piece from one of my old SKS guards to bring the front mudguard down nearer the wheel and had to use an M8 nut to space out the rear one. I've ordered some nylon spacers to tidy it all up as it looks a real mess. Anyway here is the Lynskey now:
I've also ordered my dynamo lights, so I'm really looking forward to getting those!
I've also ordered my dynamo lights, so I'm really looking forward to getting those!
My Supernova lights and dynamo hub showed up today! Almost, but not quite, as exciting as getting the frame. It's seriously nicely made kit. Almost worth the incredible price. The rear light is tiny, about as big as a USB plug.

Supernova package their products in an incredibly neat metal tin with thick foam around it. Overkill in one sense, but at least the kit inside arrived in perfect condition. It doesn't look like it'll be too much of a fiddle to fit, and connectors are included. A job for the weekend I think.
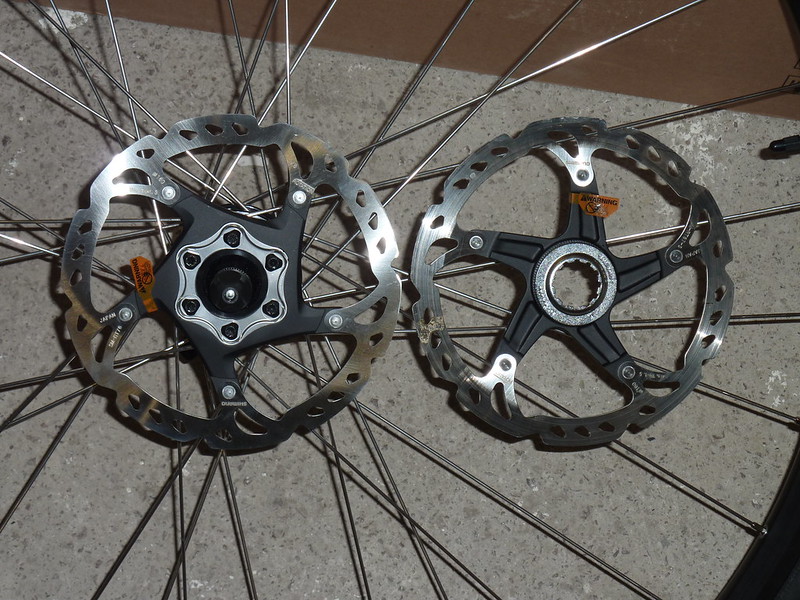
Also a job for the weekend is rebuilding the rim on to the new hub. I'm surprised how much resistance the hub generates when turning. Hopefully this won't be so bad out on the road. The hub is 6-bolt as well, which has meant that I've ordered a matching 6-bolt SLX rotor.
For my own future reference, the wheel numbers are:
A317 rim dimensions
ERD = 600mm
SP PD-8 hub dimensions
Hub length (K)=100
Centre of hub to Left flange (Ka) = 25mm
Centre of hub to Right flange (Kb) = 25mm
Diameter (gear) = 52mm
Diameter (non-gear) = 58mm
Spoke length (3x) L = 292, R = 293
XT hub dimensions
Hub length (K)=100
Centre of hub to Left flange (Ka) = 22.7mm
Centre of hub to Right flange (Kb) = 34.2mm
Diameter (gear) = 44.2mm
Diameter (non-gear) = 44.1mm
Spoke length (3x) L = 292, R = 293
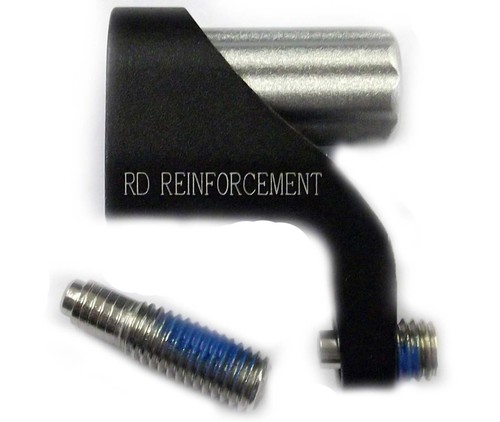
I'm also pondering whether to get a rear mech protector, a bit like this one:
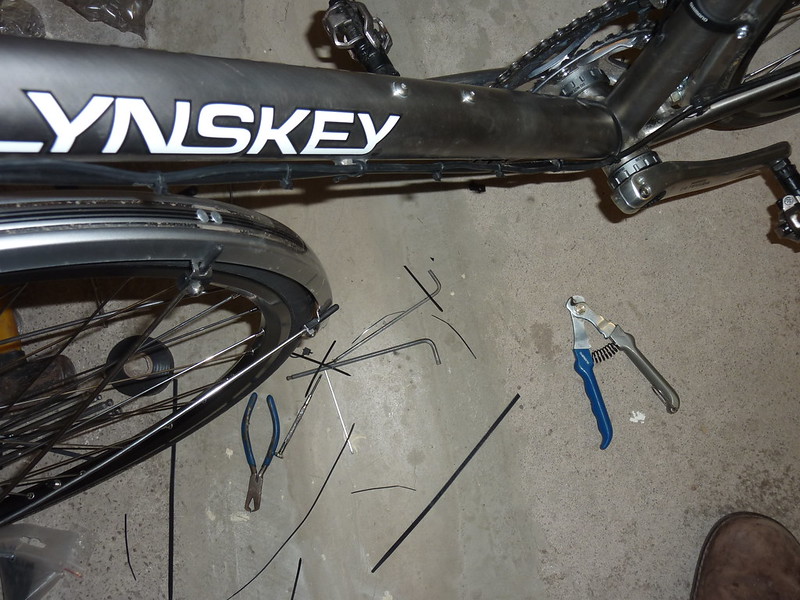
Another job that I need to do pronto is chop off the excess mudguard stays. As a guy at work pointed out to me, at the moment they're about as safe as Boadicea's chariot.
Supernova package their products in an incredibly neat metal tin with thick foam around it. Overkill in one sense, but at least the kit inside arrived in perfect condition. It doesn't look like it'll be too much of a fiddle to fit, and connectors are included. A job for the weekend I think.
Also a job for the weekend is rebuilding the rim on to the new hub. I'm surprised how much resistance the hub generates when turning. Hopefully this won't be so bad out on the road. The hub is 6-bolt as well, which has meant that I've ordered a matching 6-bolt SLX rotor.
For my own future reference, the wheel numbers are:
A317 rim dimensions
ERD = 600mm
SP PD-8 hub dimensions
Hub length (K)=100
Centre of hub to Left flange (Ka) = 25mm
Centre of hub to Right flange (Kb) = 25mm
Diameter (gear) = 52mm
Diameter (non-gear) = 58mm
Spoke length (3x) L = 292, R = 293
XT hub dimensions
Hub length (K)=100
Centre of hub to Left flange (Ka) = 22.7mm
Centre of hub to Right flange (Kb) = 34.2mm
Diameter (gear) = 44.2mm
Diameter (non-gear) = 44.1mm
Spoke length (3x) L = 292, R = 293
I'm also pondering whether to get a rear mech protector, a bit like this one:
Another job that I need to do pronto is chop off the excess mudguard stays. As a guy at work pointed out to me, at the moment they're about as safe as Boadicea's chariot.
I chopped off the excess mudguard stay and fitted my rear lights this evening. For dual redundancy I fitted a Smart 0.5W Lunar R1 as well, which somewhat dwarfs the Supernova rear light. I was pleased how neat the wiring turned out.
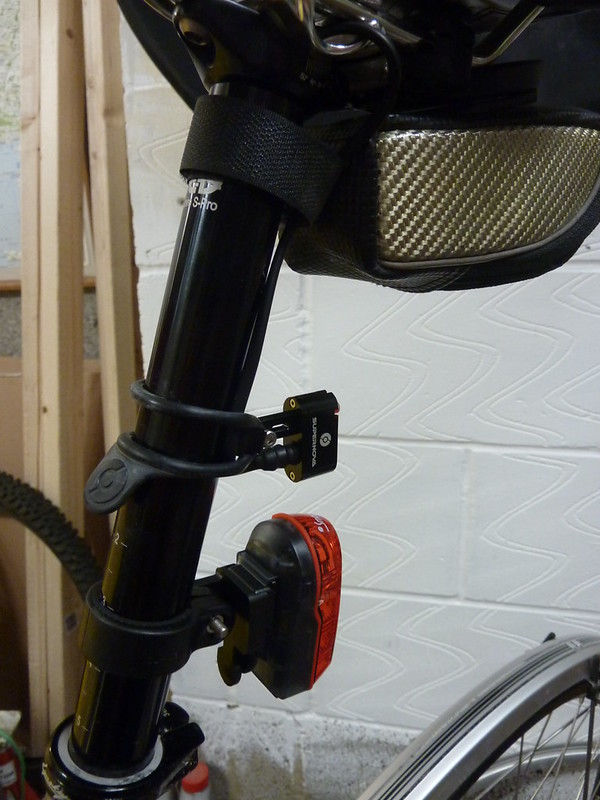
I think that I might reposition the Di2 battery into the saddle bag too. The downtube mount rattles (as do the brake levers).
I think that I might reposition the Di2 battery into the saddle bag too. The downtube mount rattles (as do the brake levers).
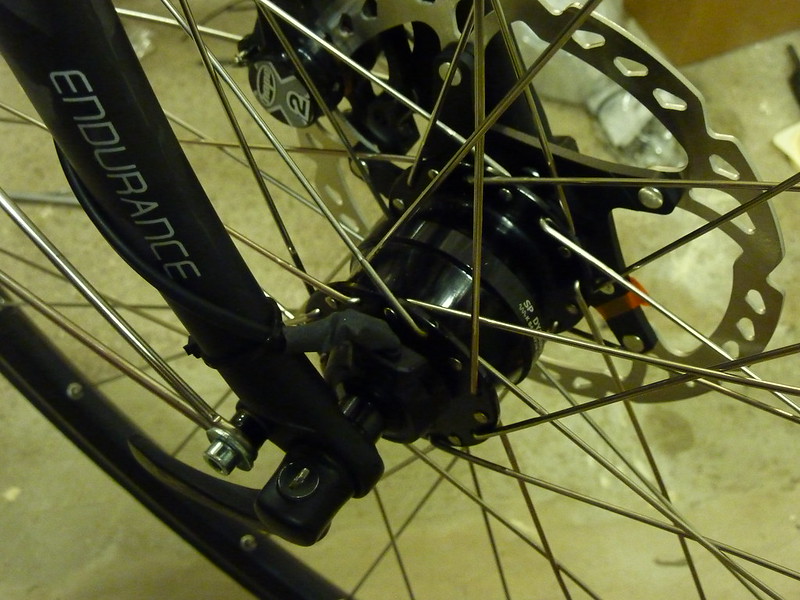
I dismantled and rebuilt my front wheel with the new dynamo hb last night. As predicted the spokes are the same length as those needed for the XT centre-lock hub. A fairly straightforward build made a lot more diffcult by the unwillingnss of the hub to spin with the generator inside. Unfortunately, when the wheel was in the fork, the non-gear side spokes snagged on the brake caliper, so I've had to dish the wheel a bit to give some clearance. I may even move the rotor out with some 1mm washers, but this doesn't quite feel like the right thing to do. Annoying. I guess that not many people run X2 calipers with 160mm rotors, road wheels and dynamo hubs yet.
I really like the design of the centre-lock disc rotor and was a bit disappointed that Shimano have had to beef up the alloy carrier for the 6-bolt version so much.
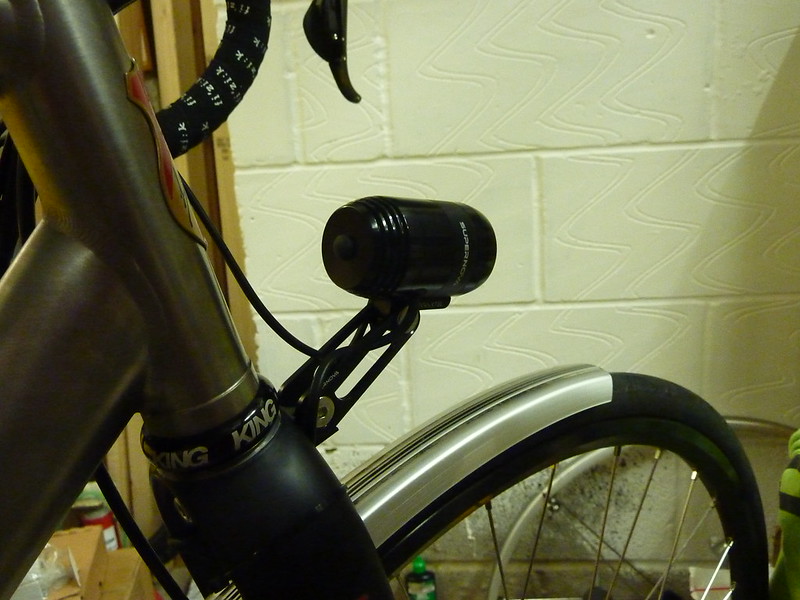
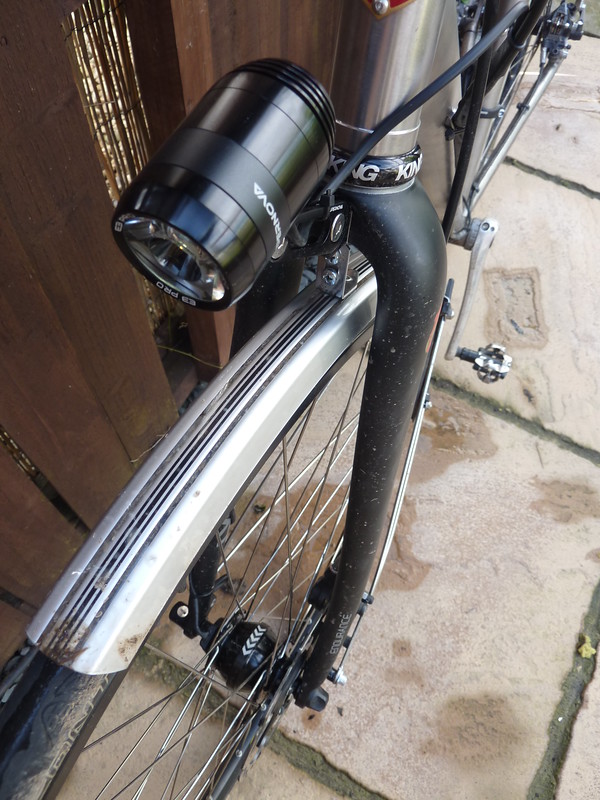
I also fitted my front light in readiness for the clocks changing soon. This is an uber-quality bit of kit and is SOLID! Seems to work okay too and I'm looking forward t giving it a road test.
I really like the design of the centre-lock disc rotor and was a bit disappointed that Shimano have had to beef up the alloy carrier for the 6-bolt version so much.
I also fitted my front light in readiness for the clocks changing soon. This is an uber-quality bit of kit and is SOLID! Seems to work okay too and I'm looking forward t giving it a road test.
-
jekyll man

- Posts: 1570
- Joined: Wed Apr 25, 2007 10:23 am
- Location: Pack filler
Nice documented build, and a nice practical bike 
However....
Your original wheels appear to be laced wrong. Valves not in a "proper" spoke gap.
Lets get it all right
However....
Your original wheels appear to be laced wrong. Valves not in a "proper" spoke gap.
Lets get it all right
Official cafe stop tester

This is by far my most favourite build thread right now! Low the documentation and love the build. I wish i had a bike like that to use through the worst months of the year 
"Stay cool and try to survive" A. Klier to the other members of the Garmin classics squad the night before P-R.
I spent this evening wiring in the rear light to my dynamo system. The strategy was to relocate the Di2 battery to the saddlebag (after turfing out my spare tube and CO2 canister) and route the power cable down the downtube and into the frame via the hole vacated by the battery wire.
Easy enough, but it meant that the bottom bracket and cranks had to be removed.
I had a spare 1400mm Di2 wire, which I threaded into the top of the seat post and then into the frame. After a bit of fiddling about the wires popped out and I managed to plug them in. I decided to use a 'chocolate block' to connect the two ends of the rear light cable, the reason being that only the bare ends would fit through the hole in the frame and I didn't want to have to chop off the fancy connector should I even need to remove the light. It's all inside so fingers crossed it won't come loose or break.
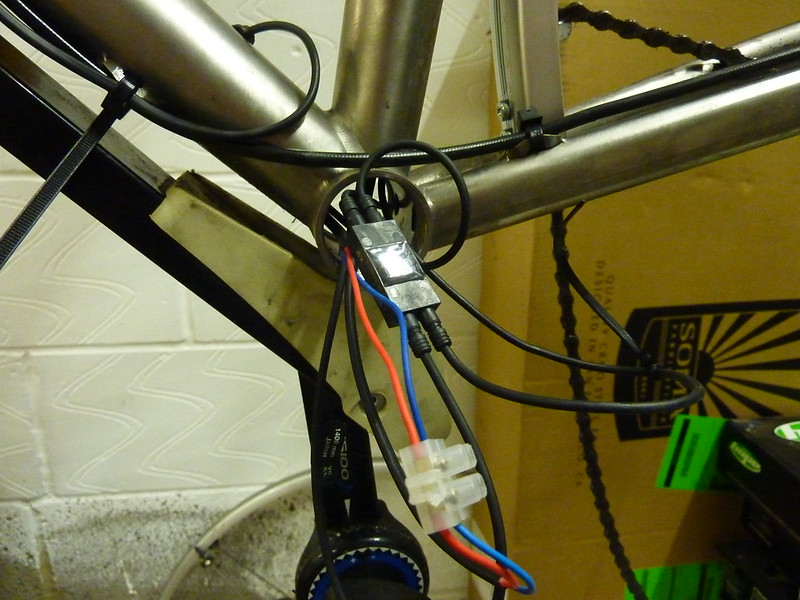
Shoving this lot inside was a bit tricky, but it's neater than it was before.

I then hooked up the Di2 battery the the harness and tidied the wires around the saddle area.
And then attached the cable to the brake hose using cable-ties.
I hate how all these cable-ties look and might re-do it with insulation tape or heat-shrink soon.
The forecast is for torrential rain tomorrow, so it'll be interesting to see how the bike performs.
Easy enough, but it meant that the bottom bracket and cranks had to be removed.
I had a spare 1400mm Di2 wire, which I threaded into the top of the seat post and then into the frame. After a bit of fiddling about the wires popped out and I managed to plug them in. I decided to use a 'chocolate block' to connect the two ends of the rear light cable, the reason being that only the bare ends would fit through the hole in the frame and I didn't want to have to chop off the fancy connector should I even need to remove the light. It's all inside so fingers crossed it won't come loose or break.
Shoving this lot inside was a bit tricky, but it's neater than it was before.
I then hooked up the Di2 battery the the harness and tidied the wires around the saddle area.
And then attached the cable to the brake hose using cable-ties.
I hate how all these cable-ties look and might re-do it with insulation tape or heat-shrink soon.
The forecast is for torrential rain tomorrow, so it'll be interesting to see how the bike performs.
I've now covered approximately 200 miles on the Lynskey, and I'm getting happier with the specification of it now.
I finally did a proper ride in the proper dark last night. I'm really impressed with the quality and performance of the Supernova lights. The beam shape is great and no motorists flashed their lights at me meaning that it doesn't dazzle either. Judging from the fact that I didn't get run over, I guess that the rear one must work quite well as well.
A major annoyance is the front disc, or rather the clearance of the spokes on the caliper. I've filed off some of the adaptor and fitted a 1mm rotor spacer, but it needs to be even more than that. The brakes too must have some kind of foul weather sintered pad in them as they have a terrible noise and score the pads but the performance isn't the same as the same calipers that I run on my MTB. I'll look to change this soon.
It's good to have mudguards, given the amount of rain we've had!

Fabulous stuff, you've done really well with this build imo ...
Thanks - it has turned out better than I thought. It's put the pleasure back into commuting!
I weighed the bike today. All up with the saddle bag, light and mudguards as you see it above it's almost exactly 28lbs. About the same as my first proper bike, a GT Talera! Quite a lot, but I can't see many areas where weight could be reduced. Swapping all the bolts and rims would probably save 250g. In the name of reliability, I'll live with it!
I weighed the bike today. All up with the saddle bag, light and mudguards as you see it above it's almost exactly 28lbs. About the same as my first proper bike, a GT Talera! Quite a lot, but I can't see many areas where weight could be reduced. Swapping all the bolts and rims would probably save 250g. In the name of reliability, I'll live with it!
Visit starbike.com Online Retailer for HighEnd cycling components
Great Prices ✓ Broad Selection ✓ Worldwide Delivery ✓
www.starbike.com


