My DIY fender/mudguard solution for winter training

Back by popular demand, the general all-things Road forum!

Moderator: robbosmans

Slagter
Posts: 251
Joined: Thu Jul 25, 2013 6:42 am

by Slagter

After countless hours of searching on the web, experimenting and adjusting on my bike and hours of testriding it, I've finally perfected my winter bike fender setup to my full satisfaction. It's not pretty, but it works very well, it's durable and it protects me and my fellow riders.

As you can se, the length is where it needs to be, and this way it doesn't spray on myself or others:

Image

Image

Image

Rear fender:


I don't remember the brand of fenders, but I guess most will do, since I've done so many modifications anyway. You need at least ones, that are long to begin with even though I've prolonged them both.

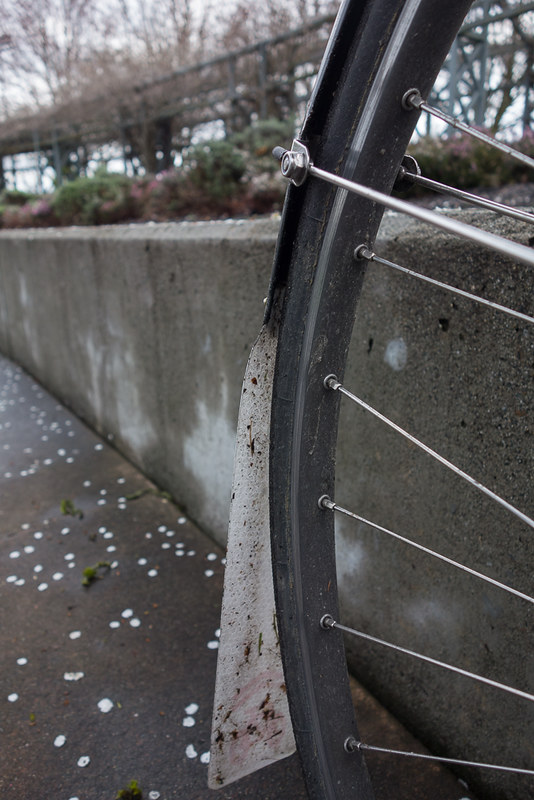
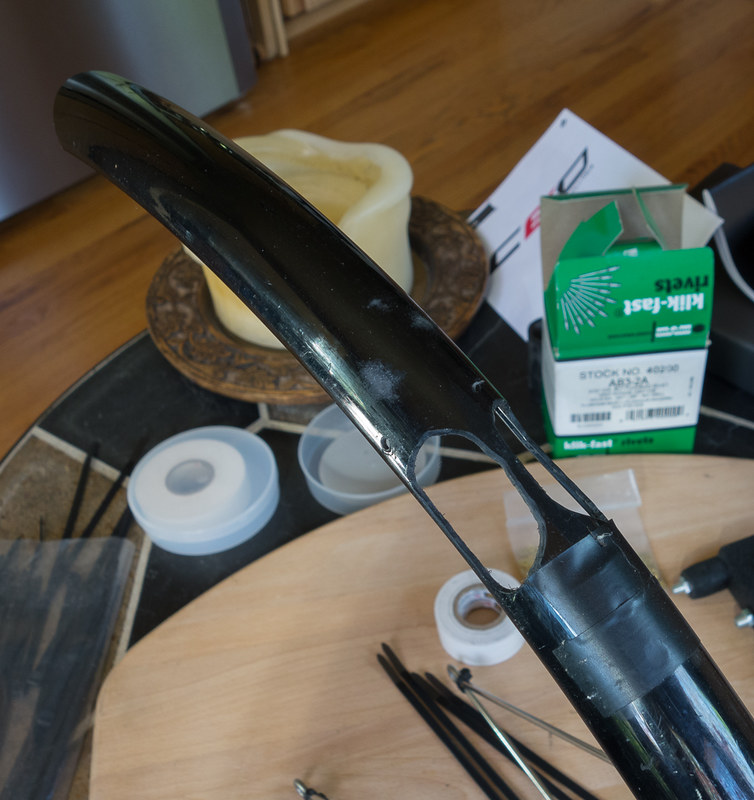
The rear one I've prolonged at the seat tube with a bit from another similar fender. I slid them together and drilled a hole trough both and attached them with a bolt and nut:

Image

The fender is attached to the seat tube with a cable tie. I drilled two holes in the fender, and tied it around the seat tube. The seat tube is protected with helicopter tape, where the fender is in contact with the seat tube:

Image

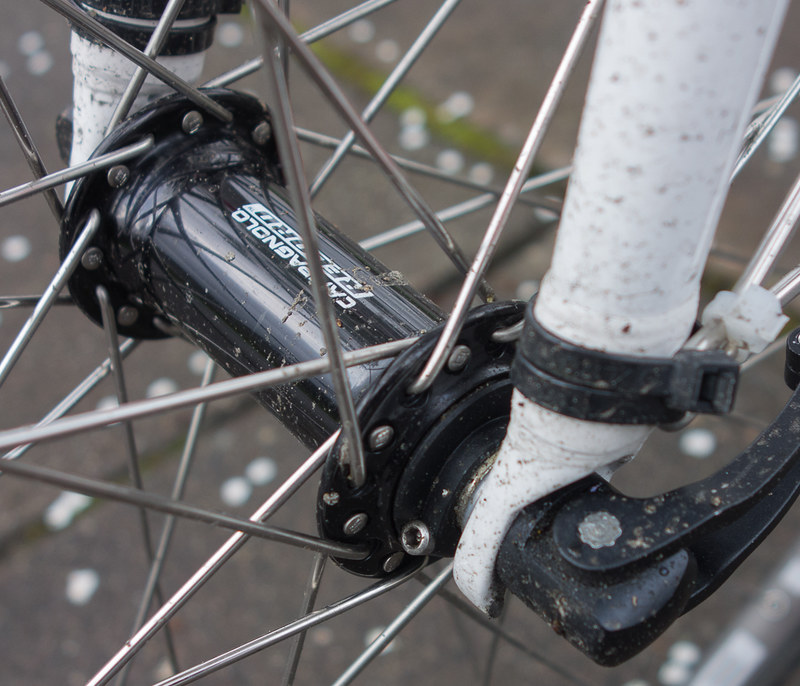
This rear fender came with two fender stays on each side. I didn't find that to be strong and stable enough, which is why I attached another two stays on each side. Now the rear fender is extremely stable and very strong, and doesn't move anywhere no matter what I ride through or over. I attached the stays on the fender with a bolt and nut each:

Image

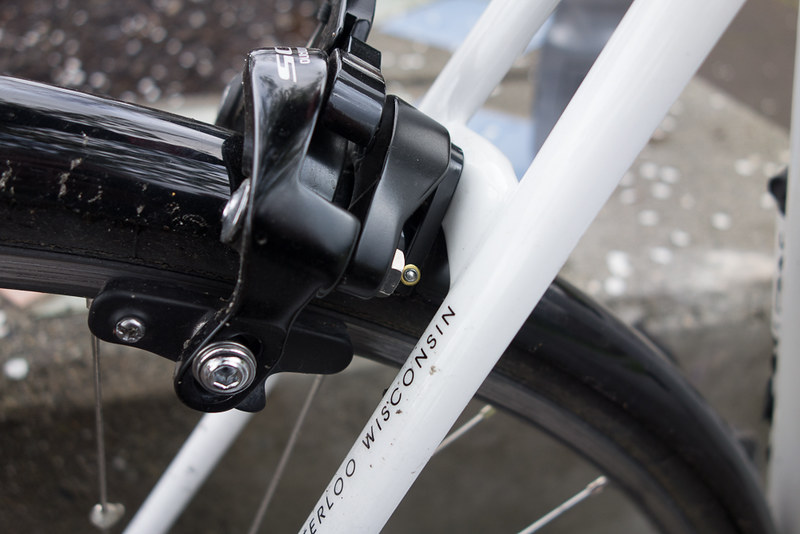
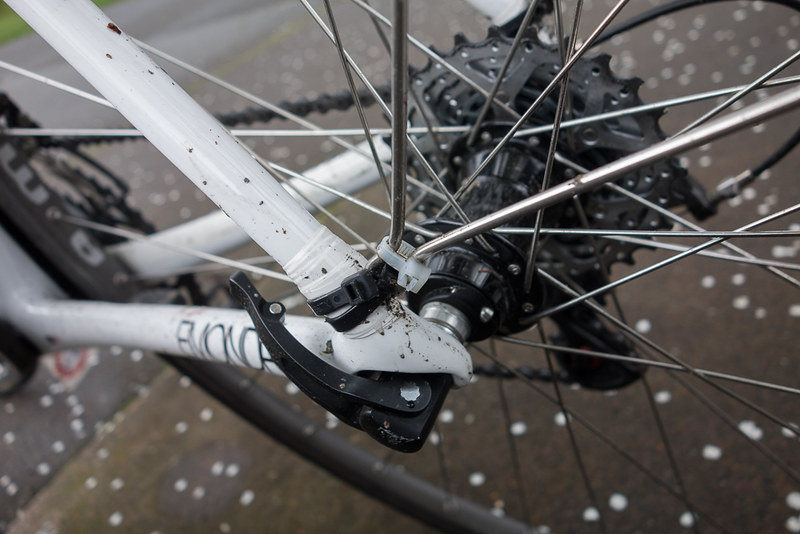
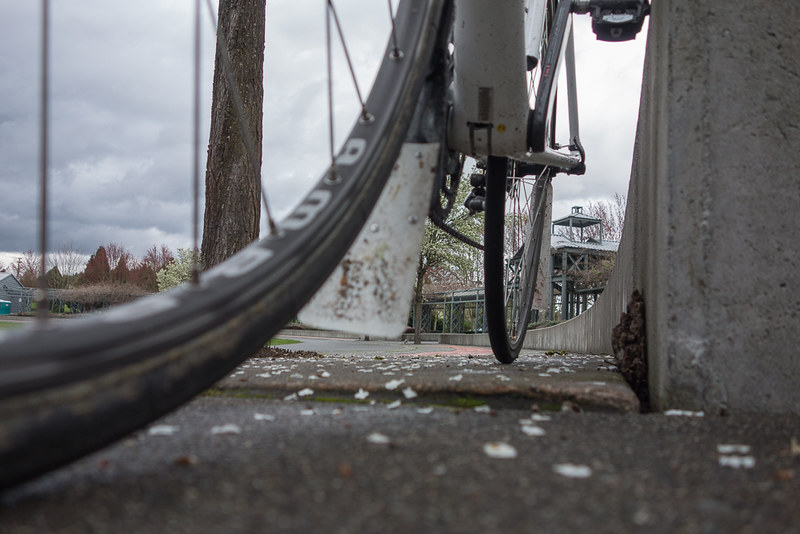
The stays are attached to the frame at the QR skewers with fender stay mounts from Velo Orange, which work very well, even when the wheel is being removed. But I guess the ease of removing the wheel partly is because of the four fender stays, which help to stabilise the fender while not attached to the rear wheel:

Image

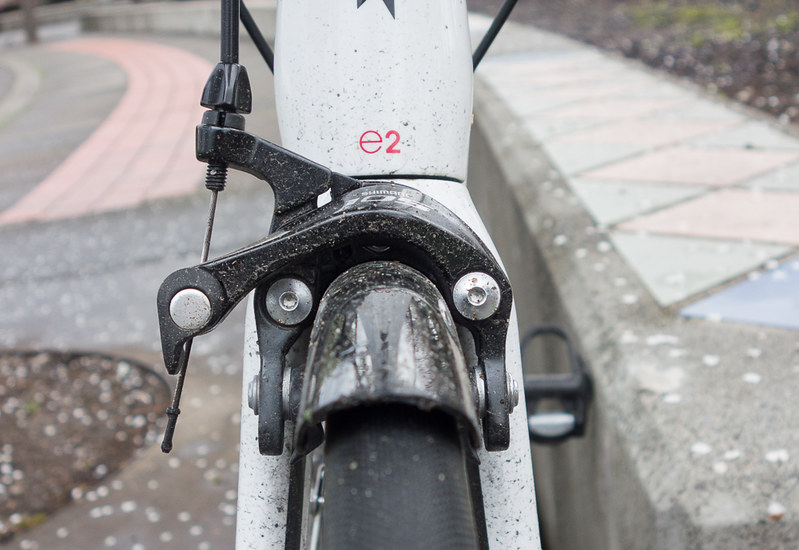
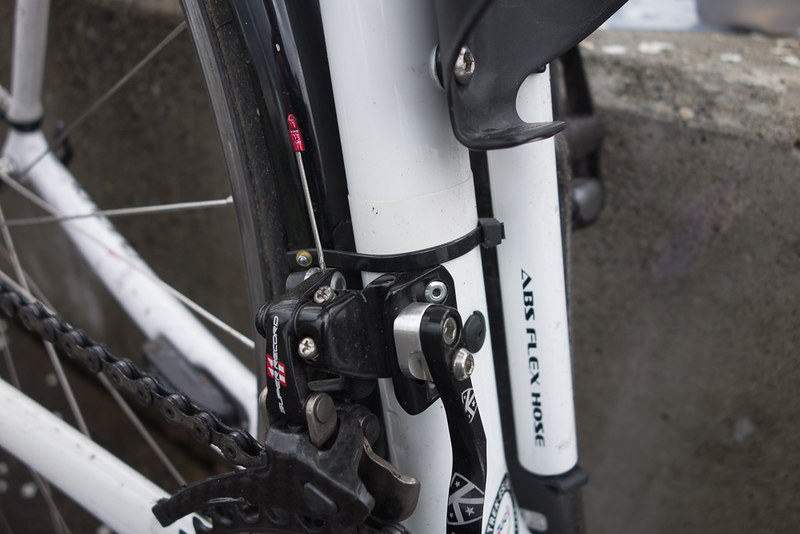
In order for me to attach the fender to the rear brake bridge, I really had to get creative, since I've tried several solutions like crimp-on fender brackets and single hole L brackets. Nothing held the fender in place for a longer period of time, and they ruined the fender as well. So I decided to make something similar to the Portland Design Works Z bracket. I didn't want to buy the Z bracket, because I wanted to be able to fasten it at the fender with bolts and nuts instead of crimping it on life the Portland one:

Image

So I decided to buy a couple of L brackets at my local home depot and build my own version of a Z bracket, which is very strong. And with this one I'm able to bend the brackets in a way so that the fender is pressed very hard against the brake bridge and doesn't touch the tire. The Supersix Evo frame is very tight and hasn't got very much clearance under the brake bridge:
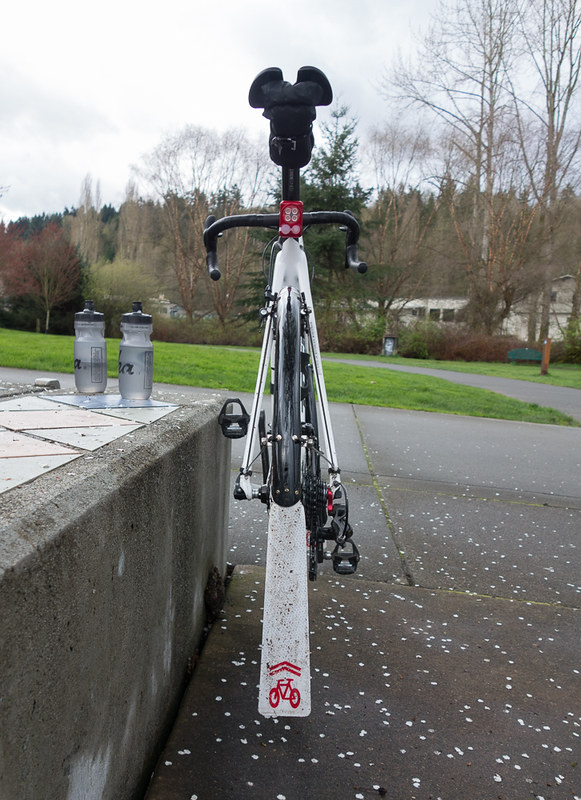
Image

Image

Front fender


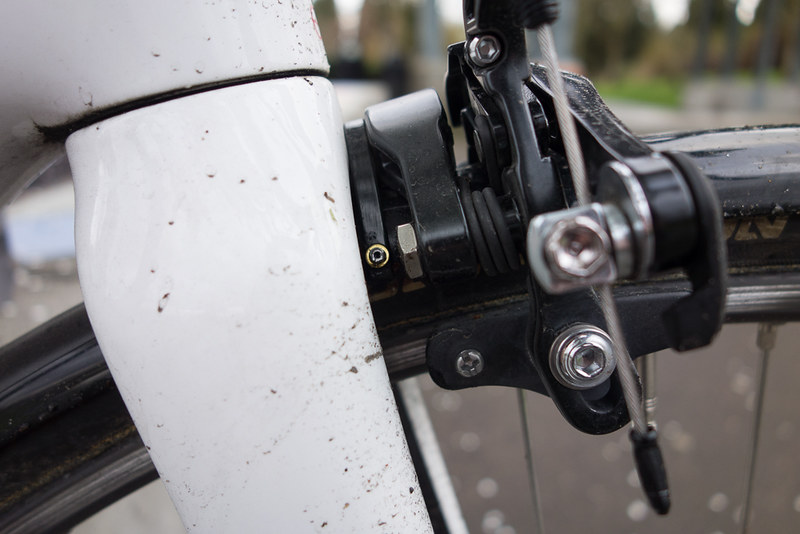
The front fender is just mounted behind the fork. I cut of the L bracket that was supposed to be mounted on the front brake and just rotated the fender backwards so that all of the fender now is behind the fork. I attached the top of the fender to the fork with an L bracket with a Problem Solver fender nut:

Image

With this fork, there's not enough clearance for the fender to go all the way under the fork. Wich is why I had to brake the fender into two pieces, and attached a similar piece in front of the fork with a similar arrangement of L brackets as on the rear fender, over the front brake. If you look closely between the fork and the brake, you'll notice the fender stops just before it reaches the fork:

Image

This is how it looks from underneath:

Image

I've ridden through two winters while perfecting this setup, and am now riding through the third one. But now it's finally dialed in and ready for the next couple of winters to come.

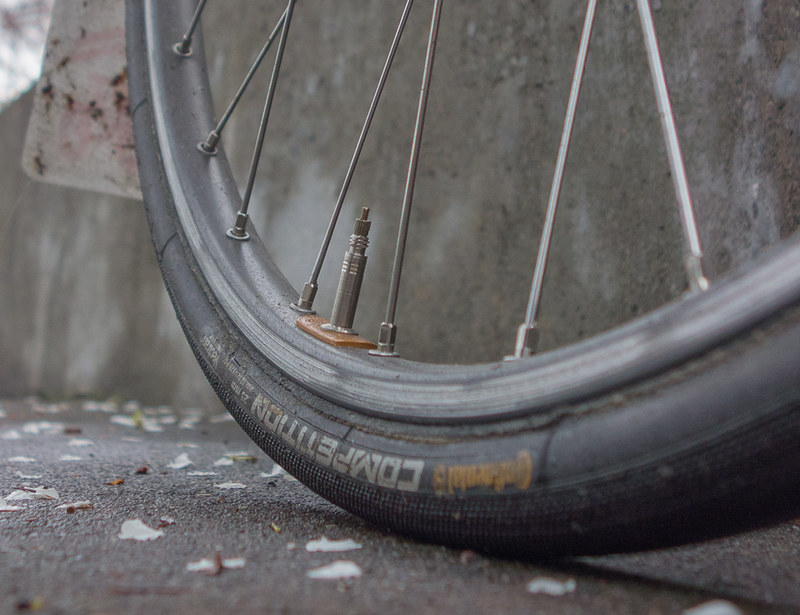
And of course I'm riding my most durable and cheap wheels during the winter in order to save money, time and hazzle with the Mavic A119 rims on Miche Primato Syntesi hubs:

Image
Last edited by Slagter on Sat Nov 12, 2016 5:23 pm, edited 1 time in total.

User avatar
corky
Posts: 1732
Joined: Thu Jul 06, 2006 5:53 pm
Location: The Surrey Hills

by corky

Nice setup..... mudguards can never be pretty so make them as functional as possible ...as you have.

by Weenie


Visit starbike.com Online Retailer for HighEnd cycling components
Great Prices ✓    Broad Selection ✓    Worldwide Delivery ✓

www.starbike.com


User avatar
Miller
Posts: 2781
Joined: Thu Sep 21, 2006 8:54 pm
Location: Reading, UK

by Miller

Nice work, your riding friends will want to follow you and only you.

androidavies
Posts: 74
Joined: Sun Sep 29, 2013 4:34 pm

by androidavies

Not very Weight Weenies with all those sets of stays there!

Satisfying job I'm sure, and look guaranteed to keep you as dry as possible..... I'm sure there are readers on here who don't get how miserable and cold it is when you're out with no mudguards and the rain/sleet comes on, or how smug you feel when all the others look like they've been on a Cyclocross ride!

User avatar
Mr.Gib
Posts: 5606
Joined: Fri Mar 18, 2005 4:12 pm
Location: eh?

by Mr.Gib

While it's no substitute for a proper winter bike, you have done about as well as you can with that frame. To nit-pick I would remove the heavy rubber fender ends and add a nice long light plastic or similar extension. If you are riding in groups on wet roads than of course this is standard etiquette.

One tip - wherever you have a cable tie you must protect the frame. That tie around the seat tube will wear through the paint in not too many rides. The vibration combined with road grit will cut a nice ring completely through the paint all the way around. Pretty much the same goes for any contact between the fenders and the frame.
wheelsONfire wrote: When we ride disc brakes the whole deal of braking is just like a leaving a fart. It happens and then it's over. Nothing planned and nothing to get nervous for.

User avatar
TonyM
Posts: 3376
Joined: Thu Jan 22, 2015 4:11 pm

by TonyM

I am using the SKS "RACEBLADE LONG BLACK" and added some duck tape extension.
That is the only fender which is working on my winter bike with my 25mm Vittoria tires.

http://www.sks-germany.com/en/products/ ... ong-black/
Attachments
1.jpg
2.jpg
3.jpg
4.jpg
5.jpg

Slagter
Posts: 251
Joined: Thu Jul 25, 2013 6:42 am

by Slagter

Mr.Gib wrote:
While it's no substitute for a proper winter bike...


As I'm always keen to evolve that winter setup, I'm curious to see, what a proper winter bike looks like in your opinion...

User avatar
mpulsiv
Posts: 1385
Joined: Mon Mar 24, 2014 9:17 pm

by mpulsiv

TonyM wrote:I am using the SKS "RACEBLADE LONG BLACK" and added some duck tape extension.
That is the only fender which is working on my winter bike with my 25mm Vittoria tires.

http://www.sks-germany.com/en/products/ ... ong-black/


In case you haven't seen this, http://buddyflaps.com/collection.htm is a cleaner solution next to DIY extensions.


Sent from my iPhone using Tapatalk
Racing is a three-dimensional high-speed chess game, involving hundreds of pieces on the board.

:arrow: CBA = Chronic Bike Addiction
:arrow: OCD = Obsessive Cycling Disorder

User avatar
TonyM
Posts: 3376
Joined: Thu Jan 22, 2015 4:11 pm

by TonyM

mpulsiv wrote:
TonyM wrote:I am using the SKS "RACEBLADE LONG BLACK" and added some duck tape extension.
That is the only fender which is working on my winter bike with my 25mm Vittoria tires.

http://www.sks-germany.com/en/products/ ... ong-black/


In case you haven't seen this, http://buddyflaps.com/collection.htm is a cleaner solution next to DIY extensions.


Sent from my iPhone using Tapatalk


Thanks.
Yes I checked these but for the front I would have been obliged anyway to have a DIY solution so I went for 2 x DIY. So it matches perfectly the width of the SKS fender.
Front is only duck tape and back is a piece cut out of an "ass saver fender" and sone duck tape to attach it. Plus some reflector tape.

User avatar
Mr.Gib
Posts: 5606
Joined: Fri Mar 18, 2005 4:12 pm
Location: eh?

by Mr.Gib

Slagter wrote:
Mr.Gib wrote:
While it's no substitute for a proper winter bike...


As I'm always keen to evolve that winter setup, I'm curious to see, what a proper winter bike looks like in your opinion...


Simple really, any frame with safe clearance for at least 25 mm tires and fenders, with the fenders attached by proper fender mounts.

You solution works, but there is a ton of extra metal - nuts, bolts, supports, brackets, etc. And you have some really tight clearance spots. What happens if something sticks to the tire and jams in those tight spots? Winter bikes also need more regular maintenance and it's nice to throw them in a stand and remove the wheels without the fenders half falling off - never liked the drop-out solution for this reason. P-clips solve this but have their own problems. And don't be surprised if the fenders crack around some of your joining solutions - pretty common occurrence. If you get a full season out of them you have done well.
wheelsONfire wrote: When we ride disc brakes the whole deal of braking is just like a leaving a fart. It happens and then it's over. Nothing planned and nothing to get nervous for.

Slagter
Posts: 251
Joined: Thu Jul 25, 2013 6:42 am

by Slagter

Thanks for the tip Mr. Gib. As I mentioned, I've been perfecting my winter bike for quite some time. That includes what you're suggesting. But I didn't like it and moved in a different direction. Two years ago I had this exact same setup on a cyclocross frame. But I didn't like to ride on the road on a cyclocross frame. I considered some of the more slack road frames or endurance frames or similar. But I simply found, that I like to ride racebikes, and I want the handling and performancefeeling of a racebike, which is why the choice was the Supersix.

Don't get me wrong, the cyclocross frame was great for fenders. It even had frame attached fender mounts on both the seat stays and the fork and on both brakebridges as well. It was a walk in the park to mount the fenders.

But since I didn't like the frame, I guess that solution isn't for me. I want a racebike.

Regarding P clips, those make for a very elegant solution. The reason I didn't go down that road is, that I want the fenders to be easily removed and attached. I want to ride the bike during summer as well without fenders, and not have to spend hours to take them of or put them back on again. This way I only need to remove the brake caliper, and it all comes of. Removing wheels isn't a problem, the fenders stay in place and don't wiggle to much around.

Regarding the clearance issue, I've already had some rides in all kinds of weather, and it seems, that with 23 mm tires I'm fine. I guess this works for me, and something else might work for others.

User avatar
TonyM
Posts: 3376
Joined: Thu Jan 22, 2015 4:11 pm

by TonyM

I have the same problem...
I would love to have a dedicated winter bike with fenders, 25mm, etc....and as I like the look of the cyclocross bikes I thought about getting such a cyclocross bike but at the end I want to have in the winter a race bike with the same geometry than my summer race bike and which is feeling like a race bike.
Same with the rain bike.
So at the end I use my old race bike for the winter, for the rain and for the home trainer.

User avatar
Calnago
In Memoriam
Posts: 8612
Joined: Sun Nov 07, 2010 9:14 pm

by Calnago

I'm just reposting this from my Emonda thread. I was in exactly the same boat... hated a cross bike on the road... wanted a real road bike with full fenders... one that actually handled like a road bike. The Emonda SL fit checked all the boxes. The rest was up to me...

Finally, a fully fendered (mudguarded) proper "road bike"...

This bike was perfect all last winter and the year before... the fender install is clean, super solid, with zero rattling even over bumps etc. It has totally met all my expectations that I was hoping it would for a winter bike, or a best summer bike for that matter.

Tires: Continental Competition Tubulars 25mm; Rims: Ambrosio Nemesis 32 hole; Hubs: Campy Record; Spokes: DT Swiss Comp (2.0/1.8/2.0); Nipples: DT Swiss Brass; Lacing: 3x both sides
Image

Brakes: This is interesting as it started out as full Campy build (bike was stripped of the Shimano 105 group it came with and loaded up with Campy). However... the new Shimano brakes have much better clearance than Campy Skeletons, and when operating, the shimano arms don't close in on the fender. And the profile of the Planet Bike fenders, underneath the shimano brakes, underneath the profile of the Trek Fork, all fits perfectly. So, for the rain bike, the 105 brakes were the way to go, and they're black, so at least the color is right. They work perfectly with the Campy levers. Might not work so well the other way around however (Shimano levers with Campy calipers) since there would be no quick release available for a quick wheel removal. But this way, I have double the quick release, at the Campy levers and at the Shimano Caliper.
Image


Installation: Basically threw away all the mounting hardware that came with the fenders. Cut out the metal pieces that attach to the front brake bolt, and removed the rear rubber mud flap. From there I repositioned the front so that enough would come out the front to prevent road grime from being sprayed out in front and up (which inevitably ends up in your face), and made sure that the rear of the fender was low enough so that with a little flap addition there would be no road spray and grime hitting my feet. While a good long rear flap is great, and necessary around here, for group rides or whomever you might be riding with, it's the cold spray from the front tire that is often the most miserable part of any ride rain. Once your feet are cold and freezing, it isn't much fun anymore.
So, check out this install. Done with no nuts, screws, etc. Just some zip ties, electrical tape, some brass spoke washers, a few pop rivets and a couple of added polycarbonate reflective mudflaps...

I definitely wanted standard mount brakes for the rain bike, to give my the anchors I needed for my zip tie installation...
Image

Image

Image

To anchor the fender stays to the rear stays and front fork I first wrapped the areas I was attaching them to with about 6 turns of electrical tape. This provides all the bite needed to really make these things solid so they won't move. They are anchored down with two zip ties each. I use two just in case one were to ever break, it would still stay put. I've done a number of these installs now and not one has ever broken or come loose the whole season. They're amazingly secure...
Image

Image

The rear flap is riveted on, is super reflective and stiff enough to stay close to the ground even descending at 45mph or whatever...
Image

Image


And the front flap, also riveted on as an extension to the front flap, ends only about 4cm from the ground and so no water, I mean zero, enters the bottom of my shoes from road spray of the front wheel. Such a treat...
Image

So there you have it... my ultimate wet weather road bike... and a couple pics of what's necessary for the install...
Image

Image

I've done this type of install before on my C50 but I had to do a lot of cutting of the fenders, and even then the clearance was so tight that I could only run 23's, and barely at that. Any road debris at all would tend to want to get caught between tire and fender at some point, so the setup with the Trek is so nice as there are zero cutouts in the fender so everything stays really clean. There's no "half stops" where you stop the fender at the rear of the fork because it wont go through, or you cut the rear fender into two parts to get around the rear bridge.

As an example, here's the fender I used to have on the C50, but eventually gave up on using it as a rain bike because of the inadequate clearance for fenders...
Image

And the C50 in it's old winter attire...
Image
Colnago C64 - The Naked Build; Colnago C60 - PR99; Trek Koppenberg - Where Emonda and Domane Meet;
Unlinked Builds (searchable): Colnago C59 - 5 Years Later; Trek Emonda SL Campagnolo SR; Special Colnago EPQ

User avatar
corky
Posts: 1732
Joined: Thu Jul 06, 2006 5:53 pm
Location: The Surrey Hills

by corky

Bit sceptical of zip ties but whatever works..... very thought out though....

No problems in terms of cable ratio pull of mixing shimano calipers with Campag levers?

User avatar
Calnago
In Memoriam
Posts: 8612
Joined: Sun Nov 07, 2010 9:14 pm

by Calnago

The key with the zip ties is to just make sure they have about 6 rounds of electrical tape to bite into. I've tried a lot of different things. These are rock solid. Not flimsy at all. Much more solid than any of the full fender solutions I've seen.
And no, not having any issues using the Campy levers with the Shimano calipers. I thought there might be but upon trying them out they work perfectly.
Colnago C64 - The Naked Build; Colnago C60 - PR99; Trek Koppenberg - Where Emonda and Domane Meet;
Unlinked Builds (searchable): Colnago C59 - 5 Years Later; Trek Emonda SL Campagnolo SR; Special Colnago EPQ

by Weenie


Visit starbike.com Online Retailer for HighEnd cycling components
Great Prices ✓    Broad Selection ✓    Worldwide Delivery ✓

www.starbike.com


Post Reply