Page 2 of 3
Re: At home Di2 install....
Posted: Tue May 06, 2014 7:29 am
by tomyboy2
Re: At home Di2 install....
Posted: Tue May 06, 2014 7:29 am
by Weenie

Visit
starbike.com Online Retailer for HighEnd cycling components
Great Prices ✓ Broad Selection ✓ Worldwide Delivery ✓
www.starbike.com
Re: At home Di2 install....
Posted: Tue May 06, 2014 7:32 am
by tomyboy2
Basically the same procedure for first and second generation di2...
Re: At home Di2 install....
Posted: Tue May 06, 2014 7:37 am
by tomyboy2
Re: At home Di2 install....
Posted: Tue May 06, 2014 10:07 am
by toiyuet
I am a MTBer for 22 year, I finished my bike at the 1st day.
I finished up a Di2 build myself last month, that is my first RB, too.
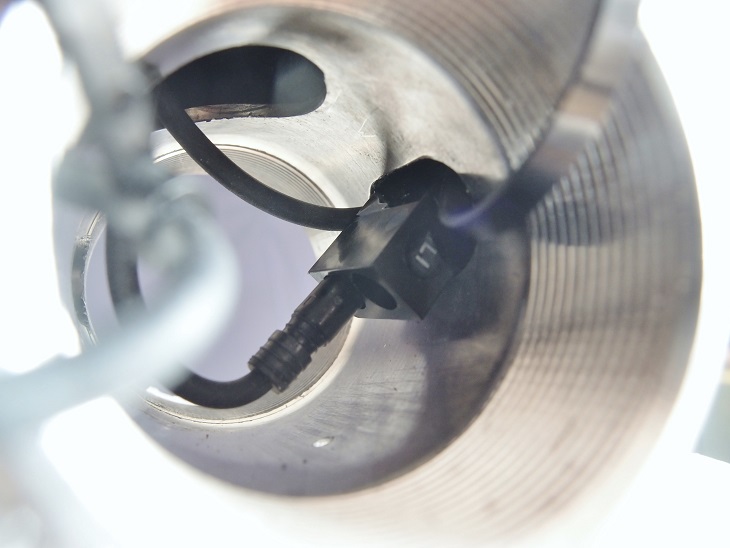
How hard would at-home setup be? it is up to your frame design, mine comes with standard BB, when it came to the junction box B part, it was the most severe problem I faced, there wasn't enough room to make it pass through the tiny hole of B.B. shell / down tube.
Finally I decided to remove two wires at first, let the junction box hung in the tiny hole and then attached the wires back.
Re: At home Di2 install....
Posted: Tue May 06, 2014 10:11 am
by toiyuet
Re: At home Di2 install....
Posted: Tue May 06, 2014 3:03 pm
by chiltonp
Thanks for all the info guys. What's the best method for me to determine the correct length e-tubes and the proper size grommets?
Re: At home Di2 install....
Posted: Tue May 06, 2014 3:13 pm
by kode54
pdlpsher1 wrote:One advice I would give is to make sure to leave some cable slack at the shifter cable connections. This step is found in the Shimano installation instructions. The professional mechanic who installed my system omitted this very important step. I learned about this problem when I hit a pothole and lost both FD and RD shifting. Came to find out BOTH connectors got disconnected when I hit the pothole. The force of the impact caused the shifters to bend downward hence disconnecting the connectors when there was no slack in the cables.
yes, i wrapped my e-wires like my mechanical shift housings with electrical tape with no slack. over time and some bumps, etc...the connection came loose...and would sometimes work and not at all. typical n00b mistake coming from mechanical set-up to Di2 set up. i have since made a squiggly routing so there's a slack if need be. no problems ever since.
Re: At home Di2 install....
Posted: Tue May 06, 2014 3:16 pm
by kode54
chiltonp wrote:Thanks for all the info guys. What's the best method for me to determine the correct length e-tubes and the proper size grommets?
test and measure length by using old brake cable or similar. make sure you have enough slack so there's no tension to pull the connectors off. you can hide a lot of the minimal excess in the down tube or seat tube if you decide to get internal (which is so much better than external battery).
Re: At home Di2 install....
Posted: Tue May 06, 2014 4:11 pm
by tomyboy2
For STI Shifters is better to choose a little longer cable and give 1-2 cm of slack at the connection.
Because of the unnecessary weight savings mine is almost too tight.

One time the connector for rear derailleur popped out 70 km from home...

I fix that with electrical tape ass suggested and found some extra slack, all in all lesson learned..

Re: At home Di2 install....
Posted: Tue May 06, 2014 4:40 pm
by toiyuet
Re: At home Di2 install....
Posted: Wed May 07, 2014 9:41 am
by aerozy
Almost had a heart attack when I read this thread to realize what those aluminium plates were

I drilled my Canyon Aeroroad last month and self installed Di2 9070.
Luckily for me Canyon have there FD mount on the side of the frame so no protection is needed as the FD at worse will contact the aluminium mount and not the carbon fibre tube. I guess the plate protection is mainly for frames that have the mount facing forwards leaving the tube exposed to the FD.
Re: At home Di2 install....
Posted: Wed May 07, 2014 1:47 pm
by toiyuet
Forgot to tell that my internal is 99% empty out of the package, I have to charge it before I upgrade the firmware.
Re: At home Di2 install....
Posted: Fri Aug 08, 2014 8:30 pm
by PuroScattista
hoping to do the same with my EvoHiMod coming in. Yet its a non-Di2 specific frame and must resort to external routing unless there are other ways to route the cables internally (without drilling).... pics welcome!
Re: At home Di2 install....
Posted: Sun Aug 10, 2014 1:35 am
by rma
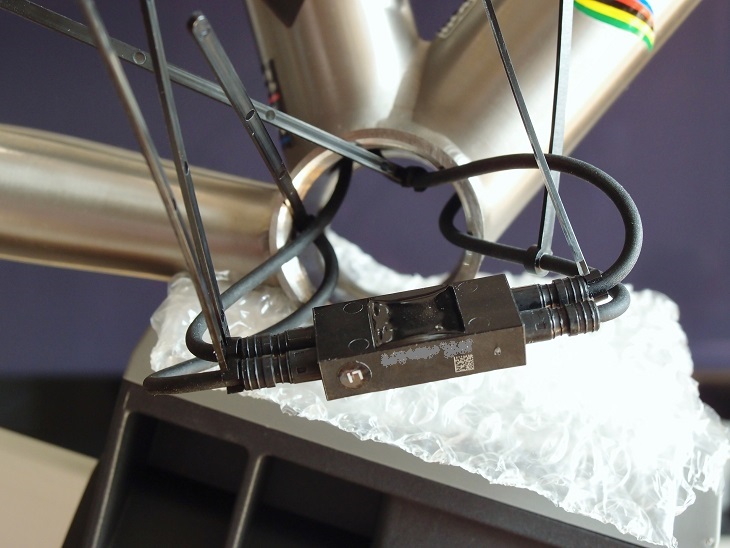
I made my Di2 install at home with a Cervélo 2012 R3 frame, now I just upgraded the frame (S3 2014) and will do it again. One thing that still bothers me, how do you guys place the junction B in the downtube and prevent it to hit the walls and create unpleasant noises? In the first install I wrapped it in bubble plastic and it was just fine, but it didn't look "right"... maybe a double faced adhesive?
Re: At home Di2 install....
Posted: Sun Aug 10, 2014 1:35 am
by Weenie
Visit
starbike.com Online Retailer for HighEnd cycling components
Great Prices ✓ Broad Selection ✓ Worldwide Delivery ✓
www.starbike.com
Re: At home Di2 install....
Posted: Sun Aug 10, 2014 2:38 am
by Frankie13
rma, I like the new 2014 S3 a lot but I was wondering if the seat post will allow the internal batterie since it is a more aero shape one and not round.
Are you planing to use the internal batterie?
Thanks,
Frank
