Show me Your Tuning!

Back by popular demand, the general all-things Road forum!

Moderator: robbosmans

andrew9
Posts: 39
Joined: Wed Nov 05, 2014 1:01 am

by andrew9

2015 5800 105 Rear derailleur

Titanium Pivot
Titanium Cable bolt with machined alloy washer to suit
Alloy limit screws and spring tension screw
Alloy pulley screws
Alloy Alligator adjuster bolt with lighter spring
Holes drilled in cages, one big hole in rear linkage, three in the front linkage

244g to 222g, 22g saved
It would be nice to get it lighter

Image


Image

by Weenie


Visit starbike.com Online Retailer for HighEnd cycling components
Great Prices ✓    Broad Selection ✓    Worldwide Delivery ✓

www.starbike.com


jooo
Posts: 1510
Joined: Wed Feb 02, 2011 3:48 am

by jooo

Cool. Lighter jockey wheels should save a decent amount for not too much $$. A CF back plate should also save a bit, even over your drilled stock item.

I'm not quite sure what the guts of a 5800 RD look like, but you may be able to remove more material from the front similar to this:
Image
A rotary tool can be purchased pretty cheaply, but if you don't want to go down that path, you could drill more holes and use a small jewelers file to remove the remaining material.

andrew9
Posts: 39
Joined: Wed Nov 05, 2014 1:01 am

by andrew9

Do I disassemble the derailleur to cut the hole?
How would I avoid hitting the spring when cutting/drilling the material?

My derailleur is a long cage, a carbon rear cage plate weighs a quoted 8g, and stock is 12g, mine is maybe 11g, my scales are only in whole grams though.

It would make sense to get a 6800 short cage derailleur, 195g and then swap the ti/alloy parts.
But this is mostly for fun, and to keep the group matching, for now

weeracerweenie
Posts: 500
Joined: Mon Aug 15, 2011 4:48 am

by weeracerweenie

On a Sram its pretty easy to smack some pins out and disassemble the complete rear derailleur. however i havent tinkered with and shimano for a long time so i cant help you there. my first tune i did without disassembling it so by all means do what your comfortable with. Its really cool to see people tuning 105. Sure its only a small difference but like i said to everyone that ever gave me hell for telling them i got another 5 grams out of a part, "if you take 5 grams out of 20 parts, you got rid of 100grams, and repeat and repeat and repeat" one day youll put it on the scales and see it weigh 5 point something. and thats pretty damn cool
I guess there's worse hobbies than making a bike light? Right?

User avatar
dino0204
Posts: 52
Joined: Tue Feb 24, 2015 5:31 pm

by dino0204

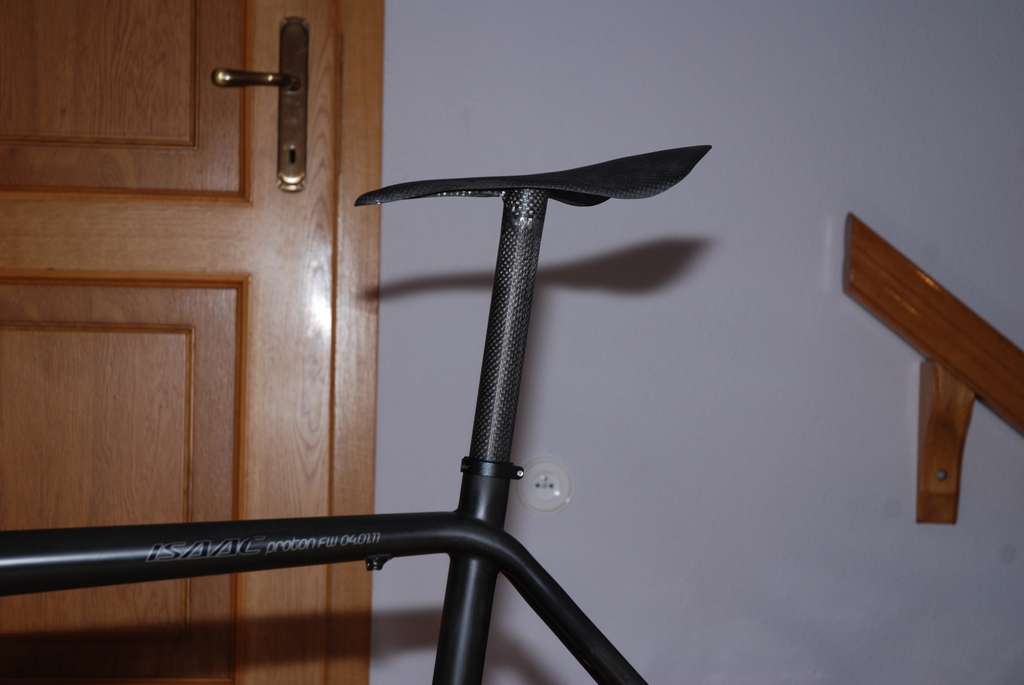
Last time I made carbon fibre combo. Seatpost is connected to the saddle permanently. Weight of this part is 135g. Saddle is really stiff and more comfortable than Selle Italia SLR Flow. I have plans to do integrated steam with handlebar, bottle cages and another superlight carbon things for my project. I wanna also to start working on separate saddle and seatpost. I going to make very light bike for less money.

Image

dereksmalls
Posts: 2305
Joined: Tue Aug 02, 2011 9:20 pm
Location: New Zealand

by dereksmalls

Nice work! Got any more pictures of the construction process?

User avatar
dino0204
Posts: 52
Joined: Tue Feb 24, 2015 5:31 pm

by dino0204

dereksmalls wrote:Nice work! Got any more pictures of the construction process?

Yes, please see the topic of my Isaac. I'll do some other items.

McGilli
Posts: 373
Joined: Sun Jun 07, 2015 6:57 pm

by McGilli

artray wrote:There is already loads of tuning posts . This is not needed .


Does anyone have the links to all these other tuning posts for road parts?

I'm using the search function but I keep only finding this one - and some other specific posts - but nothing like this with tonnes of projects.... thx.

weeracerweenie
Posts: 500
Joined: Mon Aug 15, 2011 4:48 am

by weeracerweenie

What specifically are you after? Or just anything? The search function is pretty clever


Sent from my iPhone using Tapatalk
I guess there's worse hobbies than making a bike light? Right?

McGilli
Posts: 373
Joined: Sun Jun 07, 2015 6:57 pm

by McGilli

weeracerweenie wrote:What specifically are you after? Or just anything? The search function is pretty clever


I'm fairly new here - and I'm working on my first 'light' build. Using all stock, unmodified parts I'm at 5.5kg. Now that I want to start taking some weight off here and there - this thread has already been a big help and I have 3 ideas noted down to start with.

I love these types of threads where every page you find something different that gives you new ideas. Using the search I'm just inputting parameters like 'tune' tuning' 'show' etc and I'm looking through the results for any threads that have more than 100 replies but this is the only one I am finding...

Thanks in advance to anyone who can help me locate more threads like this one where everyone shows off all their weight saving mods!

dereksmalls
Posts: 2305
Joined: Tue Aug 02, 2011 9:20 pm
Location: New Zealand

by dereksmalls

What is your stock build? Give us the run down or even better post it in the introduce yourself forum and see what else we can come up with for you?

McGilli
Posts: 373
Joined: Sun Jun 07, 2015 6:57 pm

by McGilli

dereksmalls wrote:What is your stock build? Give us the run down or even better post it in the introduce yourself forum and see what else we can come up with for you?


Will do thanks - I hadn't seen that forum yet :)

andrew9
Posts: 39
Joined: Wed Nov 05, 2014 1:01 am

by andrew9

DIY shifter clamps:
Machined Aluminium washer/spacer for shifter end, Ti bolt, Machined and threaded Aluminium clamp nut.
Band made from .5mm steel strapping, the type used for pallets and wood crates.
15g saved over Shimano clamps, these are only 7g heavier than BTP clamps
I could get these lighter yet, but wanted to put bike back together

Image

Dremeled and tuned 6800 rear derailleur
weight is 159 grams, 36g saved from 195g

Alloy pulley and limit bolts, Alloy cable adjuster
Ti clamp bolt, with machined alloy washer
Ti pivot bolt
Spring retainer Pins drilled out and replaced with hollow "roll pins"
Both cage plates thinned and tuned

Main body painted black, cages etched with oven cleaner to darken colour

Image

jorisee
Posts: 33
Joined: Fri Oct 24, 2014 10:02 am
Contact:

by jorisee

Nice! Do you have picture of the process?

by Weenie


Visit starbike.com Online Retailer for HighEnd cycling components
Great Prices ✓    Broad Selection ✓    Worldwide Delivery ✓

www.starbike.com


McGilli
Posts: 373
Joined: Sun Jun 07, 2015 6:57 pm

by McGilli

[quote="dino0204"
Image[/quote]

I want to use this photo as an example - I don't believe the poster has replied on his process.

Does anyone know of any posts here with more details on how they have made a combo saddle/post like this? Specifically what adhesive they would use? Would a rotary tool be needed to match the under side mpolding to the seat post shape or vice/versa?

Post Reply