Tuned Pedals called PlaySpeed if you reversed the name...
Posted: Wed Nov 07, 2012 6:11 am
First up, bit of background info... Im 18, from New Zealand, elite ish level racer and i like building and toying so this is what i've been up to recently... the thread is about tuning pedals from a certain company which can be figured out by reversing the words but should not be mentioned because that certain company is notorious for being unfriendly to people who genuinely enjoy their products
For obvious reasons i'm not going to quote the actual brand as serious legal action has been threatened against another user, if you haven't seen the thread have search. Since im only 18 i don't fancy being put through all that hub-ub. From here on in, my designs will be referred to as playspeeds, or 'pedals'
So i have been playing with pedal concepts for a while now, i have built a few of them, but when the offer of building some of these came up from fellow weenie 'Dereksmalls' i decided to give it a crack... NOTE: All parts used in my concepts are not from a certain company that looks like PlaySpeeds, they are all aftermarket products from an entirely different company. So essentially you don't need a set of PlaySpeeds to do a tune like this, all you needis the upgrade kit and your on your way. HOWEVER i do advise that you under take projects like this at your own risk, i take no responsibility for any work done by other people based on wok i have done. Henceforth, any tuned pedals from said company should be called PlaySpeed. and the obvious: tuning or modifying your products will certainly and most likely void any warranties or liability claims against the original manufacturer of your pedals and any tuning should be taken at your own calculated risk. No persons involved in the tuning of their products nor any ideas gleamed from this thread can be held as any guarantee of reliability. Tune at your own risk and be intelligent about your work
Dereksmalls sent down some Ward Ti upgrades (i think) for a standard set of chromoly 'pedals'. Ti Bolts, Bow Ties and Axles arrived in the post one day and i started drawing my concepts. I had seen this link (http://www.cyclingnews.com/features/pho ... aix/115486) and thought the design was sound and i thought i could repeat it easily enough. So i went to the local bearing shop and found some new needle roller bearings for it. They are the exact same size as the standard ones, and the second bearing i put in was the standard roller bearing from the outside edge of the pedal. Easy.
Then i went to the school workshop and run out some bearing housing cylinders. This fit the bearing in each end (light press fit, 0.05mm under size) then in betweenthe two bearings in the dead space i recessed a slot into the housing... This is the same width as the bow tie centre so it slotted in nicely as planned. Then taking the bowties i milled a small half round section out of the very middle where it contacted the new bearing housing. I made sure the milled section in the bow tie was slightly smaller so it would have and in different radius and 'grip' onto the housing to prevent rotation under power.
Here is where i milled the half round out of the bow tie...

My issue now was how to engage and dis engage the cleat. The originals have a small steel insert that is inserted into the bodies... like so:

What i did how ever was taking a 1 1/8th inch headset spacer, i cut a small section that fitted the width of the bowties and then milled a small section similar in shape out of the top and bottom of the section of spacer. This essentially integrated the insert and the correct spacing of the bow ties. It functionally looked like it would work, but when i tried it the spacer would slip round when i un-clipped from the pedal. This is because the bolt alone wasn't enough to hold it in place. After weeks of testing (not joking) i pressed UD carbon in the gap between the bearing housing and the spacers. this works well, and only added 3 grams per pedal.
Here you can see where i milled off material from the spacer. Unfortunately the mill i used gets vandalised by the year 9's (first year of high school kids) so when i moved it along its x axis, it would move ever so slightly on the y axis creating a non smooth finish in the milled area

Next i tuned the already light axles. I milled off the rounded face at the threaded end (that goes into your crank) into a square so it can be done up with a spanner. 15mm on the dot! I then borred into the centre, increasing the internal hole from 5mm to 7.5mm in diametre and from 20mm deep to 35mm deep. This alone dropped 7 grams per axle! This is easy stuff to do withthe right tools, but i managed to cook 5 drill bits since Titanium is darn hard...

I the rebuilt the first pedal and presed in the carbon backing to the spacers and set to try and fault it. I atttached it to the drill and vice at home at spun the bearings it, checked it for trueness, and play. It passed fine so i moved on to re creating the second pedal. A week or three later i was done. Next came cleat work. I had to make sure after my modifications thatthe cleat engaged and dis engaged perfectly. The only issue was that i had to dremel a small section from each cleat. No issues.
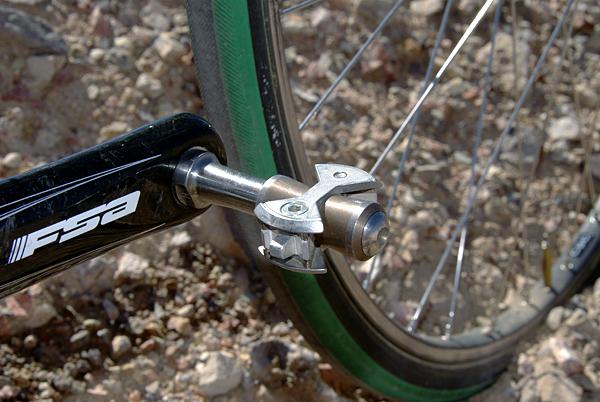
Testing followed, a week or two of it, i put them on my Single Speed MTB (fully rigid, running a 48 - 16 gearing which is huge) as when i ride this bike, i go through a set of pedals every year, bottom bracket every three months etc. I abuse the hell out of this bike, but it got me a national title so it still works fine. Riding these pedals on this pig of a bike cleared in my mind that my idea had worked and would function, barring all disasters.
I then lathed up some end caps out of delrin and called the mission complete
The pedals started at 208 grams for a standard straight of the shelf pair. My pair ended up at 118 grams a pair. 90 GRAMS GONE! WOW, i am working on a concept for prototype 2that will drop them under 100 grams a pair, so stay tuned. I also build Aerolite Pedals that are tweaked to my preference, and altered slightly as well if anyone is interested.
Final Pedals DONE


Im about to put them in a box and send them back to Dereksmalls for him to own, along woith some other wee bits i have built him! What do you all think?
For obvious reasons i'm not going to quote the actual brand as serious legal action has been threatened against another user, if you haven't seen the thread have search. Since im only 18 i don't fancy being put through all that hub-ub. From here on in, my designs will be referred to as playspeeds, or 'pedals'
So i have been playing with pedal concepts for a while now, i have built a few of them, but when the offer of building some of these came up from fellow weenie 'Dereksmalls' i decided to give it a crack... NOTE: All parts used in my concepts are not from a certain company that looks like PlaySpeeds, they are all aftermarket products from an entirely different company. So essentially you don't need a set of PlaySpeeds to do a tune like this, all you needis the upgrade kit and your on your way. HOWEVER i do advise that you under take projects like this at your own risk, i take no responsibility for any work done by other people based on wok i have done. Henceforth, any tuned pedals from said company should be called PlaySpeed. and the obvious: tuning or modifying your products will certainly and most likely void any warranties or liability claims against the original manufacturer of your pedals and any tuning should be taken at your own calculated risk. No persons involved in the tuning of their products nor any ideas gleamed from this thread can be held as any guarantee of reliability. Tune at your own risk and be intelligent about your work
Dereksmalls sent down some Ward Ti upgrades (i think) for a standard set of chromoly 'pedals'. Ti Bolts, Bow Ties and Axles arrived in the post one day and i started drawing my concepts. I had seen this link (http://www.cyclingnews.com/features/pho ... aix/115486) and thought the design was sound and i thought i could repeat it easily enough. So i went to the local bearing shop and found some new needle roller bearings for it. They are the exact same size as the standard ones, and the second bearing i put in was the standard roller bearing from the outside edge of the pedal. Easy.
Then i went to the school workshop and run out some bearing housing cylinders. This fit the bearing in each end (light press fit, 0.05mm under size) then in betweenthe two bearings in the dead space i recessed a slot into the housing... This is the same width as the bow tie centre so it slotted in nicely as planned. Then taking the bowties i milled a small half round section out of the very middle where it contacted the new bearing housing. I made sure the milled section in the bow tie was slightly smaller so it would have and in different radius and 'grip' onto the housing to prevent rotation under power.
Here is where i milled the half round out of the bow tie...
My issue now was how to engage and dis engage the cleat. The originals have a small steel insert that is inserted into the bodies... like so:
What i did how ever was taking a 1 1/8th inch headset spacer, i cut a small section that fitted the width of the bowties and then milled a small section similar in shape out of the top and bottom of the section of spacer. This essentially integrated the insert and the correct spacing of the bow ties. It functionally looked like it would work, but when i tried it the spacer would slip round when i un-clipped from the pedal. This is because the bolt alone wasn't enough to hold it in place. After weeks of testing (not joking) i pressed UD carbon in the gap between the bearing housing and the spacers. this works well, and only added 3 grams per pedal.
Here you can see where i milled off material from the spacer. Unfortunately the mill i used gets vandalised by the year 9's (first year of high school kids) so when i moved it along its x axis, it would move ever so slightly on the y axis creating a non smooth finish in the milled area
Next i tuned the already light axles. I milled off the rounded face at the threaded end (that goes into your crank) into a square so it can be done up with a spanner. 15mm on the dot! I then borred into the centre, increasing the internal hole from 5mm to 7.5mm in diametre and from 20mm deep to 35mm deep. This alone dropped 7 grams per axle! This is easy stuff to do withthe right tools, but i managed to cook 5 drill bits since Titanium is darn hard...
I the rebuilt the first pedal and presed in the carbon backing to the spacers and set to try and fault it. I atttached it to the drill and vice at home at spun the bearings it, checked it for trueness, and play. It passed fine so i moved on to re creating the second pedal. A week or three later i was done. Next came cleat work. I had to make sure after my modifications thatthe cleat engaged and dis engaged perfectly. The only issue was that i had to dremel a small section from each cleat. No issues.
Testing followed, a week or two of it, i put them on my Single Speed MTB (fully rigid, running a 48 - 16 gearing which is huge) as when i ride this bike, i go through a set of pedals every year, bottom bracket every three months etc. I abuse the hell out of this bike, but it got me a national title so it still works fine. Riding these pedals on this pig of a bike cleared in my mind that my idea had worked and would function, barring all disasters.
I then lathed up some end caps out of delrin and called the mission complete
The pedals started at 208 grams for a standard straight of the shelf pair. My pair ended up at 118 grams a pair. 90 GRAMS GONE! WOW, i am working on a concept for prototype 2that will drop them under 100 grams a pair, so stay tuned. I also build Aerolite Pedals that are tweaked to my preference, and altered slightly as well if anyone is interested.
Final Pedals DONE
Im about to put them in a box and send them back to Dereksmalls for him to own, along woith some other wee bits i have built him! What do you all think?