Colnago C60 - Traditional PR99

Who are you (no off-topic talk please)

Moderators: MrCurrieinahurry, maxim809, Moderator Team

Post Reply
User avatar
Calnago
In Memoriam
Posts: 8612
Joined: Sun Nov 07, 2010 9:14 pm

by Calnago

One final "prep" step before slapping on the components and cabling things up... and that is to widen the channels in the bottom bracket cable guide to be able to accept the PTFE tubing I use for routing the derailleur cables around the BB. Necessary?... probably not... but ever since I used this on my C59 I've kind of adopted it for any build that will accept it. It's much thicker walled than any typical tubing that is supplied for bike applications, and thus it provides a smoother internal edge for the cables to run along when it butts up against a hard edge. In the case of the C60, it's pretty smooth and the hardest edge it enounters is when the front derailleur cable passes up through the bridge between the chainstays immediately behind the bottom bracket. Anything I can do to reduce friction in the cable runs, I think is worthwhile.

The untouched cable guide...
Image


Just kept working away enough material until I could slide the tubing and cable all the way through and seat it in the entire channel without it getting squeezed and causing friction....
Image


And finally the hacked and completed cable guide... ready for install...
Image

Whew!... This documentation of the build process really did take much longer than the actual build itself. Still more to come... cabling, taping, tuning, fitting...
Colnago C64 - The Naked Build; Colnago C60 - PR99; Trek Koppenberg - Where Emonda and Domane Meet;
Unlinked Builds (searchable): Colnago C59 - 5 Years Later; Trek Emonda SL Campagnolo SR; Special Colnago EPQ

by Weenie


Visit starbike.com Online Retailer for HighEnd cycling components
Great Prices ✓    Broad Selection ✓    Worldwide Delivery ✓

www.starbike.com


User avatar
JKolmo
Posts: 655
Joined: Sat Feb 10, 2007 2:00 pm

by JKolmo

What a great thread! Thanks for posting and your bike is truly stunning! Thanks also for the tip to delete those annoying metal brake tabs, and mounting the brifters on the bars before installing the bars. Never thought of that! Will do on my coming C60 build[emoji3]

User avatar
Calnago
In Memoriam
Posts: 8612
Joined: Sun Nov 07, 2010 9:14 pm

by Calnago

@JKolmo: Yes, for my particular setup, where the shifter tips are set level with a line drawn from the straight drops, setting up the levers on the bars before mounting is ideal, because you can set everything on flat top and see that it's all aligned and same height both sides etc. But for a lot of ergo bars, that don't conform to the "shifter tips in line with the drops" guideline, I think it's still best to mount the shifters after the bars are on the bike and play with the position and angles until you get it just right. In fact, most bars these days don't even have a nice flat section in the drops from which to extend that imaginary line, so the table top method that I use above wouldn't work so well in a lot of cases.
Colnago C64 - The Naked Build; Colnago C60 - PR99; Trek Koppenberg - Where Emonda and Domane Meet;
Unlinked Builds (searchable): Colnago C59 - 5 Years Later; Trek Emonda SL Campagnolo SR; Special Colnago EPQ

beeatnik
Posts: 368
Joined: Fri Jan 25, 2013 7:26 pm

by beeatnik

Calnago, your PR99 thread is fantastic. Pitchfork Rating 9.9/10, would read again.

User avatar
Calnago
In Memoriam
Posts: 8612
Joined: Sun Nov 07, 2010 9:14 pm

by Calnago

Thanks, I think. Not sure what a Pitchfork Rating is, but I'll take it. And it's still not done... just getting to the good stuff now...
Colnago C64 - The Naked Build; Colnago C60 - PR99; Trek Koppenberg - Where Emonda and Domane Meet;
Unlinked Builds (searchable): Colnago C59 - 5 Years Later; Trek Emonda SL Campagnolo SR; Special Colnago EPQ

User avatar
Calnago
In Memoriam
Posts: 8612
Joined: Sun Nov 07, 2010 9:14 pm

by Calnago

Ok, brake calipers all cleaned up and installed. So, let's get on with the cabling. I cannot stress how important a good cable job is for both the aesthetics of the finished build, and even more importantly, the performance. I still would not trade a perfectly tuned mechanical system for an electric system. But it's got to be well set up for that statement to hold true, and in fairness it's a lot easier to get an electric system running perfectly as it was designed to do than it is to get the mechanical system to do so. What can also be a factor in the mechanical system is the size of the bike. A super small frame with a slammed stem for example, can make cable runs a little short with tight bends, and that can compromise shifting a bit, making proper attention to initial setup even more critical. Internally routed cables, while a non issue for an electric system, can be a pain in the ass for a mechanical system with its bends etc., again compromising perfect shifting. However, if you take the time to select components (bars, frame, etc), that adequately lend themselves to a nice mechanical setup, I don't think there's a better feeling on a fine road bike. I can throw around gears any which way, 1, 2, 3, or more cogs with the same motion instantly, as fast as my brain thinks about it, and also be throwing the chain around the front rings simultaneously during any of those motions. I just like the "feel" of mechanical. Like Cancellara was quoted as saying ... "I like to feel the wires..." . It's not "perfect", but because of that it allows you to manage your shifts, or finesse them if you will. Like a fine espresso where the end result is not just from pushing a button but more a result of the barista adjusting the grind, tamp, and dose of the coffee to match the environmental conditions and humidity at the time to extract that perfect shot. Ha, I am a Barista on a bike. Lol. Ok... enough pontificating... electric shifting is all well and good.... and I could have just as easily chose it for this build. But I didn't, and that's a personal decision based on what I like to experience while riding a bike. Plus, if all the bikes in my garage were currently electric... my entire garage floor would need to be a charging mat and all the bikes would need wireless charging capabilities otherwise it would be a nightmare to keep track of what was ready to ride and what needed charging. For now I'll leave the electric outlets for lights and stuff thankyou. Nuff said.

Ok... onto the matter at hand....
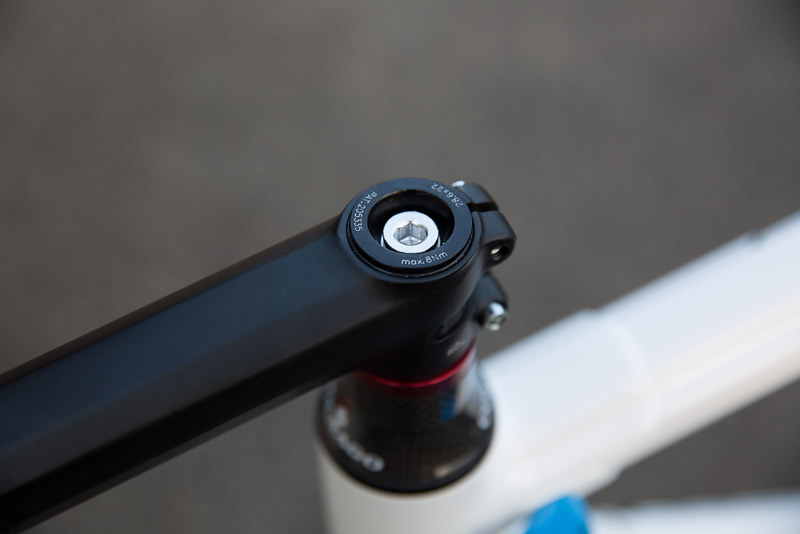
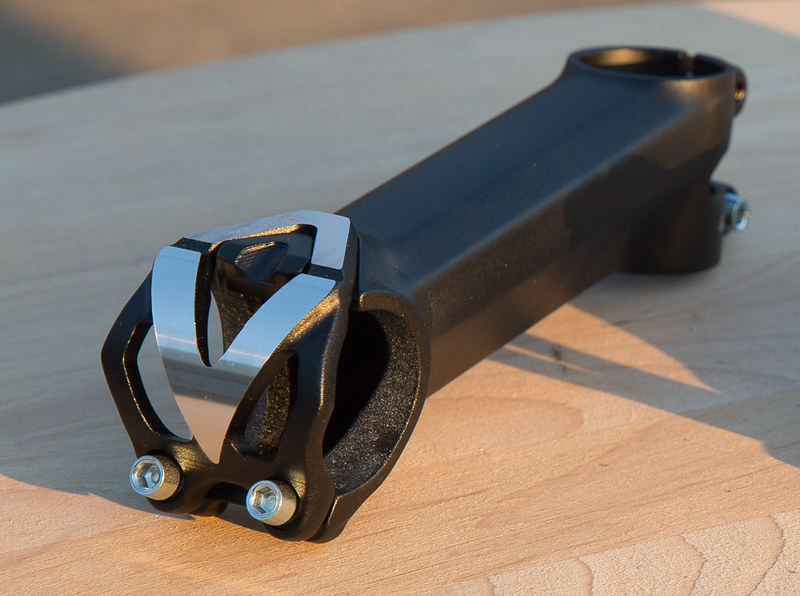
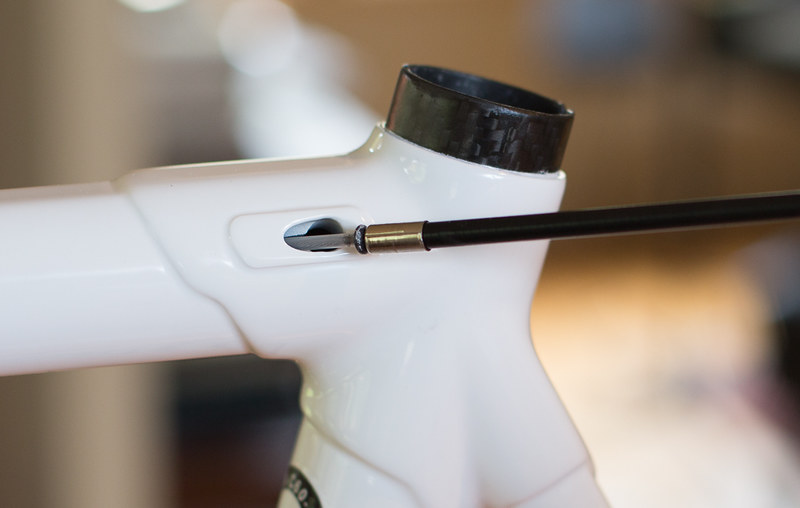
Let's get the stem and bars on... notice that the actual steer tube goes right to the top of the stem, normally I would cut it just above the stem to leave a lip. But in this case, the compression plug has a lip that sits on top of the steer tube, ensuring it doesn't fall down so far that it's not doing its job. So, I accounted for that and use the lip on the compression plug as my "1mm beyond the stem height) guideline. For a different brand of steertube where the compression plug fits completely inside the steertube, I would have cut the steertube 1mm longer than you see here, to end up with the same lip above the stem. It's that lip that provides a base for a 5mm spacer between the stem and the top cap and keeps it centered so that it doesn't move around on you. Cuz that ends up just looking dumb... oh, and I do use carbon paste between the steer tube and stem contact surfaces...
Image

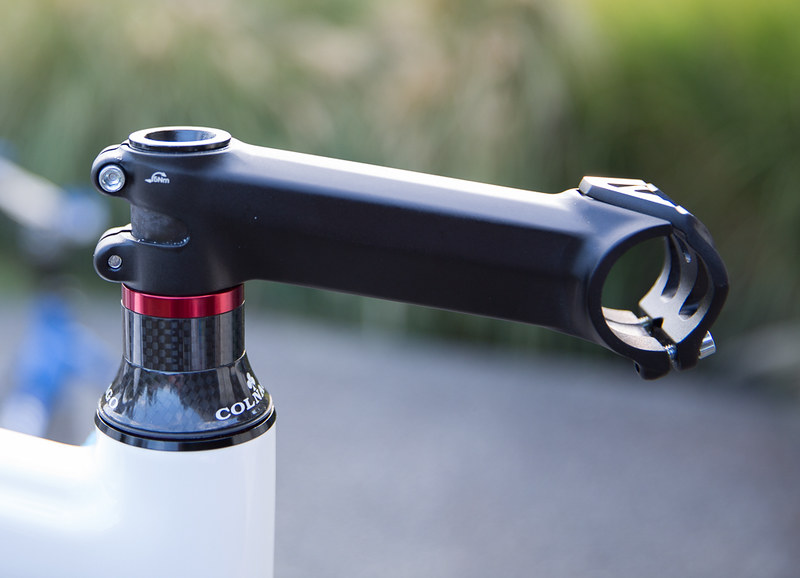
In this case, you can see how the expansion plug provides good support right from the top of the stem and, because of its length (who said size doesn't matter), extends all the way down just past the top headset bearing. It's solid. More than most. I'm not a fan of super lightweight parts where their purpose is holding strength or support, and that includes expansion plugs, skewers, and seatpost clamps. Some are better than others for sure, but some... I just would rather avoid completely for the hassles they "may" cause. I'm not 140lbs either, so I always like to err on the stronger side of things when it comes to my bike stuff. So on the top of the stem goes the 5mm spacer and the top cap and there is plenty of space between the bottom of the top cap and the top of the compression plug to ensure that it doesn't bottom out when applying the preload.
Image


And finally... icing on the cake....
Image
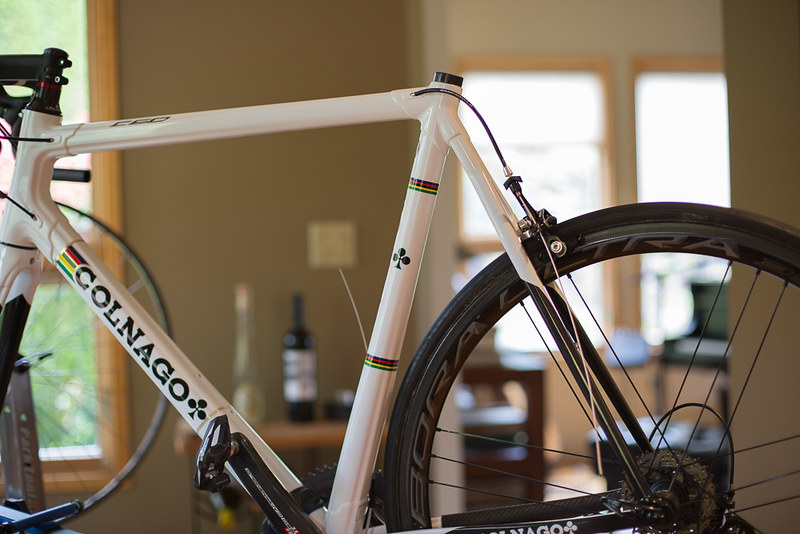
Yes, I know I've shown it before, but I'm pretty proud of it :wink: .


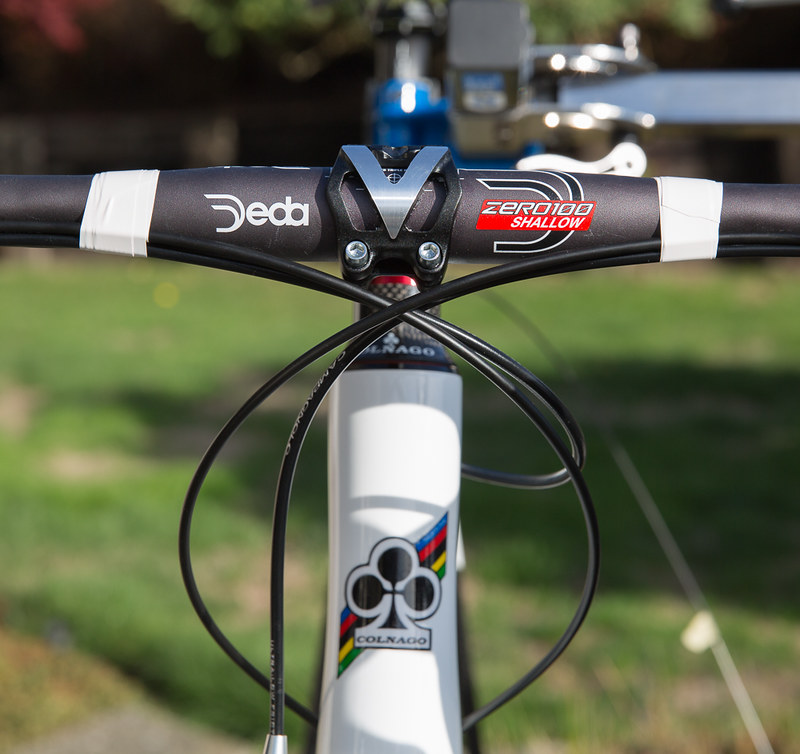
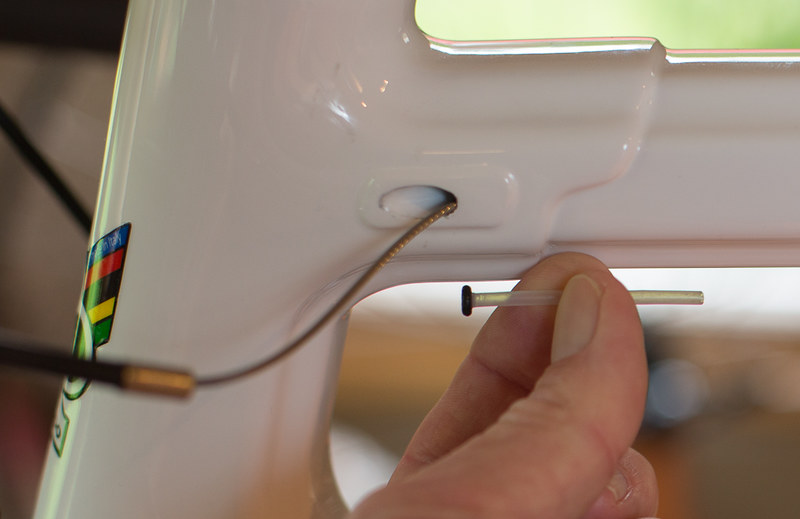
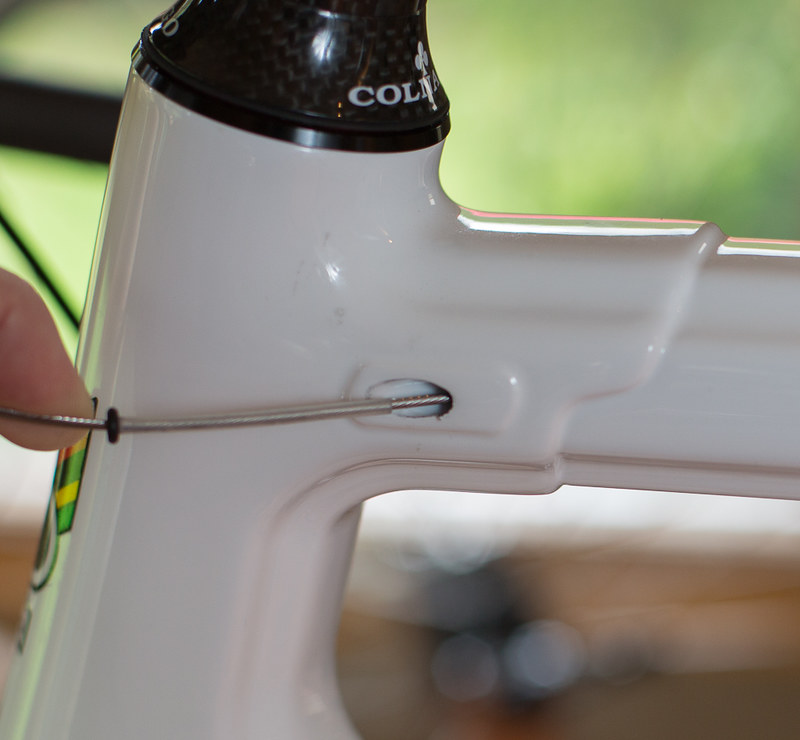
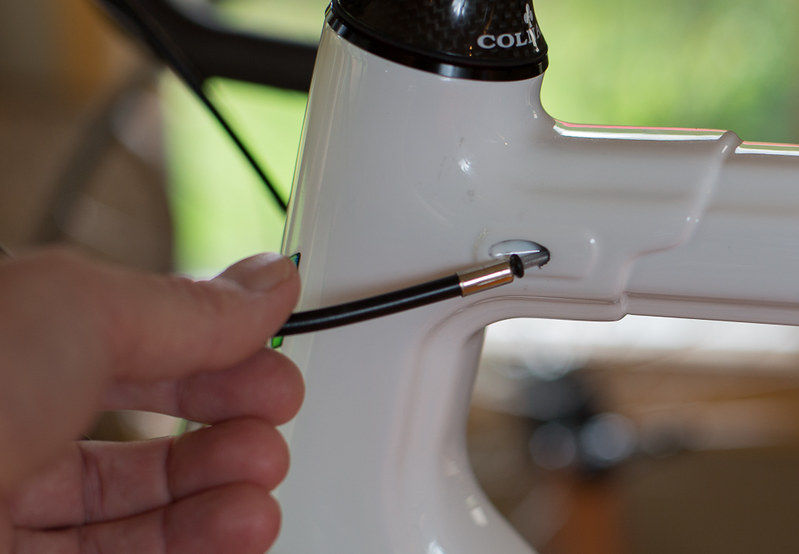
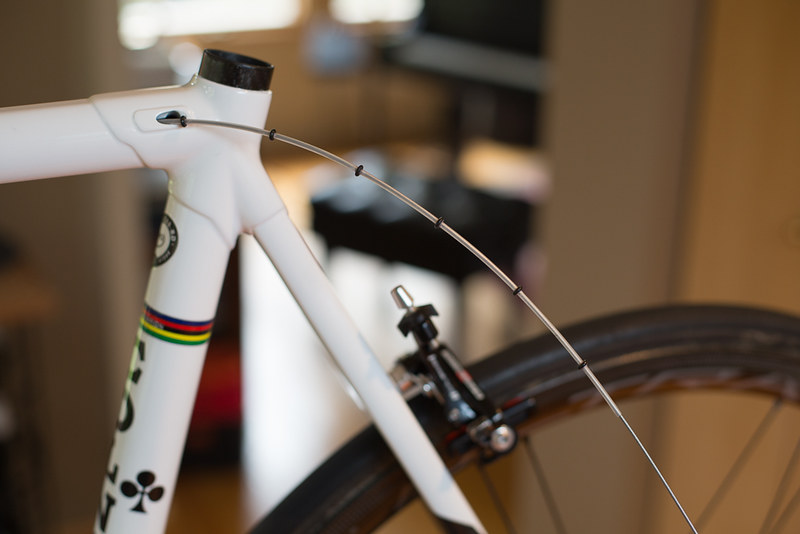
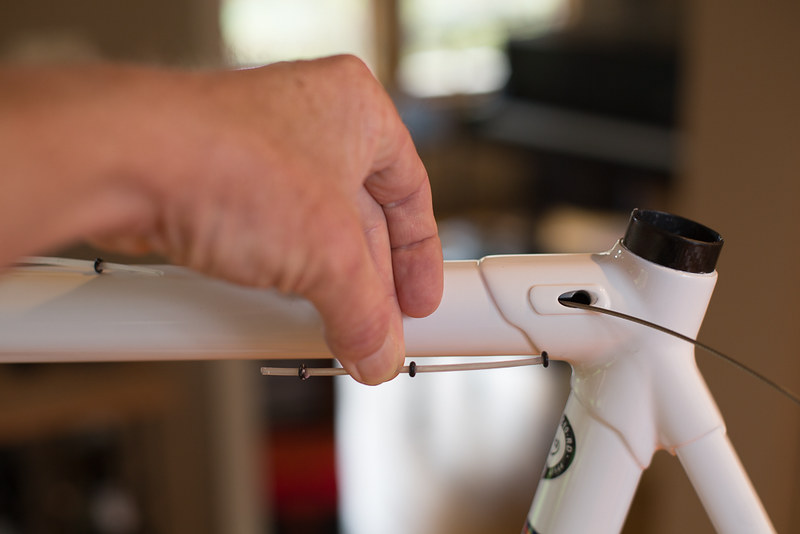
So, cable housing length. You want it not too long, not too short, you want it just right... so that they have relaxed bends, and as few as possible. Straight lines are better than curves, etc. etc. In a lot of frames these days, where the derailleur cables get routed through the downtube, it can be best to do the crossover within the downtube routing, and that's what all my internally routed bikes have now. It just makes for a nice smooth bend in the derailleur cables from the bar to the downtube. You just have to make sure there is enough length to allow the bars to be completely turned till they touch the top tube without being restricted by cables that are too short. I'll start with the derailleur cables. I run one from the lever to the cable stop in the opposite side of the downtube, temporarily taping it along the bars along it's natural run. I mark it. I take it off and cut it, then I cut the other side derailleur housing the exact same length. If they are the same length and the levers are in the same spot on each side of the bar, then you can be assured that they will cross each other in the center front of the bike, which looks nice.

In this case, I even went so far as to cut the cables so that the "Campagnolo" logos on the cable housing would end up in the same spot on each side of the bike just up from the cable stops in the down tube. That meant a couple more cuts than usual. On a new build, I like to mark it, then cut and finish the housings off the bike... to ensure the same exact length and, for the brake housings, to be able to finish up the ends on a bench grinder. A hand file will work as well, just takes longer.

So, let's assume the derailleur cable housings have been cut as they're the easiest to get right. I just cut them square and make sure they are "unsquashed" at the ends. I'll stick an awl in the ends to make sure it's good. And when you install the ends in the levers themselves, make sure that they are inserted fully into their seats.

The brake housings are a little more work. I'll always attempt to get all the cables to cross in front of the bike under the stem at exactly the same spot if possible. First I mount the derailleur cable housings and route them into their stops. They will cross in the center by default since they are the same length. All good so far. Then to determine the brake housing length, a little more trial and error is involved. I mount the front wheel and front brake because I want to mark the housing where it will actually end up being upon final setup and adjustment. I want a clean straight line up from the front brake caliper and nicely curving into the bar hopefully crossing at the same place the derailleur cables are crossing. Same with the rear brake housing. Run it from the lever and mark it at the rear brake stop on the top tube so that it curves nicely, crossing in the same place out front and entering the cable stop fairly straight but with enough slack so as not to get stretched when you turn the handlebars all the way to the right to the extreme of touching the top tube.

Here's the look I'm going for, from the front view... I got lucky here and all cable housings cross within about a 5mm circle out front and directly underneath the stem... also, keep in mind where the finishing tape will ultimately end and temporarily tape the housings at that point to know how it will look at the end... also, with this type of crossing in the downtube routing the cable housings don't ever come close to touching the headtube. In fact, there isn't a single point on the entire frame where a derailleur housing or a brake housing comes into contact with the frame itself other than at the exact point of the cable stop.
Image
Before I forget, note the absence of the inline cable adjuster for the front derailleur in the pic above. I'll talk more about that when I get to tuning the drive train, but suffice to say for now I think the adjusters are hideous and I've figured out how to dial in the front derailleur without it, but admit that you should probably have it installed unless you're very patient about learning how to dial in the front shifting without it.

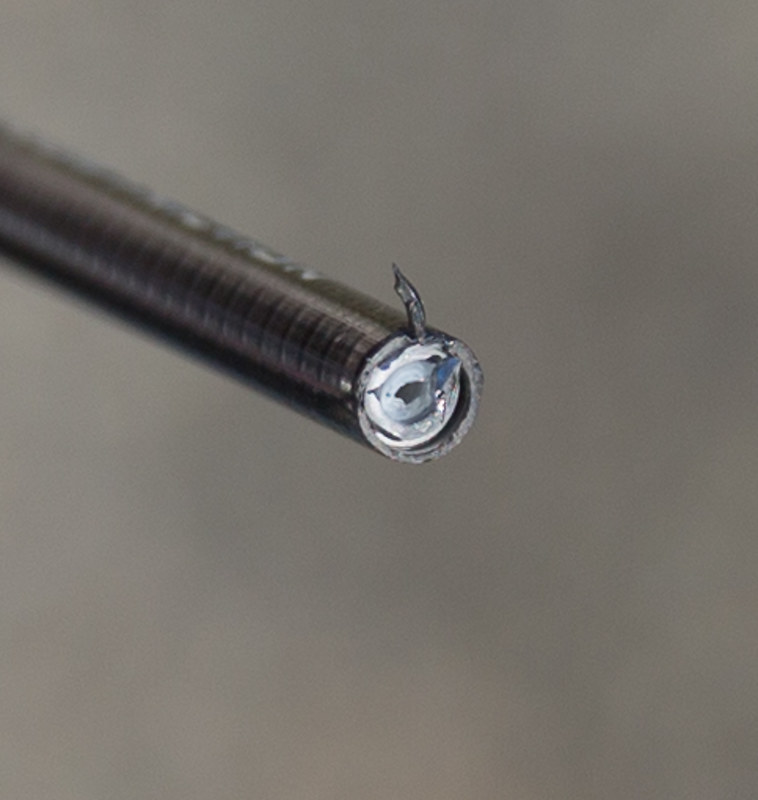
Ok... upon cutting the brake housing, the ends are raw, rough and not very "finished", with sharp bent burrs that left untouched will cause very rough operation of the brake cable... the end of this cut in the pic is actually not bad compared to most, but still needs the same work as a terrible cut would...
Image


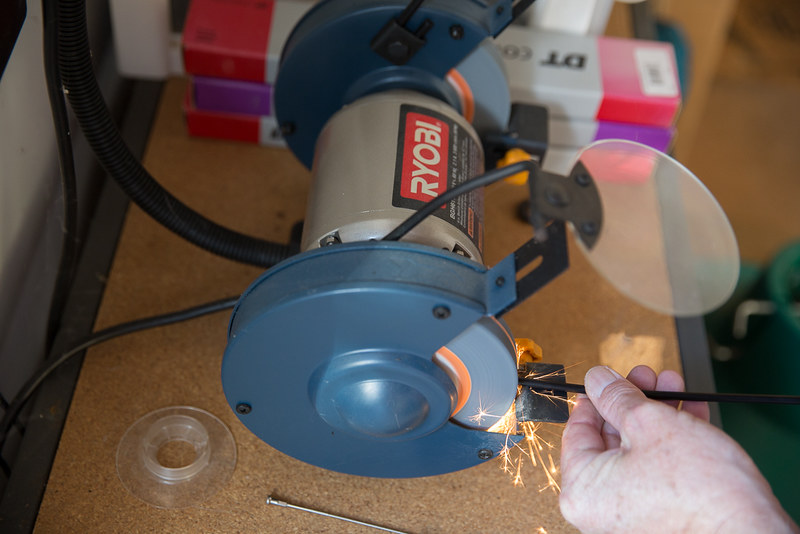
And off to the grinder we go... with caution. If you just hit it with the grinder in one fell swoop it will get too hot and melt the liner into itself. Not good. So, I like to just basically sweep the end quickly across the grinder wheel while simultaneously turning it in my hands, then quickly poke the end with a little awl to make sure nothing is melting. Give it a few seconds to cool then repeat until you have a perfectly square and round opening that does not constrict the actual brake cable in any way. I use a spare length of brake cable to make sure this is the case.
Image


Here's what I want to end up with...
Image


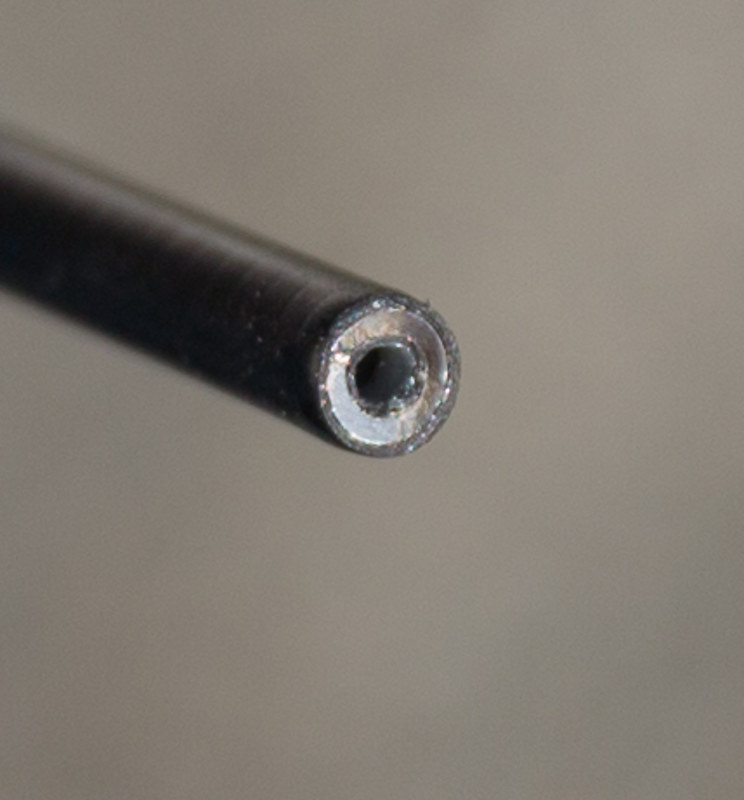
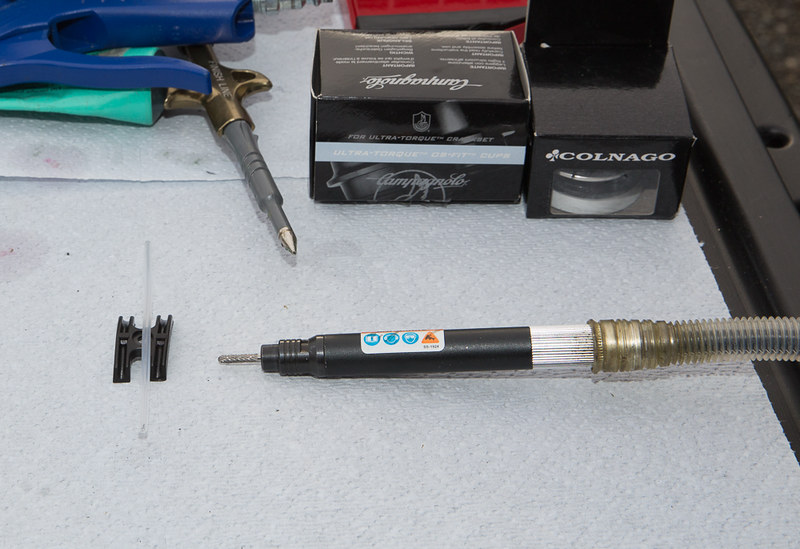
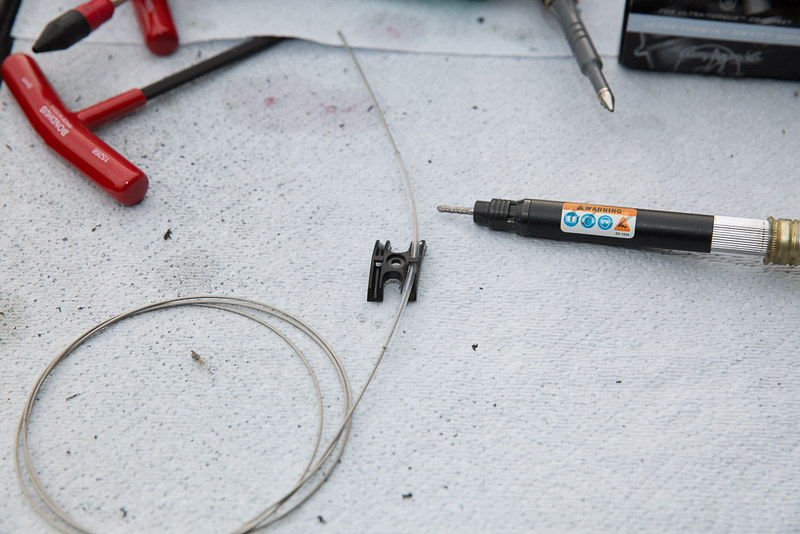
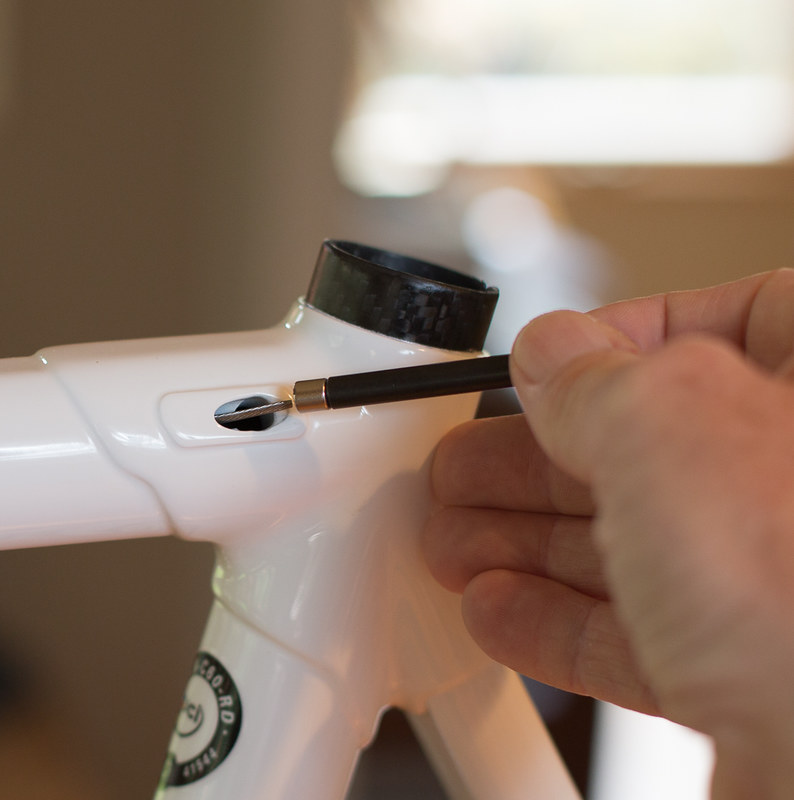
I fashioned a makeshift tool out of cut off piece of 1.5/1.7mm diameter Wheelsmith spoke, and ground the end into a point. I make sure everything is clear just by sticking the spoke in the housing and working it a bit. A Campy steel brake cable is 1.6mm, so this spoke is the perfect tool for this...
Image


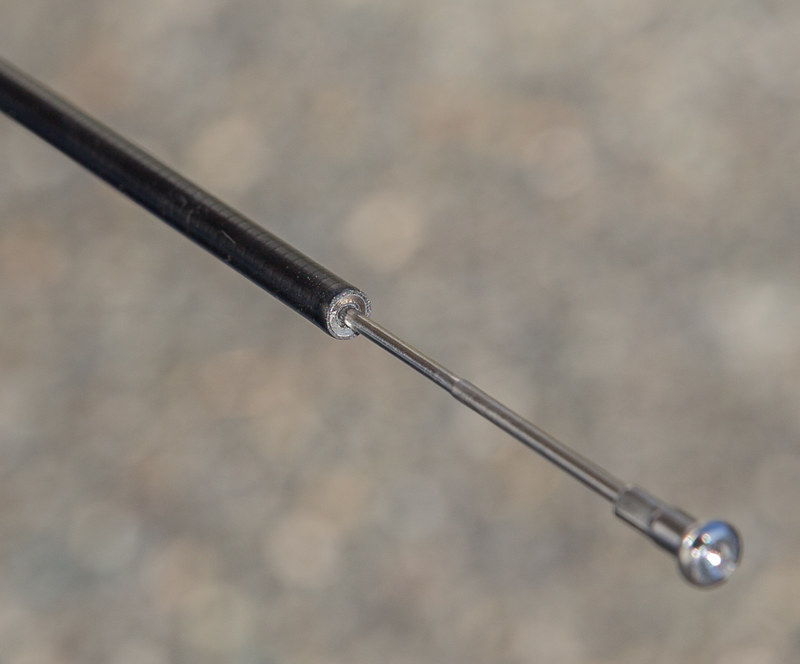
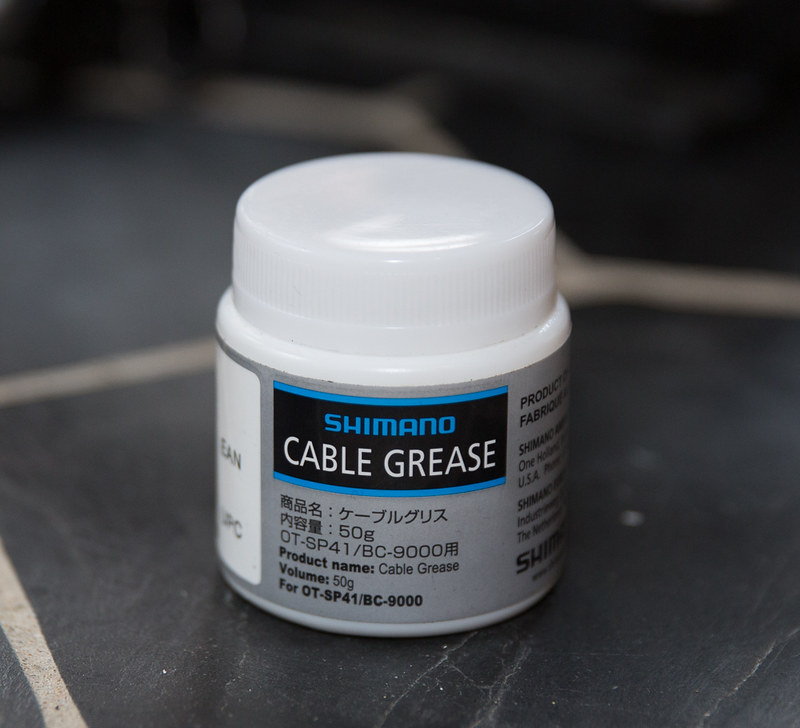
Ok, so now I actually run the cables from the levers to their respective places. But first I just run a light coating of Shimano's Cable lube over the lengths of cable that will actually be inside the housing...
Image


Next, I run the derailleur cables down through the downtube and out the slot at the bottom bracket, making sure they cross once but are not twisted. Keep them separated so you know which is which once they are both out of the slot...
Image


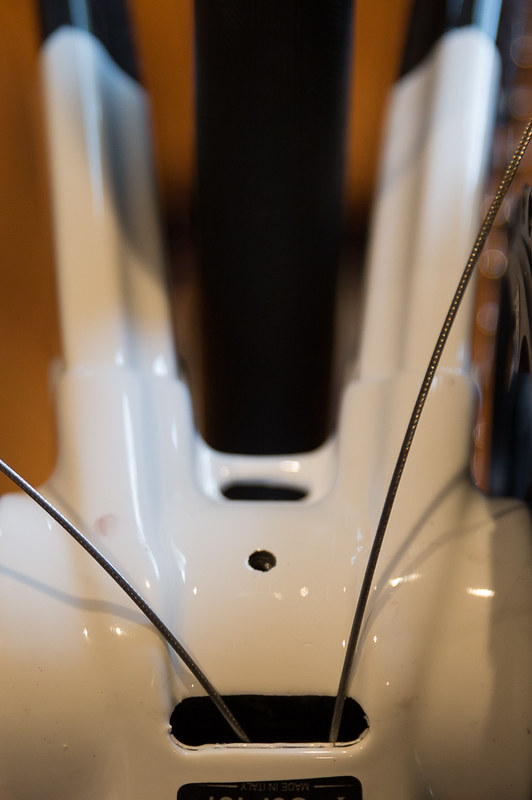
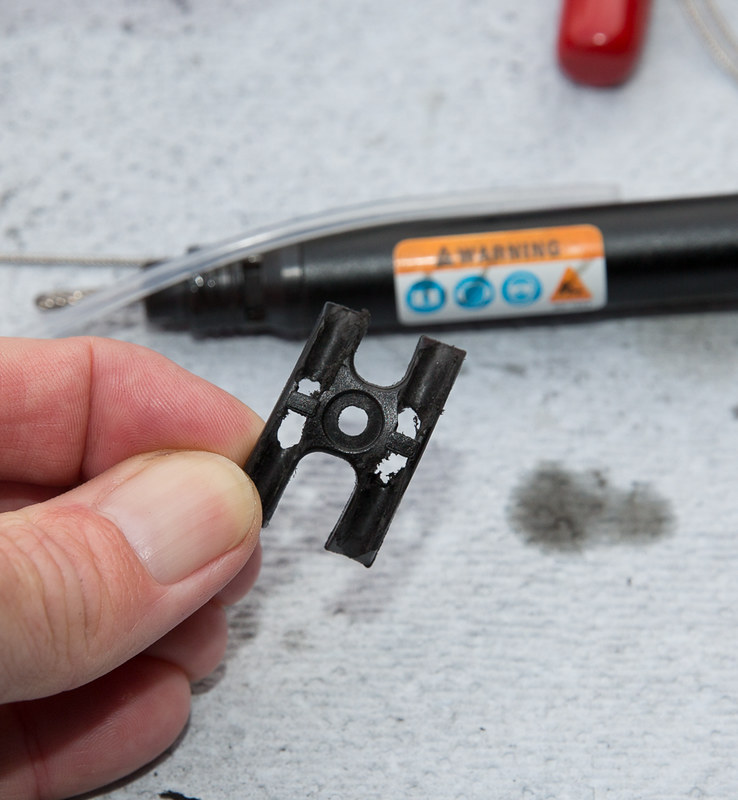
Then I take my BB cable guide "assembly" and run the cables through the tubing then insert everything back up there and lock it down with the cable guide screw (using a dab of low strength Loctite 222 on the screw). Since I want a length of tubing inserted back up the tube I have to run the cables through before setting the cable guide in place, so that in the end it looks like this....
Image

It really makes for a nice "sealed" system in that crud from the road doesn't gunk it up, although that never seems to be a problem. What can be much more a problem is sports drink that finds it way down there. I've seen that area so gunked up with sports drink that the owner thought the front shifter was broken. So did I when I first activated the shifter to see what was going on, but as soon as I turned the bike over it was clear what the issue was. Just cleaned it up and the shifter was fine. I only use plain water in my bottles so have never experience that, but it's still nice to know things are staying clean down there.

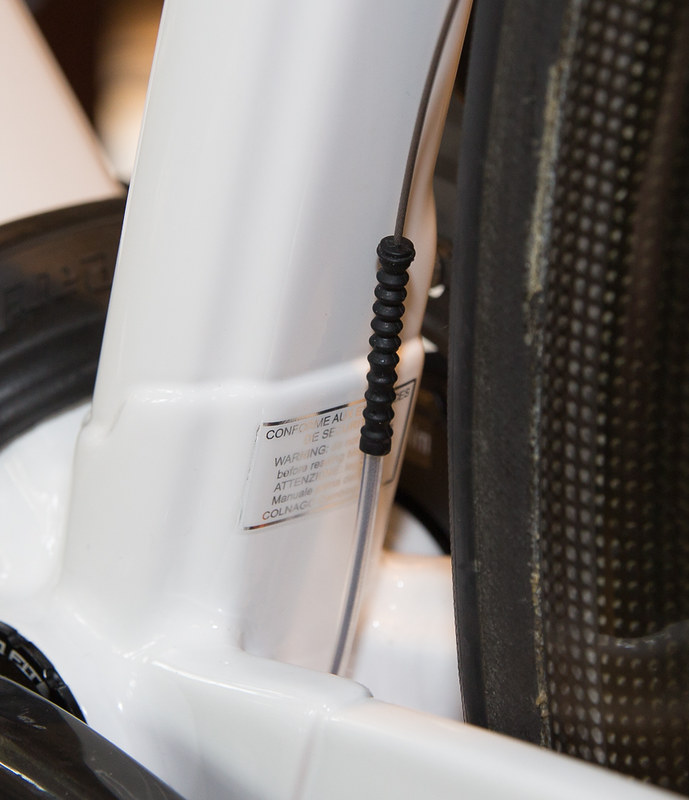
Here's a pic of the front derailleur cable and tubing coming up from the BB on it's way to the front derailleur. Note how thick walled this PTFE tubing is. And it's inner diameter is large enough for a derailleur cable but not large enough for a brake cable. The derailleur cables slide through this stuff like butter...
Image


And finally, I add a little grub seal like Campy supplies for the rear derailleur cable (If I can find one), on the end of the tubing to really seal it up but without adding any friction. These grub seals are super flexible...
Image


Ok... that's it for the derailleur cables. The rear brake cable run proved, shall we say, "interesting". I'll deal with that in the next post.
Last edited by Calnago on Fri Apr 26, 2019 9:06 pm, edited 6 times in total.
Colnago C64 - The Naked Build; Colnago C60 - PR99; Trek Koppenberg - Where Emonda and Domane Meet;
Unlinked Builds (searchable): Colnago C59 - 5 Years Later; Trek Emonda SL Campagnolo SR; Special Colnago EPQ

russianbear
Posts: 683
Joined: Wed Apr 11, 2012 3:40 am

by russianbear

Love your posts and detail. A stunning build to boot.

Arnoud
Posts: 79
Joined: Tue Dec 26, 2006 5:01 pm

by Arnoud

Fantastic posts! Building a C60 coming Spring for a friend a of mine. Very good pre-reading! Great build.


Verzonden vanaf mijn iPad met Tapatalk

User avatar
MJB
Posts: 173
Joined: Thu Jan 19, 2012 11:17 am
Location: bottom edge of Australia

by MJB

Best thread I've followed in ages, for many reasons. Thorough, well illustrated and explained - the perfect example of why building up your own bicycle is a true joy that every rider should try at least once!

User avatar
kgt
Posts: 8749
Joined: Sun Jun 18, 2006 10:29 am
Location: Athens, Greece

by kgt

I agree! Everything is so well prepared and explained.

Verbal
Posts: 102
Joined: Wed Dec 10, 2014 12:02 pm

by Verbal

Calnago wrote:Ok, onto the fork installation and cutting and spacer/stem decisions....

My biggest concern about going with the 59cm frame versus the 61cm frames that I prefer (I think), was the headtube length and just how many spacers etc I would require to get me to where I want to be. Over the years I've created all kinds of trigonometric spreadsheets that help me with bike geometry, and it's not hard for me to figure out exactly what I need to get to within 1mm of point in space at the front end of a bike so that wasn't really the issue. It was really more of an aesthetic choice at this point. One of my stem options was the Pro Vibe 7S stem which from a cross sectional profile is pretty much a perfect match for the profile of the C60 top tube. Initially I was going to go with the new Dead SuperZero stem but chose not to for a couple of reasons. First, the Deda is a -8 degree stem... the ProVibe is a -10. I like the more aggressive profile of the -10, but knew it would require an extra 5mm spacer to end up with the same bar height as if I were using the -8. So there would be a tradeoff aesthetically there. But here was the real kicker with the SuperZero. It has a stack height (height of the collar that clamps the steertube) of only 36mm, whereas most all other stems have a stack height of ~40mm. When I mounted it, it just didn't look right to me. What I discovered was that the bottom edge of the SuperZero followed the 8 degree line, so that was the reference point (versus the top edge) when positioning it along the steertube. But the top edge of the stem is basically a -6 angle. So, even though the bars will end up in the -8 degree position, it "looks" like the stem is a -6 from the side since your eye tends to follow the top ridge of the stem. I know, it's a minor aesthetic nit, but hey, those minor things can make the difference between an awesome build and something just shy of an awesome build. And I just didn't like the shorter collar of 36mm, in that I might want to interchange stems without having to faff about with funny spacer requirements or cutting the steertube again to accommodate it. So in the end I chose the ProVibe 7S, because of it's design and looks, and also I wanted to actually try it out for feel etc of the front end.

Here were my choices all lined up in a row...
Image


Of course, I had to delogo the Pro Vibe stem from this...
Image


To this...
Image

Stem choice: Done!


Hi, can you please explain me how to delogo your pro vibe stem. Thanks a lot.

User avatar
Calnago
In Memoriam
Posts: 8612
Joined: Sun Nov 07, 2010 9:14 pm

by Calnago

Brake routing: Front of course was a non-issue... perfectly smooth like silk, nothing to talk about here.
The rear routing is a different story. Up until the C59, all the C-series Colnagos had used external brake cable routing. While the EPQ shared the lugs with the C59 and thus had the same internal derailleur routing as the C59, the top tube was still just a reworked EPS top tube which used the external brake cable stops and external brake cable routing. These work very well, just not internally routed. Then the C59 adopted an internal guide that a full brake housing ran through the top tube with no stops at all. It was free to slide back and forth a bit, but still was smooth to operate because of continuous brake housing with no breaks. No problem, except for photos the brake housing would often have slid forward a bit in the top tube making my perfectly straight line down to the rear brake a bit not so straight. Nothing a bit of adjustment wouldn't fix, but grrr... :)
Now the C60 arrives. Internal brake cable routing beginning in the front headtube lug and exiting through the rear seatcluster lug. No internal guides to speak of... just a couple of holes it seems that serve as the brake cable stops. And remember in my last post what I said about there not being a single brake or derailleur housing that comes close to touching the frame on this build. Well, that's nice, but the angle of the brake housing that enters the rear cable stop is such that it creates kind of a sharp turn for the bare brake cable as it enters the top tube. Colnago does not supply any special ferrules with plastic guide extensions or anything. I knew already that some people had experienced rattling of cables inside the frame, and I even commented a bit in a thread started by @Tomcolnago about his very issue. Here's a link to that thread for background... viewtopic.php?f=3&t=137820&start=15&hilit=brake

Well... upon running a brake cable through my perfectly squared and ferruled brake housings all the way to the rear brake, I just gave it a light squeeze (before cutting anything), to ensure that all was good. Well, it was far from satisfactory to me. It felt rough, very rough. Hmmm.... well I knew it couldn't be the ends of the brake housing, so I looked to try a few things... The Colnago User Guide recognizes that the cable can cause some noise inside the tube and hence gives this recommendation... last point on the page...
Image

I really didn't understand the bit about only a 10cm length of tubing fully, and just assumed that this was all that was needed to be able to somehowe wedge itself into the section that rattling might originate from. Ok... Tried that. Still, very rough. So next was to extend the length of it and add some more O-rings at set intervals. The little rubber O-rings that I got at a hardware store fit the sheathing perfectly...
Image
It was also somewhat of a pain getting it in the tube without the rubber O-rings sliding off, which would have been a hassle to get out of there. The rear brake cable opening in the seat tube cluster has a larger hole that you can use to guide the O-rings over and then in. Patience is a virtue here. But alas... my first try I made the whole thing too long and it probably squeezed up against both cable stops internally and when you squeezed the brakes it would really "slap" against the top tube. Worse than before. Ok, so shortened that up some and the slap was resolved but it was still really rough feeling. Clearly, the roughness was originating where the steel cable made it's way around the carbon cable stops internally, especially at the rear it seemed. Was driving me nuts, so I went to sit down and think about it some more and seek the wisdom of Cat (yes, that's his name)....
"So, ya see Cal... here's what I think might work... but feed me first...."
Image

Well, it's amazing what can come to you with a little break in the action and you have the wisdom of a wise old sage such as Cat to guide you through the abyss...

A little Krazy Glue, some sheathing (cutting up the liner supplied as a guide works fine here), some little rubber O-rings and voila... make your own custom cable guides that begin at the outside of the frame to provide a smooth internal guide around the rough internal edge... oh, the little brass ferule that's all blurry in the pic with the attached tubing was something I found lying around far too late, so if you have some of these they might work as well, I just didn't think of that in time. Anyway, I was far too excited about my home remedy solution, plus with the O-rings attached with a little dab of Krazy Glue along the length of the tubing, I didn't have to worry about them sliding off and figured they would provide a kind of bumper between the cable and the top tube, eliminating any chance of noise... Bonus!
Image


Instant cable guide with it's very own stop that fits flush into the brake routing hole in the frame... perfect... the Krazy Glue was the key here because you need that rubber o-ring on the very end of the liner, and judging by how long it took me to unstick my fingers with a little overglue, I think it will hold these materials extremely well...
Image


You have to remove the cable entirely in order to get the front guide where it needs to be, but don't fret... with a little effort and a strong magnet you can guide the cable out the rear brake hole without too much difficulty...
Image


I like using the brass ferules wherever the situation causes a cut in the brake housing. Much neater, and prevents that unsightly exposed look of the metal under the housing when the black housing inevitably starts to shrink back a bit over time...
Image


The magnet supplied with Campy/Fulcrum wheels that have no spoke holes in the rim bed, used for guiding spoke nipples through the rim to their rightful place works perfectly to retrieve the end of the brake cable out the rear exit hole...
Image


So, now to add the internal length (not really sure this is even needed... still have some experimenting to do here)...
Image


And then the final, and most crucial piece... the short section (with added/glued O-rings) which will prevent all the rough feeling as the cable makes its way around the edge of the internal carbon hole...
Image


Insert final short piece, with stop that fits on OUTSIDE of the hole in and between the ferule on the last piece of brake housing...
Image


Edited: Oh, during all of the above, there was a lot of trial and error going on figuring out the easiest and most efficient way to keep pulling the cable out (without a liner) from the top tube then getting it back in a routed through the rear hole properly. To facilitate this, I'd not cut the brake cable until you've got everything set up. The extra length came in handy for working the inner liner back and forth. For instance, once the inner liner was in, I wondered how I would possibly get it out easily if I had to change cables for example, or for that matter get the new cable routed through it. The solution was to pull the bare cable out from the front a long enough distance and then do one wrap of thin tape or something on it. Then push the cable back in and the wrap of tape will act as a stop against the inner liner and push it out the back. Voila. How to remove an inner liner that you have no access to other than the cable going through it.
[Edit]: Since this build, or maybe because of it, I just went right out and got the internal cable routing kit from Park. A bunch of magnetic ends on coated cables that make routing cables internally a snap, particularly if you're dealing with electronic setups a lot. Just get it. I'll leave my process proudly detailed intact above, but it's much easier with one of the magnetic internal routing kits that are available now.

Best to keep some length on the brake cable while you're doing all these adjustments is possible, just makes it a bit easier, when pulling the liners in and out while you get things right....
Image


DONE! And am glad to say it's working perfectly so far. Smooth as silk, no different than the front. Very happy. Still want to experiment without the middle section however, as I think it might not be needed at all. For now it's still in there.

I think it's time for another button push... Cat refused to hit the button with me this time. He said I took far too long figuring this one out, so while it seems "easy" now, I was pulling my hair out for a little while. Glad Cat helped me out...
Image
Last edited by Calnago on Tue Jan 23, 2018 7:19 pm, edited 2 times in total.
Colnago C64 - The Naked Build; Colnago C60 - PR99; Trek Koppenberg - Where Emonda and Domane Meet;
Unlinked Builds (searchable): Colnago C59 - 5 Years Later; Trek Emonda SL Campagnolo SR; Special Colnago EPQ

sawyer
Posts: 4485
Joined: Fri Dec 15, 2006 7:45 pm
Location: Natovi Landing

by sawyer

Great bike, write-up and pictures ... though that spacer tower ...
----------------------------------------
Stiff, Light, Aero - Pick Three!! :thumbup:

User avatar
Calnago
In Memoriam
Posts: 8612
Joined: Sun Nov 07, 2010 9:14 pm

by Calnago

MJB wrote:Best thread I've followed in ages, for many reasons. Thorough, well illustrated and explained - the perfect example of why building up your own bicycle is a true joy that every rider should try at least once!

Thanks... yes, I'm trying to think of and verbalize the thought process along the way as well, as if someone who hasn't built a bike on their own is reading.

And thanks to all who are following along. This is a lot more work than building the bike itself. Ha.
Colnago C64 - The Naked Build; Colnago C60 - PR99; Trek Koppenberg - Where Emonda and Domane Meet;
Unlinked Builds (searchable): Colnago C59 - 5 Years Later; Trek Emonda SL Campagnolo SR; Special Colnago EPQ

by Weenie


Visit starbike.com Online Retailer for HighEnd cycling components
Great Prices ✓    Broad Selection ✓    Worldwide Delivery ✓

www.starbike.com


User avatar
Calnago
In Memoriam
Posts: 8612
Joined: Sun Nov 07, 2010 9:14 pm

by Calnago

sawyer wrote:Great bike, write-up and pictures ... though that spacer tower ...

Ha! Surprised it took this long before someone attempted to bring the tower down. Sorry, but it's as low as it will go at this point.
Colnago C64 - The Naked Build; Colnago C60 - PR99; Trek Koppenberg - Where Emonda and Domane Meet;
Unlinked Builds (searchable): Colnago C59 - 5 Years Later; Trek Emonda SL Campagnolo SR; Special Colnago EPQ

Post Reply