Colnago C60 - Traditional PR99

Who are you (no off-topic talk please)

Moderators: MrCurrieinahurry, maxim809, Moderator Team

Post Reply
Look565w
Posts: 225
Joined: Mon Dec 27, 2010 1:25 am
Location: West of Scotland

by Look565w

Hi Calnago,

Impressively documented & explained building process so far & I expected nothing less from you indeed, Cal :-) Thank you for sharing this!

I find myself coming back into this thread every few hours just to if/of any updates ........... sorry, thats how sad I am!

Sorry to go back a bit, but can I ask what is your take on the Colnago supplied "compression ring" (for the fork steerer tube, just underneath the top bearing cover) which is made of plastic rather than the alloy ones I normally get with other forks? What I mean by that is - is plastic just as good as the alloy to do the intended job of this part?

Cheers & absolutely looking forward to more of this ...................

by Weenie


Visit starbike.com Online Retailer for HighEnd cycling components
Great Prices ✓    Broad Selection ✓    Worldwide Delivery ✓

www.starbike.com


User avatar
Calnago
In Memoriam
Posts: 8612
Joined: Sun Nov 07, 2010 9:14 pm

by Calnago

Ahhh... now getting to the fun stuff... up first is the SRM Campy 4 arm crank. This is absolutely in my mind the nicest piece of kit for a Campy install that you can get. It really does look like a factory crank, and not even a powermeter. I like the simplistic look, with no clunky add ons, batter covers, cutouts, etc. Just clean and simple, and ultra reliable... it does what it's supposed to do. And quite frankly, I think it looks better than the stock Campy 4 Arm cranks, because it doesn't have all that carbon webbing out from the arm. Clean!

Ok... but first I needed to flush out all the grease that SRM packs into the CULT bearings. Why they do this is beyond me. It pretty much negates the benefits of having CULT bearings in the first place. Campy CULT bearings are not intended to be packed with grease, at most just a couple drops of light synthetic oil is all you need or want. Here's how they now come from SRM...
Image


So after a few minutes with this stuff...
Image


I end up with what I want these CULT bearings to look like upon install, with a couple drops of light oil they spin like a dental tool...
Image


Oh, the SRM crank utilizes a C-clip which is a little smaller around the loops that jut out from the cups in order to recess properly in the SRM shell without touching. Make sure you use the clip for the SRM install and not the standard clip that comes with the Campy Cups, SRM clip on the left...
Image


And voila...
Image
Colnago C64 - The Naked Build; Colnago C60 - PR99; Trek Koppenberg - Where Emonda and Domane Meet;
Unlinked Builds (searchable): Colnago C59 - 5 Years Later; Trek Emonda SL Campagnolo SR; Special Colnago EPQ

User avatar
Calnago
In Memoriam
Posts: 8612
Joined: Sun Nov 07, 2010 9:14 pm

by Calnago

Look565w wrote:Hi Calnago,

Impressively documented & explained building process so far & I expected nothing less from you indeed, Cal :-) Thank you for sharing this!

I find myself coming back into this thread every few hours just to if/of any updates ........... sorry, thats how sad I am!

Sorry to go back a bit, but can I ask what is your take on the Colnago supplied "compression ring" (for the fork steerer tube, just underneath the top bearing cover) which is made of plastic rather than the alloy ones I normally get with other forks? What I mean by that is - is plastic just as good as the alloy to do the intended job of this part?

Cheers & absolutely looking forward to more of this ...................

No problem... there are actually two versions of that ring, one that just fits straight into the bearing with a flush edge and a newer version which has a beveled top edge. I like the beveled version better. I also think the bearings must be matched to the type of ring you have. But I too thought... "hmmm, plastic?... why. I like metal. I don't know if that will be an issue down the road... I hope not. Acros actually says it dampens the shock or something like that. Whether that's true or just marketing I don't know. Although I have seen carbon steerers which were scored with a visible indent from the edge of the top bearing. Not Colnago but I guess I can appreciate how a delrin compression ring could ease that situation somewhat. Should be ok and they'd be easy enough to replace for sure, if you can get your hands on them. I've talked with Acros and they seemed pretty good, so I'm happy with them as a supplier. I guess they'd be sort of like the Chris King of Europe, they do have a lot of product. However, I did not like their two piece wedge type headset adjusters which they used for about one year on some later C59's. Those things left a bit of a sour taste in my mouth.

Here's the piece you are talking about... you probably have the beveled edge one on the right...
Image
Last edited by Calnago on Thu Nov 10, 2016 10:04 pm, edited 1 time in total.
Colnago C64 - The Naked Build; Colnago C60 - PR99; Trek Koppenberg - Where Emonda and Domane Meet;
Unlinked Builds (searchable): Colnago C59 - 5 Years Later; Trek Emonda SL Campagnolo SR; Special Colnago EPQ

nismosr
Posts: 1317
Joined: Mon May 05, 2008 5:15 pm

by nismosr

This is just perfect ! love the detailed work and photography skills. can you tell me more about the bb press tool that you have? Congrats Cal !
2020 Colnago C64 Mapei-SR12 EPS-WTO 60
2021 Basso Diamante SV-SR12 Disc EPS-WTO 60
2023 Colnago G3X-SRAM AXS Force-Levante

User avatar
Calnago
In Memoriam
Posts: 8612
Joined: Sun Nov 07, 2010 9:14 pm

by Calnago

@Nismosr: Yes, in that pic I was using the Wheels Manufacturing Press, as part of their fancy Press Toolkit which includes a bunch of drifts and a nice wooden case for all of it. I also use the Park BB/Headset Press, probably more often, depending on the install and what's required. I almost got the Campy specific BB Press for this, but I don't think it does anything different than what the press I used does. The key is to get the proper drifts and make sure you're pressing on the right surfaces. For example, you really want the bearings to be lined up with each other and seated in surfaces that are square and parallel to each other. In the days of steel threaded BB shells, it was just common practice to face the BB shells to ensure this was the case. Threads on the BB's were a bit of a "loose" thread so that the cups, when screwed and torqued, had just enough play that they would seat themselves on the perfectly faced shell surfaces and all was good. These days its a crap shoot as to whether those surfaces are perfectly square to each other and even the paint thickness can throw things off enough to cause premature bearing wear and less than perfectly smooth operation. That's why I've always faced every C59 as well and all my campy cranks spin effortlessly. Just because you buy a C59, does not mean it doesn't need facing if the BB shell is covered in paint.
In the case of Campy Ultratorque, the bearings themselves are pressfit onto the crank spindle, which is good, and when everything is tightened down, the two halves of the crank are perfectly aligned with each other as are the bearings on the crank. But this alone does not ensure that the cups they are sitting in are perfectly aligned, and if they aren't, then you still have a misaligned "system". So, for installing the pressfit Campy cups in this build, I used the drifts that seat on the surface where the bearings seat inside, as opposed to a big "plate" that just might press on the outer surface of the cups. By pressing on the seats where the bearings themselves will end up pressing against, there's a better chance of making sure the cups are aligned even if the outer shell of the bottom bracket is a bit off. In this case, it probably wouldn't have mattered which surface I pressed on since I''m pretty sure the surfaces of the BB shell have been perfectly faced beforehand leaving no paint etc between the surfaces of the BB shell and the Threadfit cups.
I have a lot of "press kits", including the DT Hub Toolkit, and some FSA stuff, a Campy Wheel and Bearing Service Kit that includes all I need to work on any Campy wheel and associated bearings, oversized or not. And various things from Wheels Manufacturing including this kit (which I used here)... It is very versatile, nicely finished and well machined...

Image
Last edited by Calnago on Thu Nov 10, 2016 6:50 pm, edited 1 time in total.
Colnago C64 - The Naked Build; Colnago C60 - PR99; Trek Koppenberg - Where Emonda and Domane Meet;
Unlinked Builds (searchable): Colnago C59 - 5 Years Later; Trek Emonda SL Campagnolo SR; Special Colnago EPQ

User avatar
Calnago
In Memoriam
Posts: 8612
Joined: Sun Nov 07, 2010 9:14 pm

by Calnago

Ok, onto the fork installation and cutting and spacer/stem decisions....

My biggest concern about going with the 59cm frame versus the 61cm frames that I prefer (I think), was the headtube length and just how many spacers etc I would require to get me to where I want to be. Over the years I've created all kinds of trigonometric spreadsheets that help me with bike geometry, and it's not hard for me to figure out exactly what I need to get to within 1mm of point in space at the front end of a bike so that wasn't really the issue. It was really more of an aesthetic choice at this point. One of my stem options was the Pro Vibe 7S stem which from a cross sectional profile is pretty much a perfect match for the profile of the C60 top tube. Initially I was going to go with the new Dead SuperZero stem but chose not to for a couple of reasons. First, the Deda is a -8 degree stem... the ProVibe is a -10. I like the more aggressive profile of the -10, but knew it would require an extra 5mm spacer to end up with the same bar height as if I were using the -8. So there would be a tradeoff aesthetically there. But here was the real kicker with the SuperZero. It has a stack height (height of the collar that clamps the steertube) of only 36mm, whereas most all other stems have a stack height of ~40mm. When I mounted it, it just didn't look right to me. What I discovered was that the bottom edge of the SuperZero followed the 8 degree line, so that was the reference point (versus the top edge) when positioning it along the steertube. But the top edge of the stem is basically a -6 angle. So, even though the bars will end up in the -8 degree position, it "looks" like the stem is a -6 from the side since your eye tends to follow the top ridge of the stem. I know, it's a minor aesthetic nit, but hey, those minor things can make the difference between an awesome build and something just shy of an awesome build. And I just didn't like the shorter collar of 36mm, in that I might want to interchange stems without having to faff about with funny spacer requirements or cutting the steertube again to accommodate it. So in the end I chose the ProVibe 7S, because of it's design and looks, and also I wanted to actually try it out for feel etc of the front end.

Here were my choices all lined up in a row...
Image


Of course, I had to delogo the Pro Vibe stem from this...
Image


To this...
Image

Stem choice: Done!
Colnago C64 - The Naked Build; Colnago C60 - PR99; Trek Koppenberg - Where Emonda and Domane Meet;
Unlinked Builds (searchable): Colnago C59 - 5 Years Later; Trek Emonda SL Campagnolo SR; Special Colnago EPQ

Sleepless
Posts: 224
Joined: Sun Feb 23, 2014 7:58 pm
Location: Istanbul, TR

by Sleepless

Great bike and thread Calnago. I'm very interested in details as I'm going to build a C60 soon myself. Keep it up! :thumbup:

AJS914
Posts: 5430
Joined: Tue Jan 28, 2014 6:52 pm

by AJS914

Nice build! Cal, are you in the industry? I'm just curious how you got to see Colnago's list of every C60 in the US.

I'm interested in hearing your riding impressions of the C59 vs the C60.

User avatar
Calnago
In Memoriam
Posts: 8612
Joined: Sun Nov 07, 2010 9:14 pm

by Calnago

I'm not "in the industry" per se... I made my $$$ outside of building bicycles, but bicycles are certainly a passion of mine and have had some great opportunities to build up some nice bikes and admittedly spend most of my time either working on them or thinking about them or even, riding them. I've actually had the opportunities to ride in many great places in the world... was planning on the Dolomites this past September, but I wasn't healed enough for that. Next year. Since I couldn't ride this summer, it afforded me the time to just build this slowly, taking pics along the way, knowing that at some point I'd create this build thread. If I wasn't injured I probably wouldn't have had documented the build process like I have, would have just built it up and started riding it. The dealer I go through showed me the list of available frames when I was looking for frames for a couple of friends last spring. I'm sure if you asked any dealer if you could get such and such a frame in such and such size, they would do the same thing.... call the distributor to see what's available. Or special order it. But that's the thing... when I saw this frame on the list, I asked if I could order it in a 61 and they said no, that this was just a random frame that was sent in a shipment. Versus my EPQ which was a very long drawn out process, and had the involvement of Alex Colnago seeing it through at the end. Completely different from this one, which truly was just a random find. And the list I saw certainly wasn't every C60 available in the US at the time, only the ones still at the US headquarters ready for distribution. To see every frame in the US would require calling every dealer who had any stock I suppose.

And I certainly plan on giving my ride impressions when I've had enough time on the bike. I'm riding it now, and will strip down my C59 and send it off to Calfee for repair. By the time I get it back, I should have logged enough ride time to have a fairly good impression of the C60.
Colnago C64 - The Naked Build; Colnago C60 - PR99; Trek Koppenberg - Where Emonda and Domane Meet;
Unlinked Builds (searchable): Colnago C59 - 5 Years Later; Trek Emonda SL Campagnolo SR; Special Colnago EPQ

Lafolie
Posts: 662
Joined: Tue Sep 08, 2009 10:12 pm

by Lafolie

Well done Sir

dpkinard
Posts: 62
Joined: Tue Oct 11, 2016 11:31 pm

by dpkinard

How did you de-logo the stem? Very clean and documented build. I'm glued to this one.

Sent from my SM-G920V using Tapatalk

User avatar
Calnago
In Memoriam
Posts: 8612
Joined: Sun Nov 07, 2010 9:14 pm

by Calnago

Ok... let's line out everything that goes onto the fork steertube next, and cut it.
Image
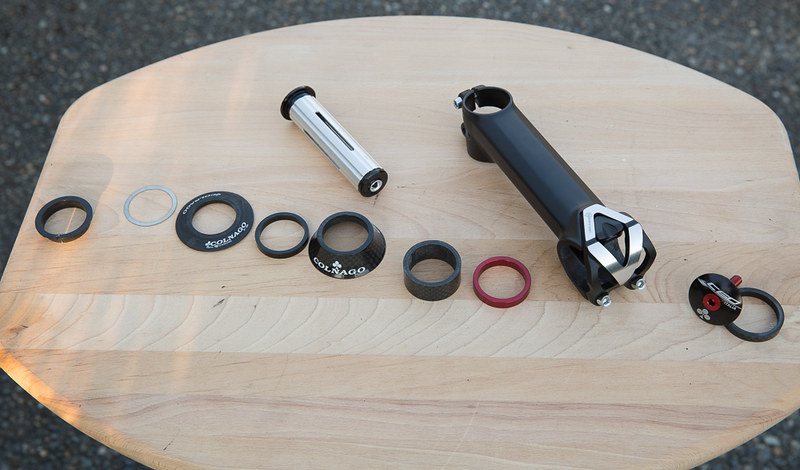
From left to right, except for the fork insert (above the tall Colnago cover):
- Compression ring
- Shim
- Short Acros Headset cover
- 5mm spacer... this spacer is critical to take up the gap between the lower Acros headset cover and the taller Colnago cover which I am placing over it strictly for aesthetic reasons. Without the spacer there would be a "gap" in the chain of spacers that the preload must travel through in order to do it's thing on the compression ring and upper headset bearing.
- Tall Colnago cover (not supplied) I found this and don't know which model headset it originated from. There are a few very similar but not quite the same. Some are solid, some have a lip at the edge (like my C59) which wouldn't have worked here. Etc. In any case, I like the profile of this cover as it gradually tapers up it's 15mm height finishing at exactly the right diameter of the spacers above it making it look all very integrated as if it was planned to be like that :) . I was very conscious of the spacer tower I was constructing, not that it is that bad by any means but I can almost hear the "Slam That Stem" crowd as I write this... "WTF... that thing belongs in Dubai it's so tall". Ha ha... Bite me. It works.
- 15mm carbon spacer
- 6mm red alloy spacer (Chris King, I like their anodization). This spacer was needed in addition to the 15mm (which was essentially the difference in headtube lengths between my 61 and the 59 frames) because I'm using a -10 degree stem here versus a -8 on the C59. So to make sure the bars end up in the same point in space the stem needs to start a bit higher. Plus, I like the red and it sort of viually breaks up the tower I'm constructing. Again, the spacer police are a tough crowd.
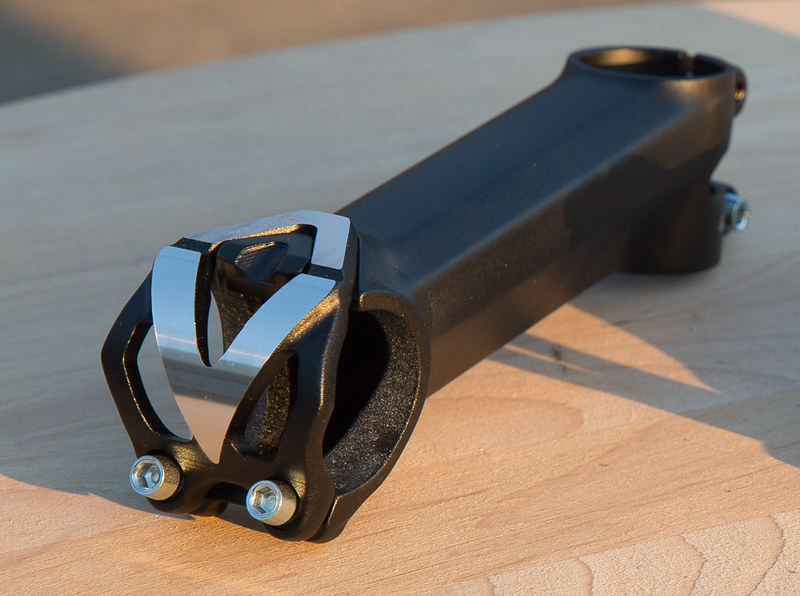
- Stem
- 5mm Carbon spacer (Whenever possible I always cut my steertubes just a smidge taller than the stem for two reasons... 1) because I like the stem to have full complete contact with the steerer along it's entire collar height, and 2) the little lip provides a place holder to position the top spacer upon so that it doesn't move around. Oh, and I guess the main reason for the 5mm spacer is also to provide enough of a gap to adjust the preload on the headset, slight as it may be.
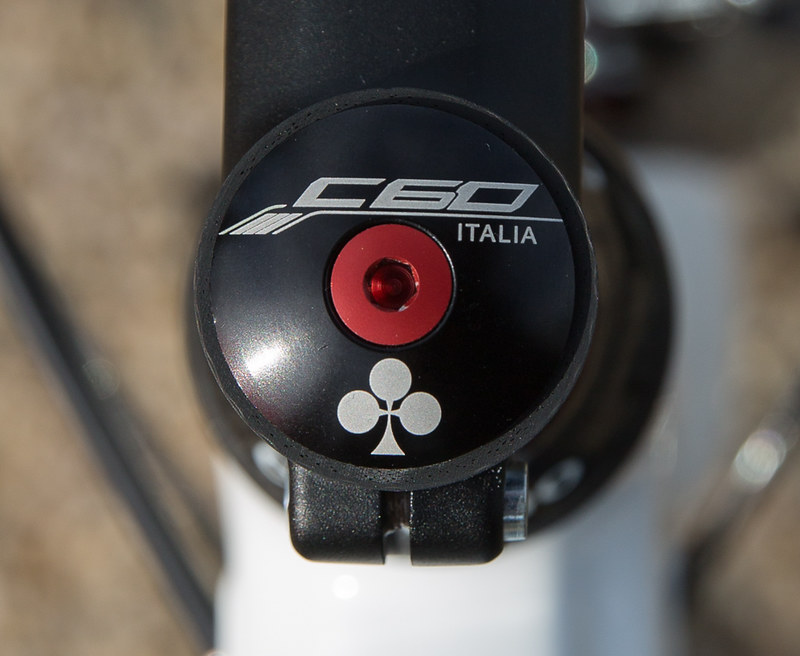
- Custom C60 top cap (it's what I do :) )

Oh, and here's a gratuitous shot of the top cap, even though we haven't got that far yet...
Image

Next up... cutting the steer tube... (to be continued, I'm going for a quick spin on this thing now)
Colnago C64 - The Naked Build; Colnago C60 - PR99; Trek Koppenberg - Where Emonda and Domane Meet;
Unlinked Builds (searchable): Colnago C59 - 5 Years Later; Trek Emonda SL Campagnolo SR; Special Colnago EPQ

User avatar
Calnago
In Memoriam
Posts: 8612
Joined: Sun Nov 07, 2010 9:14 pm

by Calnago

dpkinard wrote:How did you de-logo the stem? Very clean and documented build. I'm glued to this one.
Acetone... just be sure to mask off anything you don't want to remove (I masked the little "max torque" numbers). Since the basic stem is anodized and not painted, the acetone will not remove the "black", just the painted logos. When it seems like the acetone has gotten everything off, I use a little Goof-Off as this seems to better remove the last bit of residue that may remain. Rinse with lots of water then use the acetone filled rags to clean the cat...


Image

No, of course I wouldn't do that... he's my bud and watches over every step of my builds.
Colnago C64 - The Naked Build; Colnago C60 - PR99; Trek Koppenberg - Where Emonda and Domane Meet;
Unlinked Builds (searchable): Colnago C59 - 5 Years Later; Trek Emonda SL Campagnolo SR; Special Colnago EPQ

User avatar
cerro
Posts: 1964
Joined: Fri May 12, 2006 2:11 pm
Location: Malmö, Sweden
Contact:

by cerro

Awesome bike! Happy I don't do all that documentation on building bikes at work :)

by Weenie


Visit starbike.com Online Retailer for HighEnd cycling components
Great Prices ✓    Broad Selection ✓    Worldwide Delivery ✓

www.starbike.com


User avatar
Calnago
In Memoriam
Posts: 8612
Joined: Sun Nov 07, 2010 9:14 pm

by Calnago

I mentioned that I crashed out this summer on June 5th, the day before I was going to build this up. So, I had plenty of time to document the build instead of rushing through so I could hurry up and ride it. I couldn't ride again until just recently. And I knew this would be a special frame so I really took a lot of extra care in building it and documenting it along the way, since I knew it would be a while before I could actually ride again.
Colnago C64 - The Naked Build; Colnago C60 - PR99; Trek Koppenberg - Where Emonda and Domane Meet;
Unlinked Builds (searchable): Colnago C59 - 5 Years Later; Trek Emonda SL Campagnolo SR; Special Colnago EPQ

Post Reply